Hack the Box Challenge Lazy Walkthrough
Hello Friends!! Today we are going to solve a CTF Challenge “Lazy”. It is a lab that is developed by Hack the Box. They have an amazing collection of Online Labs, on which you can practice your penetration testing skills. They have labs which are designed for beginners to the Expert penetration testers. Lazy is a Retired Lab.
Level: Medium
Task: Find the user.txt and root.txt in the vulnerable Lab.
Let’s Begin!
As these labs are only available online, therefore, they have a static IP. Lazy Lab has IP: 10.10.10.18.
Now, as always let’s begin our hacking with the port enumeration.
nmap -A 10.10.10.18
As you can see in the given screenshot that we have two services running on our Target Machine, ssh and HTTP on ports 22 and 80 respectively.

The Port 80 is open so let’s open IP in our browser to see that if a website is hosted on the IP. After opening the IP in the browser, we were greeted by a simple page with Register and Login Links. Clicking on the Register opens up a form.

Then I decided to register as admin: 123 for username and password respectively.

But I got an alert “Duplicate entry ‘admin’ for key PRIMARY”, also received error “can’t create the user: user exists” when I registered as admin. Hence username “admin” is already registered, now we though to crack the password for login but that was quite tough to crack.

At last, I decided to use the burp suite for capturing browser request. Here I simply register with aadmin as username and password 123.

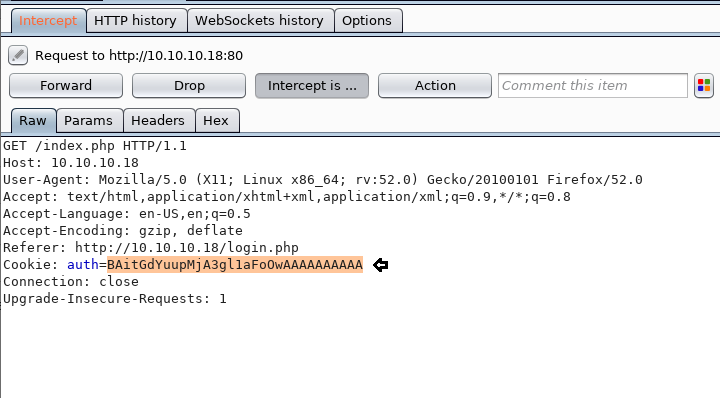
And got intercepted request, here I saw auth cookie. Then I send the intercept request to the repeater for analyses its response. It gave a hint “invalid padding” which means there could be padding oracle vulnerability. To know more about what is padding oracle vulnerability read our previous article from here. Since I had already faced such a situation in my past experience, therefore, I know what to do next.

Next, open the terminal to run the command shown in the given image which contains target URL and above-copied auth cookie

Further type 2 where it asked ID recommended
Last part of screenshot has captured three decrypt values in base64, HEX, and ASCII. The cookie of auth is a combination of username with its password from padbuster we came to know what is the encrypted value of username for admin.

We are very near to our goal just encrypt this auth cookie with the user as admin once again. Here we have our plaintext as admin and let’s encode it using padbuster.

Further type 2 where it asked ID recommended. Here the highlighted part is our encrypted value for admin. Copy It “BAit——–AAAA”.

Now replace the original auth cookie from the encrypted value which you have copied above and forwarded the intercepted request.

When request sent by burp suite, automatically on the web server you will get logged in as an admin account. After that when you will access the admin page you will get a URL “my key” that offers us with a username mitsos and an ssh key.

So as you can observe that we had opened the ssh key let’s save it into a text file as “key” on the desktop and if you notice the URL can read ssh login username mitsos.

First, let’s download the key and then give appropriate permission using the chmod. Now that we have the ssh username and key let’s get an ssh session.
ssh -i key mitsos@10.10.10.18
After successfully accessing the PTY shell of a victim system, a simple ‘ls’ command will be shown to us that we have the user.txt. Congrats we got our user flag.

Now, let’s work on the root flag.
As we saw in the screenshot above that we the peda and backup folder too. We have tried working around it but nothing useful seems to come up. On running the executable backup we saw that it prints the shadow file with user hashes. So we ran the strings command and found that it does contain command “cat /etc/shadow”

Now, all we need to do was to create a personalized executable cat file, which can be done as shown in the below image. Here we are reprogramming cat to give us the shell, on execution.
cd /tmp
echo "/bin/sh" > cat
chmod 777 cat
export PATH=/tmp:$PATH
cd
ls
./backup
When you will execute the backup to see if we have got the shell. Great! We have the root shell.

Now all which is left is to get to the root directory and get the flag. But remember we have the $PATH changed; so to run the cat command we will have to specify the location.
/bin/cat root.txt
Great!! We got our root flag successfully
And this way, we successfully solved our challenge. YAY!

Author: AArti Singh is a Researcher and Technical Writer at Hacking Articles an Information Security Consultant Social Media Lover and Gadgets. Contact here