Manual Post Exploitation on Windows PC (Network Command)
Today you will learn how to penetrate a network for enumerating any information of a system once it is compromised by an attacker.
Requirement
Attacker: Kali Linux
Targets: Windows operating system
Open Kali Linux terminal and type msfconsole in order to load Metasploit framework. Now you need to compromise victim’s machine once to achieve any type of session either meterpreter or shell and to do so you can read our previous article from here. Now to make Post Exploitation, we will need an Administrator Privileged shell, which can be found here.
Get Information about Network Cards
We can enumerate information about the Network Interface Cards using the systeminfo command.
Information can be extracted:
The number of NIC Cards, Manufacturer of NIC Cards, Model, Type (Wireless or LAN).
systeminfo | findstr Network
From given below image you can observe 2 Network Interface Cards is installed.

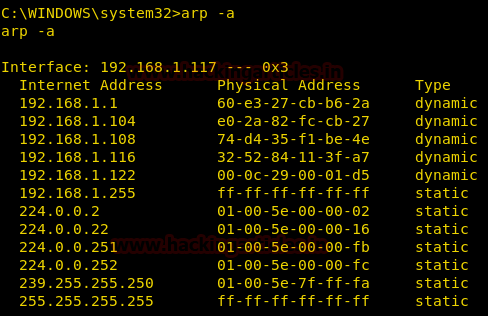
ARP
Arp or Address Resolution Protocol converts the maps the IP Address to the MAC Address of the Devices. Using the arp command we can enumerate the mac addresses of other systems in the same network as the victim’s system.
Here we are using [-a] to get the list of all the entries of arp cache.
arp -a
From given below image you can see the stored Mac address of arp table.
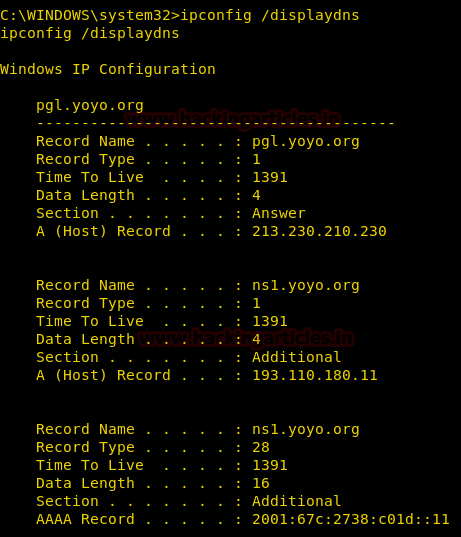
Get DNS Cache
We can enumerate DNS Resolver cache using the ipconfig command.
DNS Resolver is a temporary database, maintained by the operating system. It contains records of all the recent visits or the attempted visits to websites and other internet domains.
Here we are using [/displaydns] to display the complete DNS cache.
ipconfig /displaydns
From given below image you can observer following output is contains:
- Record Name: Name with which the DNS query was initiated
- Record Type: It is a number to represent the IPv4 or IPv6 address (1 is for IPv4 and 28 is for IPv6)
- Time To Live: Time in seconds after which cache entry will expire
- Data Length: Length of the data in bytes, IPv4 has 4 bytes and IPv6 has 16 bytes
- A/AAAA Record: A is the Address of IPv4 and AAAA is the address of IPv6 (Four A because the address is four times in size as compared to IPv4)
Display all the Connections and Listening Ports on a System
While penetration testing a Remote PC, knowledge of all the connections and listening ports along with the Process id is essential so that we can migrate session if needed
This can be done using the netstat command
Here we are using the following options with netstat command:
- [-a] to display all connections and listening ports
- [-n] to display address and port number numerically
- [-o] to display the Process ID
netstat -ano

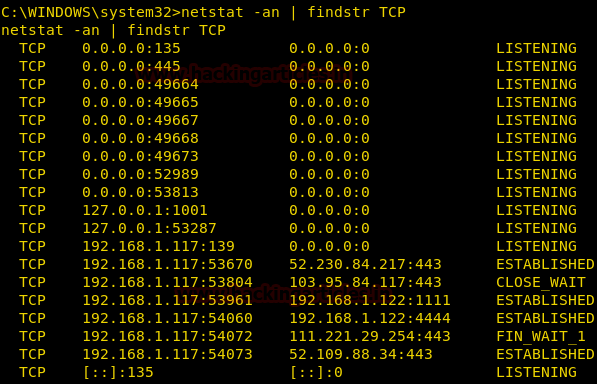
Display All the TCP Connections
To enumerate all the TCP connections, we will use the netstat command. Here we are using the following options with netstat command:
[-a] to display all connections and listening ports
[-n] to display addresses and port numbers in numeric form
We are going to use the findstr command to filter out the Connections which mentions TCP.
netstat -na | findstr TCP
From giving below image you can observe that all state of TCP connection i.e. Listening, Established and Close Wait on their respective Port number.
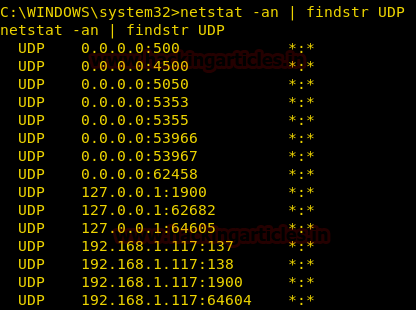
Display All the UDP Connections
To enumerate all the UDP connections, we will use the netstat command. Here we are using the following options with netstat command:
[-a] to display all connections and listening ports
[-n] to display addresses and port numbers in numeric form
We are going to use the findstr command to filter out the Connections which mentions UDP.
netstat -na | findstr UDP
Similarly From give below image you can observe that all state of UDP connection on their respective Port numbers is left blank *:* which means no UDP connection established.
Display All the Established Connections
While penetration testing a Remote PC, knowledge of all Established connections and listening ports is also essential. This can be done using the netstat command.
Here we are using the following options with netstat command:
[-n] to display addresses and port numbers in numeric form
[-a] to display all connections and listening ports
We are going to use find command to filter out the Connections which mentions Established.
netstat -ano | findstr ESTABLISHED
From given below image you can observe that it shows established TCP connection through between source IP source Port and destination IP and Destination Port.

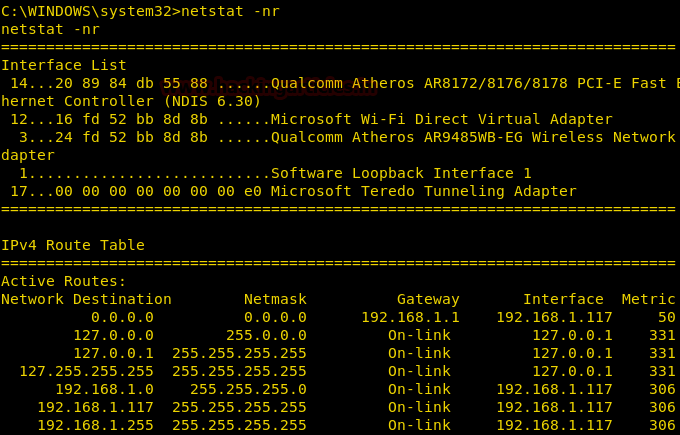
Display the Routing Tables
While penetration testing a Remote PC, knowledge of Routing Tables is essential because Routing tables are used to generate the information about the routes which were chosen by the routing algorithm as preferred routes for packet forwarding and it gives info about the netmask and gateways too.
It contains the Interface List, IPv4 Route Table, Persistent Routes, IPv6 Route Table.
This can be done using the netstat command
Here we are using the following options with netstat command:
[-n] to display addresses and port numbers in numeric form
[-r] to display the routing table
netstat –nr
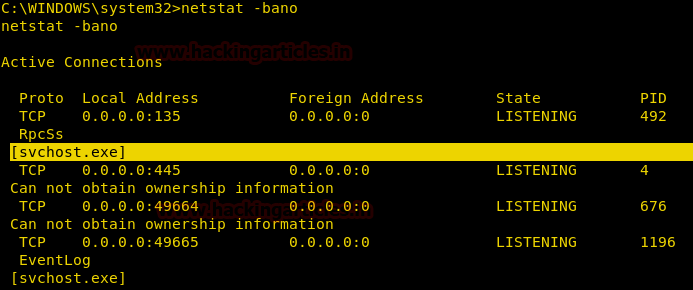
Get Executables Which Created Connections
While penetration testing a Remote PC, knowledge of all executable involved in creating each connection, all connections and listening ports, addresses and port numbers in numerical form, owning process ID is very essential because it gives the attacker information about the connections, port numbers as well as the Process ID.
This can be done using the netstat command
Here we are using the following options with netstat command:
[-b] to displays the executable involved in creating each connection or listening port
[-a] to display all connections and listening ports
[-n] to display addresses and port numbers in numeric form
[-o] to display the owning process ID associated with each connection
netstat –bano
From given below image you can observe that it is showing the name of running service on a particular port.
Get All the Adapters
We can enumerate all the adapters connected to the victim’s system by using the ipconfig command.
As the output of ipconfig command is very vast so we will use the findstr command to filter out the specific result about the adapters.
ipconfig | findstr adapter

Get All the Addresses
We can enumerate all the address including IPv4 and IPv6 by using ipconfig command.
As the output of the ipconfig command is very vast so we will use the findstr command to filter out the specific result about the address.
ipconfig | findstr Address

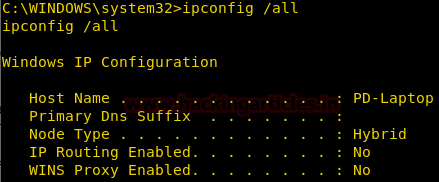
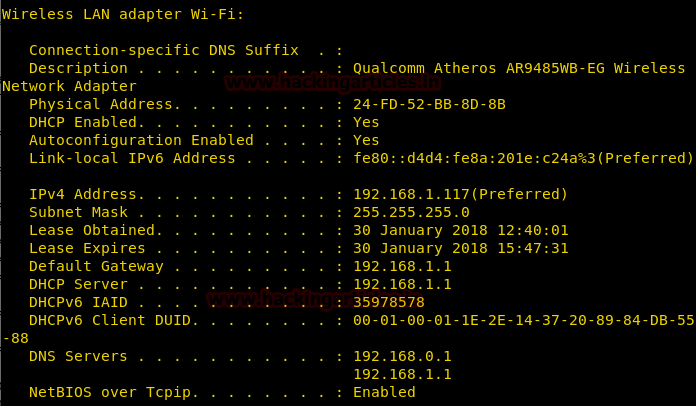
Get the Basic IP Details
We can get the Basic Network Configuration on the Victim’s System and the Network in which the Victim is connected to through the ipconfig command.
[/all] is used to extract all the ipconfig information
ipconfig /all
Victim System is connected to a Wi-Fi so its properties can be viewed below
Things to enumerate:
Adapter Name, Model, Type, MAC Address, IPv4 Address, IPv6 Address, Subnet Mask, DHCP Server, Default Gateway and much more.
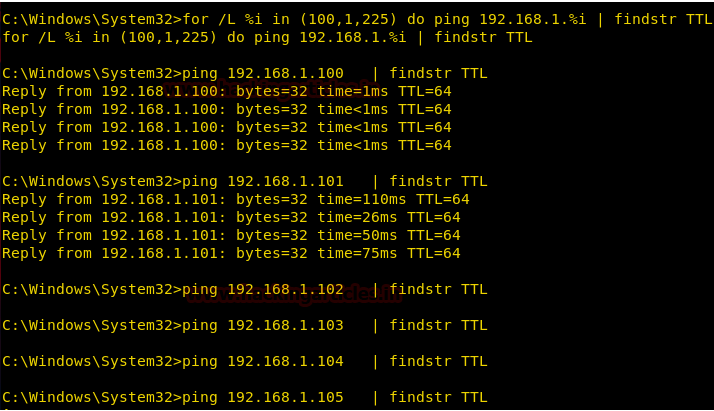
Ping Sweep
Ping Sweep is a networking technique to get a range of active terminals on the network.
IP Addresses from which we get a reply are active, rest are not.
for /L %i in (100,1,225) do ping 192.168.1.%i | findstr TTL
From given below image you observe the result of multiple Ping response in a network using Ping command loop.
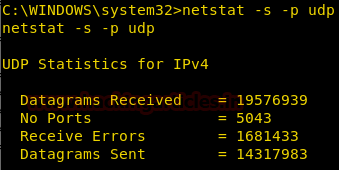
UDP Statistics
In order to obtain statistics for established UDP connection, we can execute given command which describes information of UDP traffic sent or received.
netstat -s -p udp
[-s] denotes statics option
[-p] denotes protocols
From given below image you can observe that it showing details such as datagram received, received error and etc.
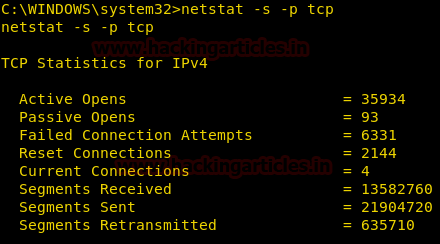
TCP Statistics
In order to obtain statistics for the established TCP connection, we can execute given command which describes information of TCP traffic sent or received.
netstat -s -p tcp
[-s] denotes statics option
[-p] denotes protocols
From given below image you can observe that it showing details such as segment received, failed attempted, Reset connection and etc.
Display Connections Sorted by Port
Options Used:
[-a]: To Display all active TCP connections and UDP ports on which
[-n]: Addresses and Port Numbers are displayed numerically
[-o]: Display Connections with process IDs
We are using findstr to sort result for 443 Ports
netstat -ano | findstr 443
From given below image you can observe that it has shown TCP connection state only for port 443.

Author: Pavandeep Singh is a Technical Writer, Researcher and Penetration Tester Contact here