OverTheWire – Bandit Walkthrough (21-34)
Today, we will continue to play the war-game called Bandit. OverTheWire Organization hosts this war-game. To play this war-game, go to the Bandit website by clicking here. Get the solutions of other levels from below.
OverTheWire – Bandit Walkthrough (1-14)
OverTheWire – Bandit Walkthrough (14-21)
Objective
Find the password file. It will give us access to the next level.
Table of Content:
- Level 21-22
- Level 22-23
- Level 23-24
- Level 24-25
- Level 25-26
- Level 26-27
- Level 27-28
- Level 28-29
- Level 29-30
- Level 30-31
- Level 31-32
- Level 32-33
- Level 33
Level 21-22
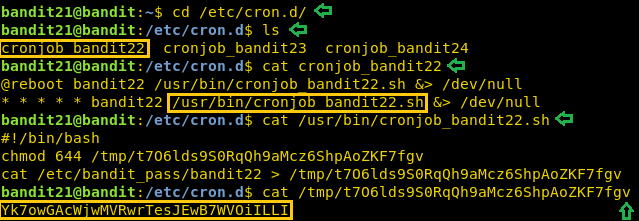
In the previous article, we got the password for level 21 and have successfully connected as user bandit21. We are informed that there is a cron script running and we need to enumerate /etc/cron.d/ for the password. So, we traversed to that path. We use ls command to show the list of files inside the directory. As the next level is bandit22 so we read the cronjob_bandit22 using cat command. It shows that there is a script at /usr/bin/cronjob_bandit22.sh. So, we read that script to find that it writes the password for the next user inside a file that is located inside the tmp directory. On reading that file we got the password we required to get on to the next level.
cd /etc/cron.d/
ls
cat cronjob_bandit22
cat /usr/bin/cronjob_bandit22.sh
cat /tmp/t7O6lds9S0RqQh9aMcz6ShpAoZKF7fgv
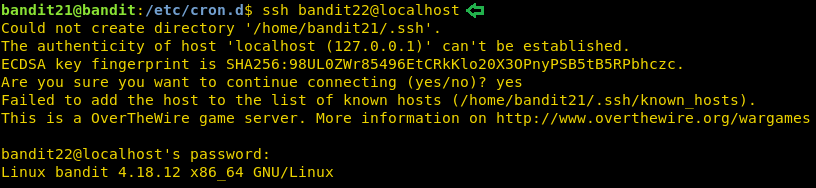
Now that we have the password for the next level, we will login as bandit22 using SSH.
ssh bandit22@localhost
Level 22-23
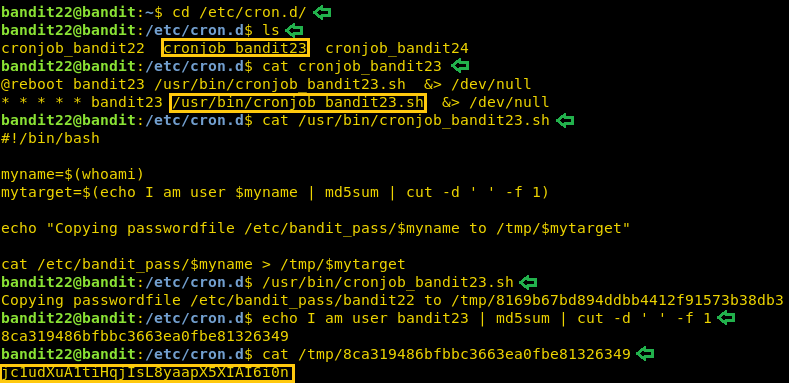
On this level, we are informed that there is a cron script running and we need to enumerate /etc/cron.d/ for the password. So, we traversed to that path. We use ls command to show the list of files inside the directory. As the next level is bandit23 so we read the cronjob_bandit23 using cat command. It shows that there is a script at /usr/bin/cronjob_bandit23.sh. So, we read that script using cat command. This script has a variable called myname which is the output of the command whoami. Which basically return bandit22. Next, the operation is done on this variable. It prints “I am user bandit22” and it is encrypted in MD5. This hash is used to name the file which has the password for the next level. Now to get the password for the bandit23 user, we run the command with the value for the variable myname set to bandit23. This will give us the hash value which further gives the name of the file in the tmp directory.
cd /etc/cron.d/
ls
cat cronjob_bandit23
cat /usr/bin/cronjob_bandit23.sh
/usr/bin/cronjob_bandit23.sh
echo I am user bandit23 | md5sum | cut -d ' ' -f 1
cat /tmp/8ca319486bfbbc3663ea0fbe81326349
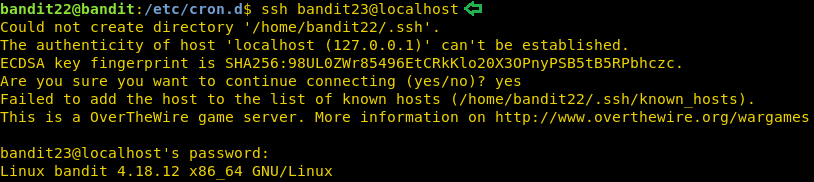
Now that we have the password for the next level, we will login as bandit23 using SSH.
ssh bandit23@localhost
Level 23-24
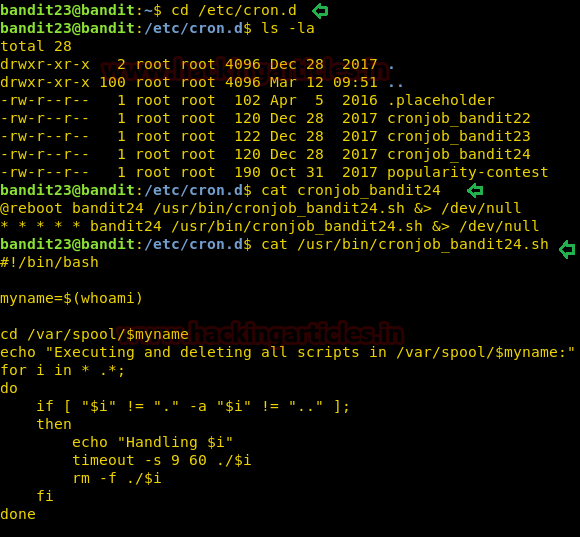
On this level, we are informed that there is a cron script running and we need to enumerate /etc/cron.d/ for the password. So, we traversed to that path. We use ls command to show the list of files inside the directory. As the next level is bandit24 so we read the cronjob_bandit24 using cat command. It shows that there is a script at /usr/bin/cronjob_bandit24.sh. So, we read that script using cat command. We see that we have a script with a variable named myname which consists of the output of the whoami command. The script first changes the name directory to /var/spool and then executes files with the variable myname file. And after executing it deletes all files inside that directory.
cd /etc/cron.d/
ls -la
cat cronjob_bandit24
cat /usr/bin/cronjob_bandit24.sh
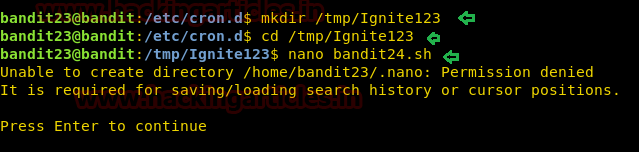
Now to get the password for the next directory we will have to create a script of our own so that we can put it inside the /var/spool that will cat the password file from the /etc/bandit_pass/bandit24. We will have to save the file with the name of the next user in order to run the file as a cron job successfully.
mkdir /tmp/Ignite123
cd /tmp/Ignite123
nano bandit24.sh
After creating a file using nano, we will write the script that will read the password from the /etc/bandit_pass and writes in the file inside the directory we just created.
#!/bin/bash
cat /etc/bandit_pass/bandit24 >> /tmp/Ignite123/level24

Now to execute successfully, we will have to give proper read and write permissions to the script we just created and also to the directory we created.
chmod 777 bandit24.sh
cp bandit24.sh /var/spool/bandit24/
chmod 777 /tmp/Ignite123

We will have to wait for some time. We got a bit stuck here as we didn’t wait for enough. Have a bit of patience, it will take some time. After that when we list the files inside the directory, we see that a new file is created and upon reading the contents of that file, we find the password that we were looking for in this level. Now that we have the password for the next level, we will login as bandit24 using SSH.
ls
cat level24

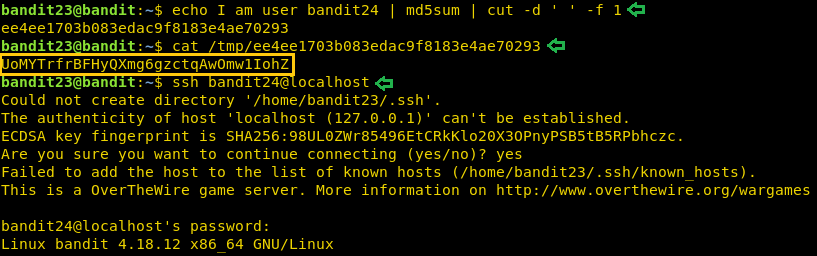
Now, if the above-mentioned method doesn’t work for you. This is another method to grab the password. It is based on the method that we did at an earlier level. In the previous level we wrote the I am user bandit23 now that we have to grab the password for bandit24 we will write I am user bandit24 and convert it to MD5 and use that text as a directory for the password for the next level. We prefer this method because is obviously faster and easier.
echo I am user bandit24 | md5sum | cut -d ' ' -f 1
cat /tmp/ee4ee1703b083edac9f8183e4ae70293
ssh bandit24@localhost
Level 24-25
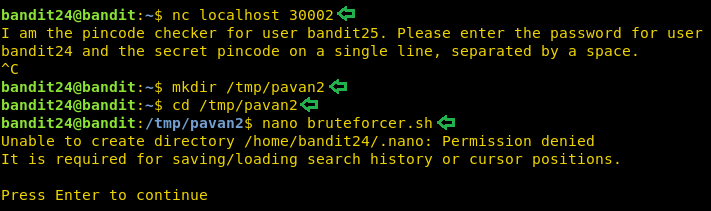
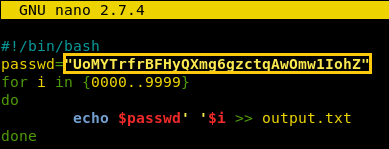
On this level, we are informed that a background process is running. It is listening at post 30002 and will give the password for the next level. And we will have to feed it the password for the current level. But wait there is a catch. We will also have to provide a 4-digit secret passcode which will have to Bruteforce as we have absolutely no clue about it. Now to apply Bruteforce we will have to create a Dictionary. As always, we will be needing to read and write permissions to create a script. So, we will create a directory inside the tmp directory. Let’s create a script using nano.
nc localhost 30002
cd /tmp/pavan2
nano bruteforcer.sh
After creating the script file, we will have to create a file that would act as a dictionary. We are told that we will have to feed the daemon running on port 30002 the password of the current level followed by a 4-digit passcode. So, we ran a loop that lists all the 4 digits and writes those inside a file called output. This file will act as a dictionary.
#!/bin/bash
passwd="UoMYTrfrBFHyQXmg6gzctqAwOmw1IohZ"
for i in {8000..8999}
do
echo $passwd' '$i >> output.txt
done
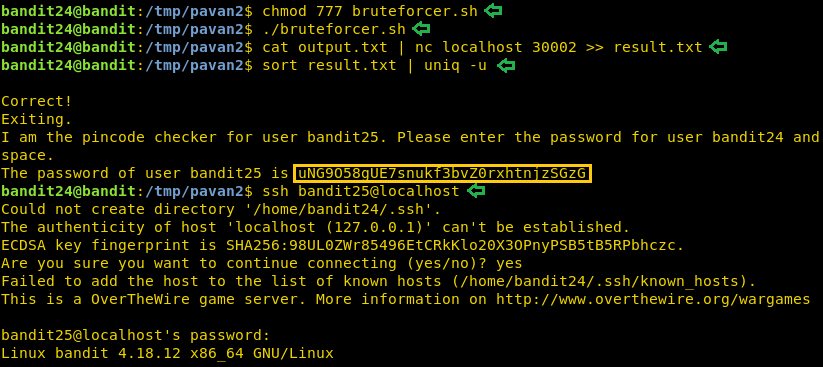
Now before running the above script, let’s first give it proper permissions. After that, we will run the script. Now, to apply Bruteforce, we will have to use piping (|). We will first read the password we created inside the output.txt than we will feed its output to the nc at 30002 port. Further, we will feed the output to a file called result. This will make reading the password easier. Now using the sort command combined with the uniq command, we will extract the correct password easily. Now that we have the password for the next level, we will login as bandit25 using SSH.
chmod 777 bruteforcer.sh
./bruteforcer.sh
cat output.txt | nc localhost 30002 >> result.txt
sort result.txt | uniq -u
ssh bandit25@localhost
Note: When we were trying the Bruteforce, there were times when we were getting a session timeout error. To resolve this, don’t Bruteforce from 0 to 9999. Instead, divide the dictionary into small sections like 0 to 1000 and 1001 to 2000 and so on.
Level 25-26
On this level, we are informed that the shell for user bandit26 is not bin bash. So, we will have to figure it out. After logging in as bandit25, we ran the ls command to list all the files inside the directory. This gave an ssh key. So, we tried to login with it.
ls
ssh bandit26@localhost -i bandit26.sshkey

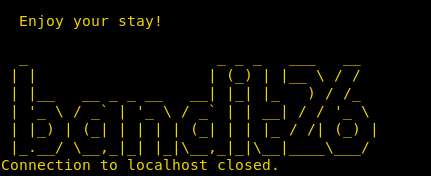
We saw that a session was generated but it displayed a pattern as below and then the session was closed.
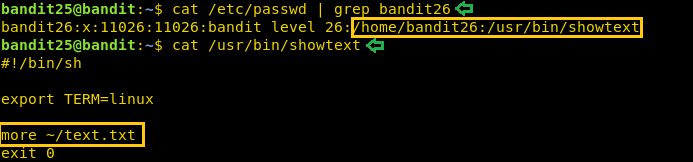
After a bit enumeration, here and there. It hit us to check the /etc/passwd file. As this was a machine with lots of users so we used the grep command to get a refined result for the bandit26 user. It gave us a file called showtext. We read the file showtext using the cat command. It shows us that ‘more’ is used with the text file that shows us the pattern we saw before. Now, this gave us an idea that we need to provoke the more command. To do this we will have to decrease the size of the terminal so that it can’t display that pattern.
cat /etc/passwd | grep bandit26
cat /usr/bin/showtext
So, we decreased the size of the terminal as shown in the image and then again tried to login. This will trigger the ‘more’. Now press ‘v’ to enable vi editor.

Now, we will write the following command to invoke a shell here as shown in the given image.
:set shell=/bin/bash

As we can see in the given image that we have the shell for bandit26.
:sh

Level 26-27
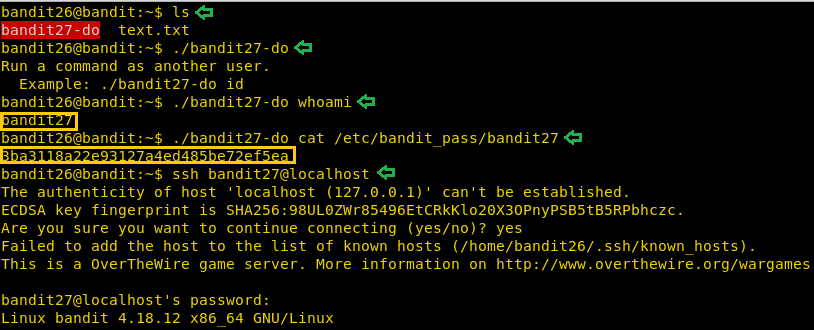
On this level, we are not given any hints. We are on our own on this. So, we like to see what we have to work upon in the current directory. We ran ls command to find a script bandit27-do. Let’s execute the script to see if we get any message or hint. It does one better, it gives us an example. This script basically runs the command it is given as user bandit27. So now that we can run commands as user bandit27. Let’s read the password file located at /etc/bandit_pass/bandit27. Now that we have the password for the next level, we will login as bandit27 using SSH.
ls
./bandit27-do
./bandit27-do whoami
./bandit27-do cat /etc/bandit_pass/bandit27
ssh bandit27@localhost
Level 27-28
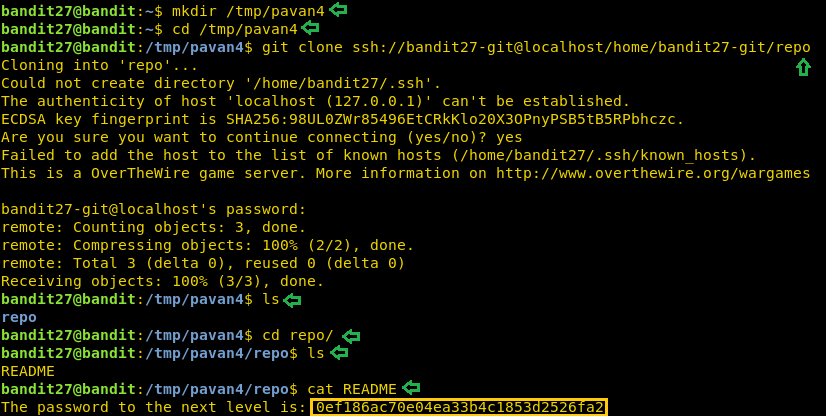
On this level, we are informed that there is a git repository and the password for that repository is the same password that was used to login in as user bandit27. We are required to clone the repository. Now we need to have the write permission to clone a repository. So, we create a directory in the tmp directory. After cloning let’s list all the file in the repo. We find a README file. Upon reading that file we get the password for the next level.
mkdir /tmp/pavan4
cd /tmp/pavan4
git clone ssh://bandit27-git@localhost/home/bandit27-git/repo
ls
cd repo
ls
cat README
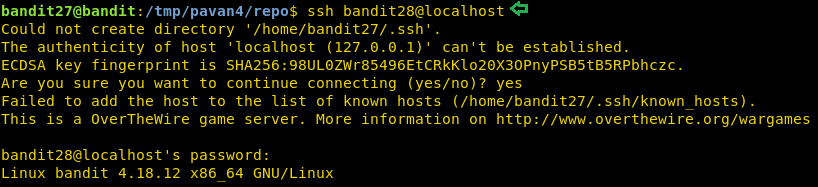
Now that we have the password for the next level, we will login as bandit28 using SSH.
ssh bandit28@localhost
Level 28-29
On this level, we are informed that there is a git repository and the password for that repository is the same password that was used to login in as user bandit28. We are required to clone the repository. Now we need to have the write permission to clone a repository. So, we create a directory in the tmp directory. After cloning let’s list all the file in the repo. We find a README file. Upon reading that file we see that password is hidden.
mkdir /tmp/pavan5
cd /tmp/pavan5
git clone ssh://bandit28-git@localhost/home/bandit28-git/repo
ls
cd repo/
ls
cat README.md

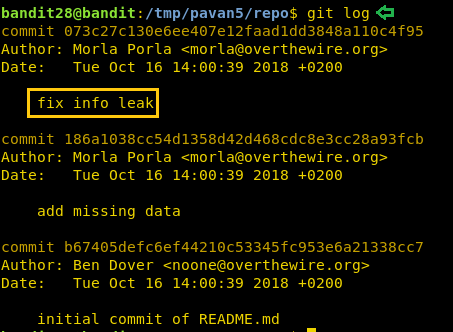
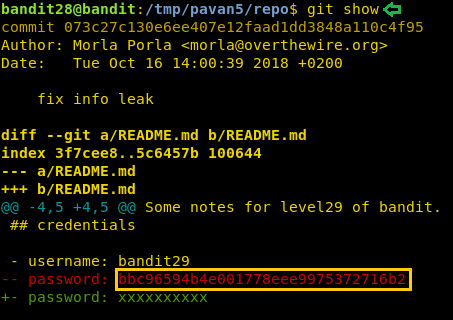
Maybe the password was inside the file but was removed. Good thing is that whenever a change is made in a git, a log entry is created. Let’s check that log, we can see that the author of git has made the latest commit named ‘fix info leak’. We need to check out this commit.
git log
To see the changes made in the commit, we will use the git show command to read the changes made. As expected, we found the password inside this commit.
git show 073c27c130e6ee407e12faad1dd3848a110c4f95
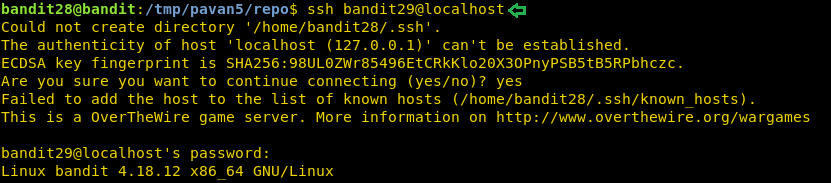
Now that we have the password for the next level, we will login as bandit29 using SSH.
ssh bandit29@localhost
Level 29-30
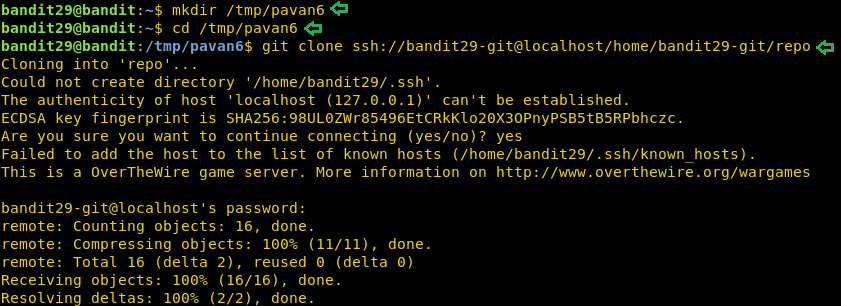
On this level, we are informed that there is a git repository and the password for that repository is the same password that was used to login in as user bandit29. We are required to clone the repository. Now we need to have the write permission to clone a repository. So, we create a directory in the tmp directory. Now we will clone the repository inside this directory.
mkdir /tmp/pavan6
cd /tmp/pavan6
git clone ssh://bandit29-git@localhost/home/bandit29-git/repo
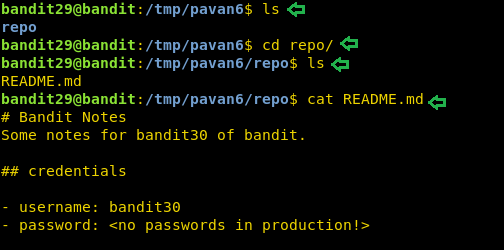
After cloning let’s list all the file in the repo. We find a README file. Here we are told that there is no password in production. Now its time to enumerate this git.
ls
cd repo/
ls
cat README.md
We list all the branches in this git using the git branch command. It shows us that we. have another branch called dev. Let’s check out this branch for the password. After switching to this branch, we run ls command to see that we have a README file. Upon reading that file we get the credentials.
git branch -a
git checkout dev
cat README.md
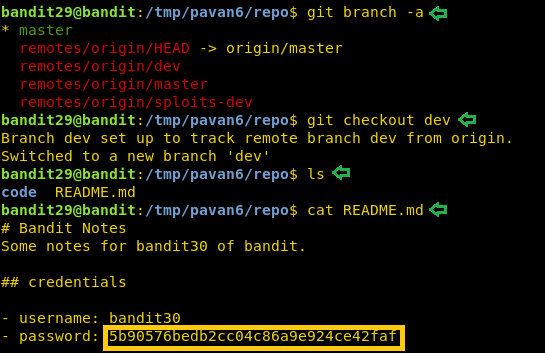
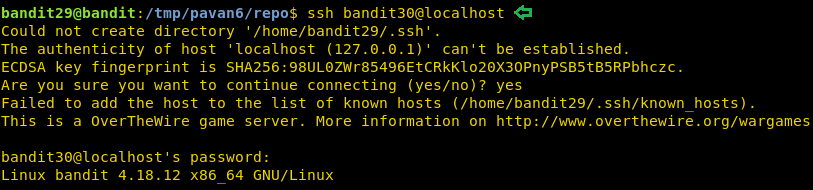
Now that we have the password for the next level, we will login as bandit30 using SSH.
ssh bandit30@localhost
Level 30-31
On this level, we are informed that there is a git repository and the password for that repository is the same password that was used to login in as user bandit30. We are required to clone the repository. Now we need to have the write permission to clone a repository. So, we create a directory in the tmp directory. Now we will clone the repository inside this directory.
mkdir /tmp/pavan7
cd /tmp/pavan7
git clone ssh://bandit30-git@localhost/home/bandit30-git/repo

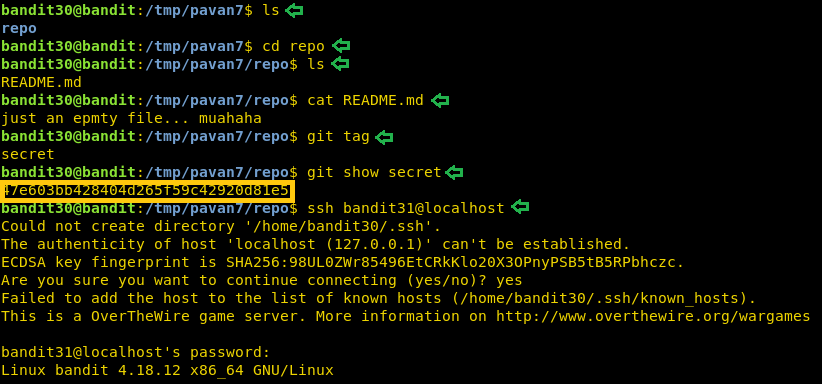
After cloning let’s list all the file in the repo. We find a README file. Here we are told that it is an empty file. Now it’s time to enumerate this git. Git has the ability to tag specific points in a repository’s history as being important. We can enumerate that tag. On looking carefully, we find the tag secret. On reading that tag we find the password we were looking for on this level. Now that we have the password for the next level, we will login as bandit31 using SSH.
ls
cd repo
ls
cat README.md
git tag
git show secret
ssh bandit31@localhost
Level 31-32
On this level, we are informed that there is a git repository and the password for that repository is the same password that was used to login in as user bandit31. We are required to clone the repository. Now we need to have the write permission to clone a repository. So, we create a directory in the tmp directory. Now we will clone the repository inside this directory.
mkdir /tmp/pavan8
cd /tmp/pavan8
git clone ssh://bandit31-git@localhost/home/bandit31-git/repo

After cloning let’s list all the file in the repo. We find a README file. Here we are told that in order to get the password for the next level, we have to push a file in the remote repository. This file must be named key.txt and should contain the content May I come in?
ls
cd repo/
ls
cat README.md
nano key.txt
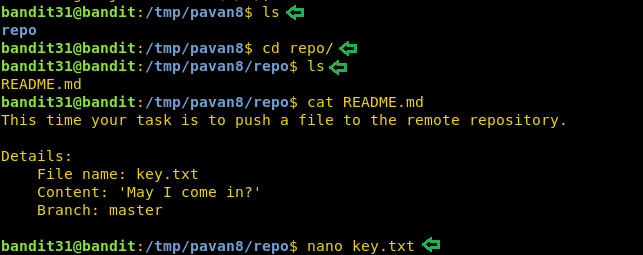
So, we create a text file name key using nano and enter the phrase “May I come in?” in it.

Now we add the file to the repository and commit to that entry. And finally, push it into the origin branch. This step requires the password for the current user. As we can see in the given image that we have the password for the next level.
git add -f key.txt
git commit -m "."
git push origin
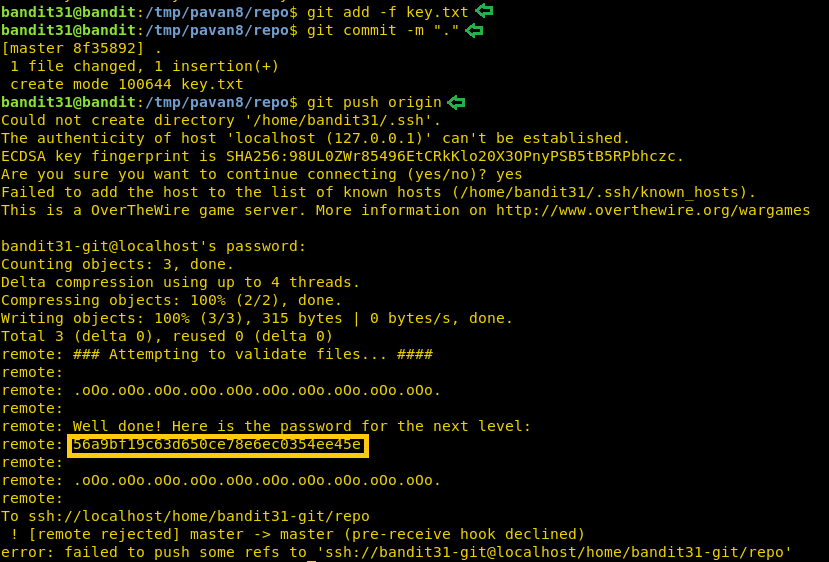
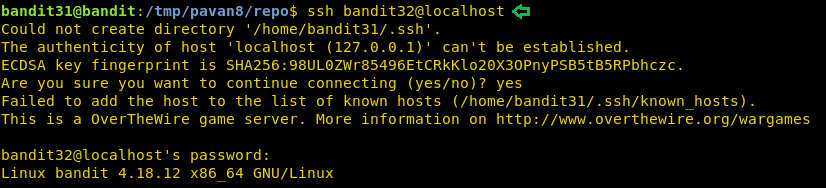
Now that we have the password for the next level, we will login as bandit32 using SSH.
ssh bandit32@localhost
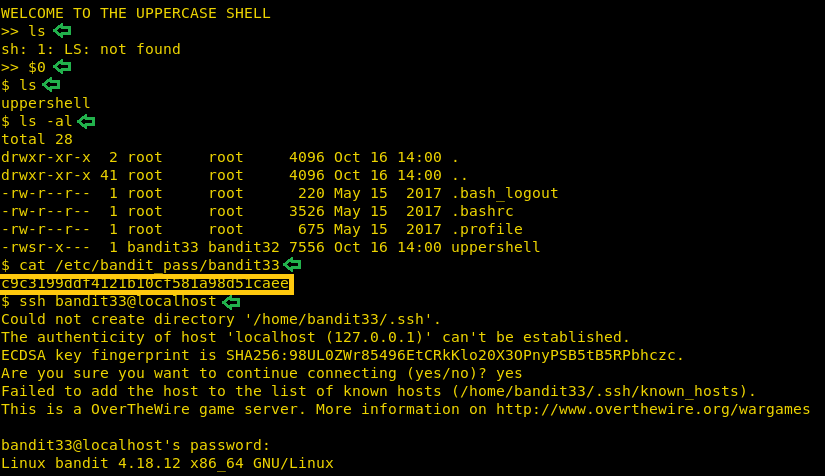
Level 32-33
On reaching this level, we are greeted with a message “Welcome to the Uppercase shell”. To understand what it does, we ran ls command but we got an error. On close inspection of the error message, we understand that it states that the LS command is not found. It means that the shell converts my commands to Uppercase before executing. For this level, we are given a hint “it’s time for another escape”. This made us curious about escape characters. Upon brief research, we found that we can bypass this uppercase shell using an escape character ‘$0’. We were right. We got the bash. Let’s list all files using ls -al command. We see that the owner of uppercase is bandit33. So, we can access the /etc/bandit_pass/bandit33 file to get the password for the next level. After getting the password, we will login as bandit33 using SSH.
ls
$0
ls -al
cat /etc/bandit_pass/bandit33
ssh bandit33@localhost
Level 33
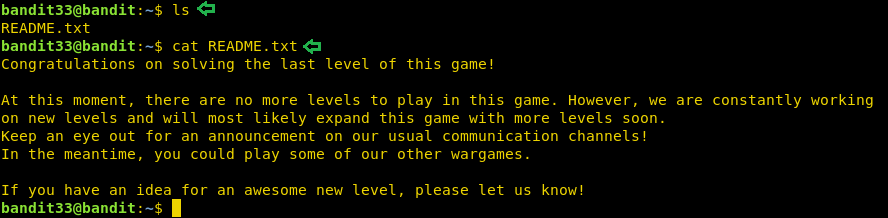
This is the final level for now as the bandit team is working on creating more levels. We connected to this level as use bandit33. After connecting we run ls command to see the list of files we have in the current directory. We see that we have a README file. On opening that file, we see the final flag and a brief message from the Over the Wire Team. This concludes this series for now. We will solve more levels as soon as Over the Wire team publishes more levels.
ls
cat README.txt
Author: Pavandeep Singh is a Technical Writer, Researcher and Penetration Tester Contact here
Sorry for late but happy to learn!
@ level 23 – 24
First method – The reason behind you were not success is – giving r/w/e permission to folder – /tmp/Ignite123 i.e chmod 777 /tmp/Ignite123 .. then only the folder get executable at cronjob and password will get strd in that file.
Thank you!