Implementation of Firewall Policies :FortiGate (Part 2)
In the previous part, we have discussed some basic firewall policies that are must require to set up a firewall. Let’s move towards some advance policies.
You can access the previous article from Here:
Implementation of Firewall Policies :FortiGate (Part 1)
In this article, we are going to create some policies that is much required to make safe your network from unauthorized access or also safe from bad traffics. So without of much theory let’s begin it.
Table of Content
- Block Whole Social Media using FortiGuard categories
- Site-to-Site IPsec VPN Tunnel with two FortiGates
- Simplifying Policies with Zone
Block Whole Social media using FortiGuard categories
In this part, we are going to explain how to block access to social media websites using FortiGuard categories.
Must remind one thing an active license of FortiGuard web filtering service is required for using this type of function.
Web filtration with FortiGuard categories enables you to take action against a group of websites on the other hand a static URL filter is intended to block or monitor specific URL.

Enable web Filter
Go to system > feature Visibility and enable the Web Filter Feature
Edit Default Web Filter Profile
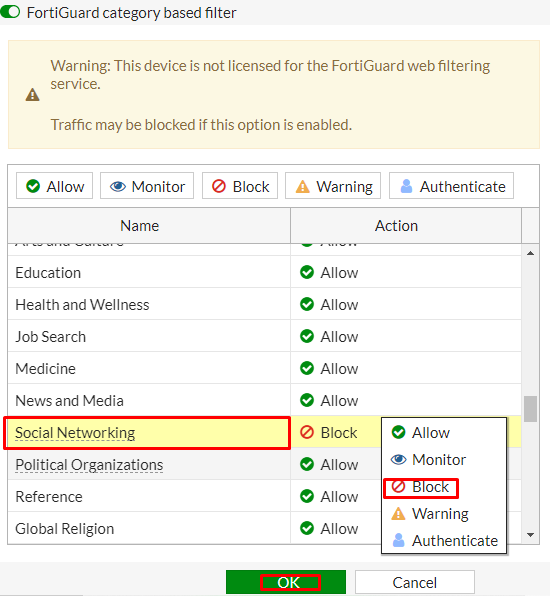
Go to Security Profiles > Web Filter and edit the Default web filter profile and make sure that “FortiGuard category-based” filter service is enabled.
Right-click on General interest FortiGuard category. scroll down to Social networking subcategory and select action to “Block” as shown below.
Add Web Filter Profile to Internet Access Policy
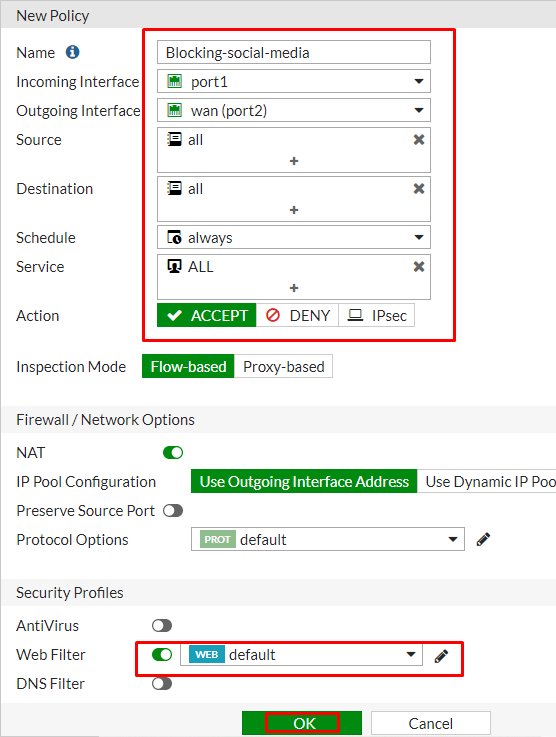
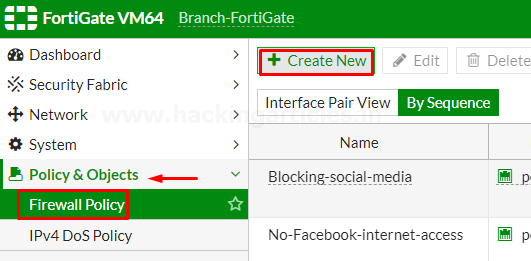
Go to Policy & objects > Firewall Policy and create a new policy

Give the name to the policy “Blocking-social-media” to make it identifiable. Set incoming interface to internal network and outgoing interface to internet facing interface. Set the rest to allow “ALL” Traffic or you can select multiple rules by selecting the + icon and the action to “Accept” enable the “NAT” and make sure “Use Outgoing Interface Address is enabled”.
Scroll down to Security profiles enable Web Filter and select default web filter profile and save the configuration.
Now you have successfully enabled the social media blocking policy to move this policy to Top of the list to make it effective.

Site-to-Site IPsec VPN Tunnel with two FortiGates
In this part, we are going to configure a site-to-site IPsec VPN tunnel to allow communication between two networks that a situated behind different FortiGates.
We are going to create an IPsec VPN tunnel between two FortiGates one is called HQ (Headquarter) another is called Branch.

Configure IPsec VPN on HQ
On HQ FortiGate, GO to VPN > IPsec wizard and create a new tunnel.
In the section, VPN setup describe a VPN name to make it identifiable, set Template type to Site-to-Site, set NAT configuration to NO NAT between sites and set Remote Device type to FortiGate.

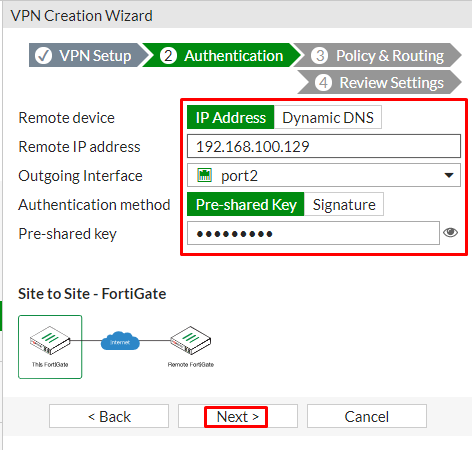
In the Authentication Section, set IP address to Public IP address of the Branch FortiGate.
After entering the IP address an interface is assigned to the outgoing interface. You can change the interface by the drop-down menu as per your requirement.
Set a secure Pre-shared key that is used to connect and verification for both FortiGates.
In the section of Policy and Routing set Local interface to “LAN” in my case “Port1” is dedicated to the LAN and local subnets will add automatically further then set “Remote Subnets” to the Branch network and set internet access to “None” as shown below

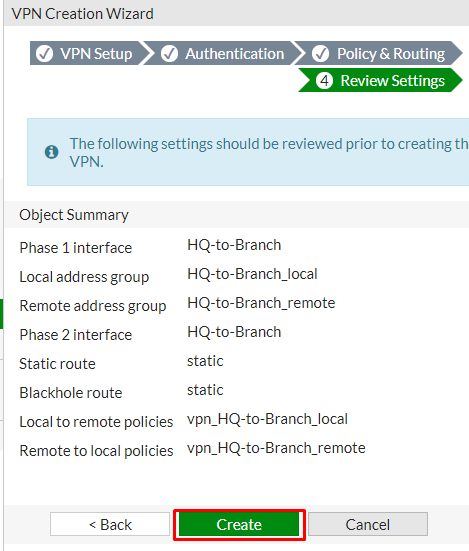
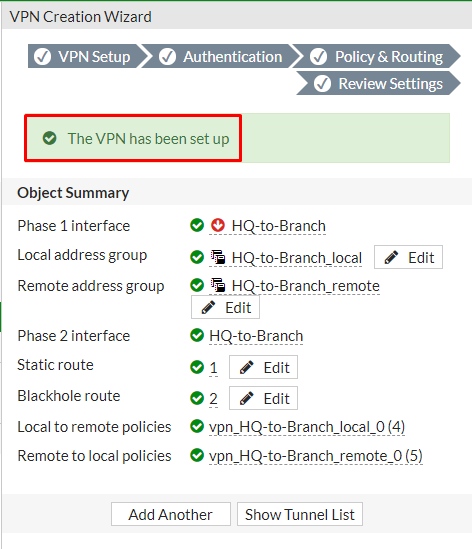
Review the configuration summary that you configured that shows the interfaces, firewall addresses, routes, and policies after verifying it select create an icon
After creating the VPN, you can verify the details as shown below.
Configure IPsec VPN on a branch
On Branch FortiGate, GO to VPN > IPsec wizard and create a new tunnel.
In the section, VPN setup describes a VPN name to make it identifiable, set Template type to Site-to-Site, set NAT configuration to “NO NAT” between sites and set Remote Device type to FortiGate.

In the Authentication Section, set IP address to Public IP address of the Branch FortiGate.
After entering the IP address an interface is assigned to the outgoing interface. You can change the interface by the drop-down menu as per your requirement.
Set a secure Pre-shared key that was used on the VPN of HQ FortiGate.

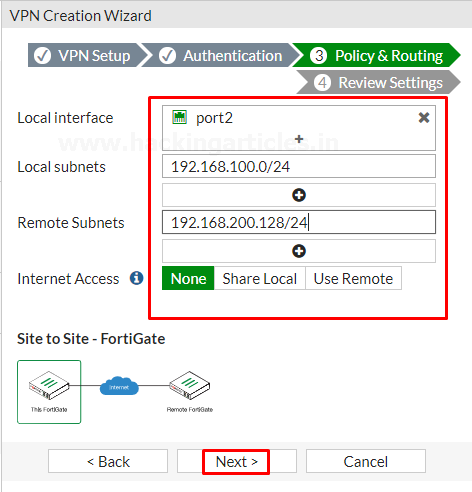
In the section of Policy and Routing set Local interface to “LAN” in my case “Port2” is dedicated to the LAN and local subnets will add automatically further then set “Remote Subnets” to the HQ (Headquarter) network and set internet access to “None” as shown below
Review the configuration summary that you configured that shows the interfaces, firewall addresses, routes, and policies after verifying it select create icon

After creating the VPN, you can verify the details as shown below.

You can also verify it by users of the Headquarter (HQ) can access resources on the Branch internal network and so on Vice Versa.
To test the connection, ping HQ LAN interface from the device Branch Internal network.
Or you Can also check the LOG events of VPN by going to Log & Report > Events > VPN Events and where you can see every Single logs of VPN.

Simplifying Policies with Zone
In this Part, we’re Going to Explain how to group multiple interfaces into Zone to simplify Firewall Policies.
By creating multiple VLANs we are going to add them into a zone, so that we can just use the single zone object as a source interface in our firewall policy, rather than having to reference each interface separately.
Create VLAN Interfaces
Go to Network > interfaces and create a new interface

Enter the name for the interface VLAN10 or whatever you want, select the type to VLAN, select Interface to LAN, enter the VLAN ID, enter the VRF Id. assign the Role to LAN, set the Addressing mode to manual, enter the IP/Netmask provided by your ISP and select the Administrative Access to HTTPS, PING

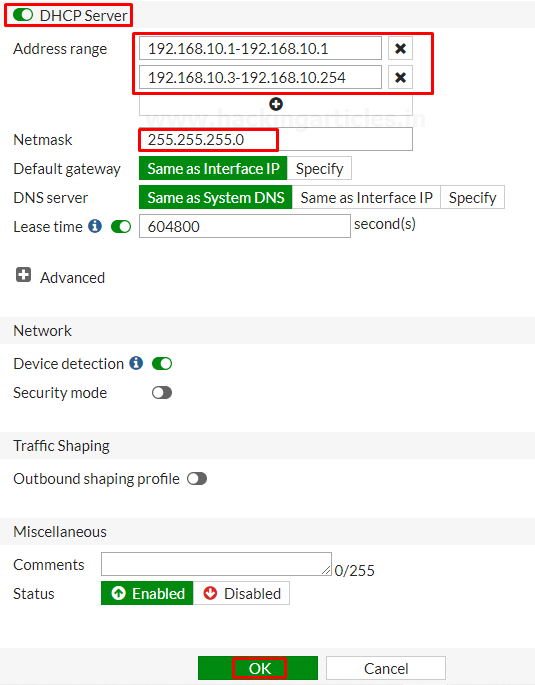
Enable the DHCP server and assign the address range further then save the configuration.
Next, create another by making the same selections…
Go to Network > interfaces and create a new interface.
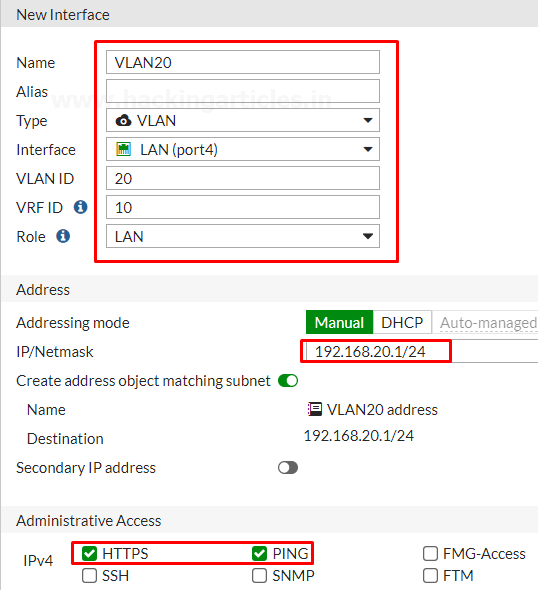
Enter the name for the interface VLAN20 or whatever you want, select the type to VLAN, select Interface to LAN, enter the VLAN ID, enter the VRF Id. assign the Role to LAN, set the Addressing mode to manual, enter the IP/Netmask provided by your ISP and select the Administrative Access to HTTPS, PING
Enable the DHCP server and assign the address range further then save the configuration.

Finally, create a 3rd VLAN by making the same selection
Go to Network > interfaces and create a new interface.
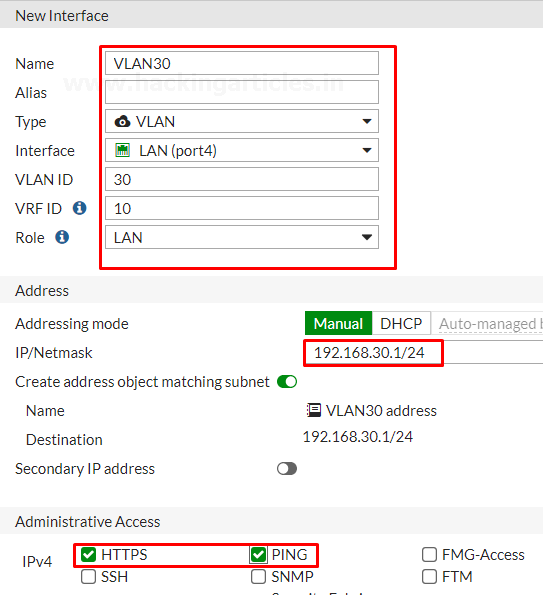
Enter the name for the interface VLAN30 or whatever you want, select the type to VLAN, select Interface to LAN, enter the VLAN ID, enter the VRF Id. assign the Role to LAN, set the Addressing mode to manual, enter the IP/Netmask provided by your ISP and select the Administrative Access to HTTPS, PING
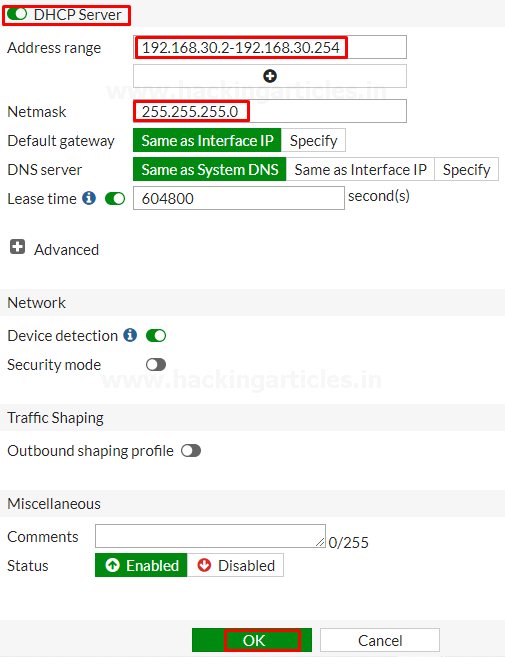
Enable the DHCP server and assign the address range further then save the configuration.
Review the Interface list to see the VLAN’s that you have created

Create an Interface Zone
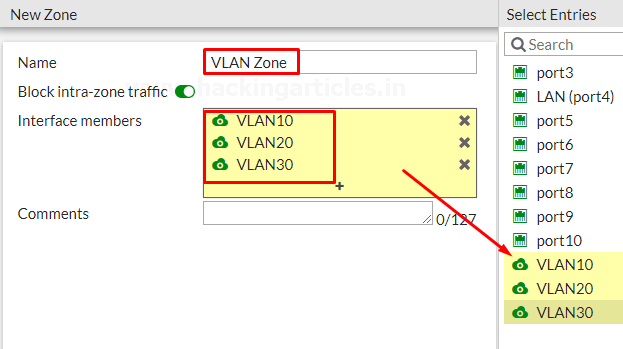
GO to the Network > Interfaces and select create new Zone

Name the zone to “VLAN Zone” to make it identifiable and add the newly created VLAN’s to it as shown below.
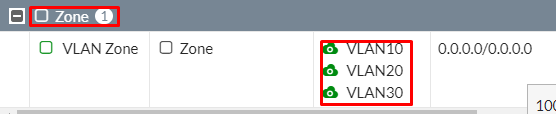
Review the Zone list to see the VLAN’s that you have Added.
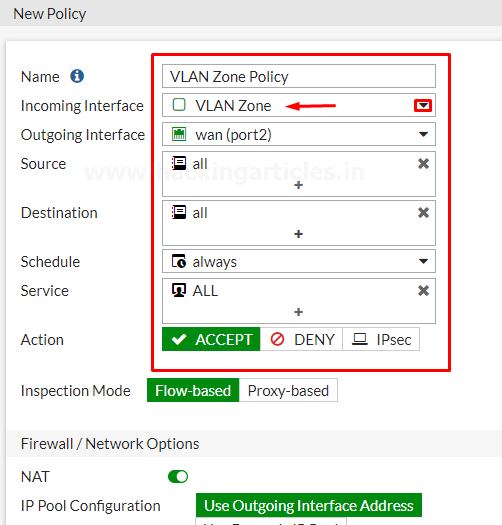
Create a Zone Firewall Policy
Go to Policy & Objects > Firewall Policy and create a new policy that will allow any VLAN in the Zone that we have created to access the internet.
Assign a name to “VLAN Zone Policy” make it identifiable, set the Incoming interface to your Zone and the outgoing interface to the internet-facing interface. configure the rest as needed or as per your requirement.
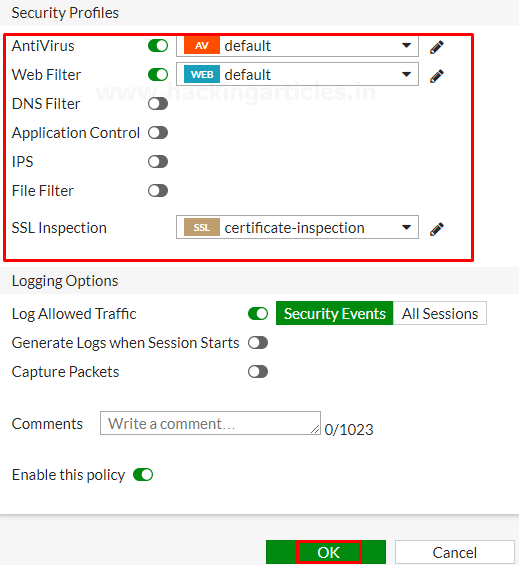
Select the Security Profiles as per your requirements and save the configuration by selecting OK.
To make this Policy Effective move this Policy to the TOP of the List as per your environment which policy should be on Top.

Similarly, you can create as much policy as you want.
Let’s end up here.
Reference: -http://docs.fortinet.com/document/fortigate/6.2.4/cookbook/856100/dashboard
Author – Vijay is a Certified Ethical Hacker, Technical writer and Penetration Tester at Hacking Articles. Technology and Gadget freak. Contact Here