Implementation of Firewall Policies :FortiGate (Part 1)
In today’s era whether your is for personal use or designated to a multi-billion-dollar enterprise, no doubt security should be the number priority out of all. A firewall acts like a barrier that keeps destructive forces away from computers and prevents a network from unauthorized access by enhancing the security devices connected to a network. In order to choose the best firewall NAT (Network Address Translation) firewalls are considered to be the safest firewall option.
In the previous article “Firewall Lab Setup FortiGate”, we looked at the configuration and installation of Virtual firewall. Let’s take a look at the involved process in the creation of policies of FortiGate and discuss the various Recipe of FortiGate firewall policies.
Table of Content
- Prerequisites
- How do firewall work
- Connect Network Devices
- Connect Network Interfaces
- Add a Default Route
- Create an IPv4 Firewall Policy
- Create an IPv4 DOS Policy
- Blocking Facebook with Web Filter
Prerequisites
- Strong Knowledge of Networking
- Attacker Machine Kali Linux
How do firewall Works?
Basically, firewalls are divided into two parts
- Stateful: – Stateful firewalls are capable of monitoring whole network traffic, including their communication channels. These firewalls are also referred as dynamic packet filter as they filter traffic packets based on the context (it involves metadata of packets including ports and IP address belonging to that Endpoint) and state.
- Proxy: – Proxy Firewall can be Defined as, A firewall that can monitor and filter communication at the application level and protect the resources from unwanted dangerous traffic. A proxy firewall also is known as Application layer Firewall.
After some time in an inspection stateful firewall become more sophisticated and proxy Firewalls become too slow.
Today nearly all Firewalls are stateful and they are divided into two General Types.
- Host-based Firewalls
- Network Firewalls
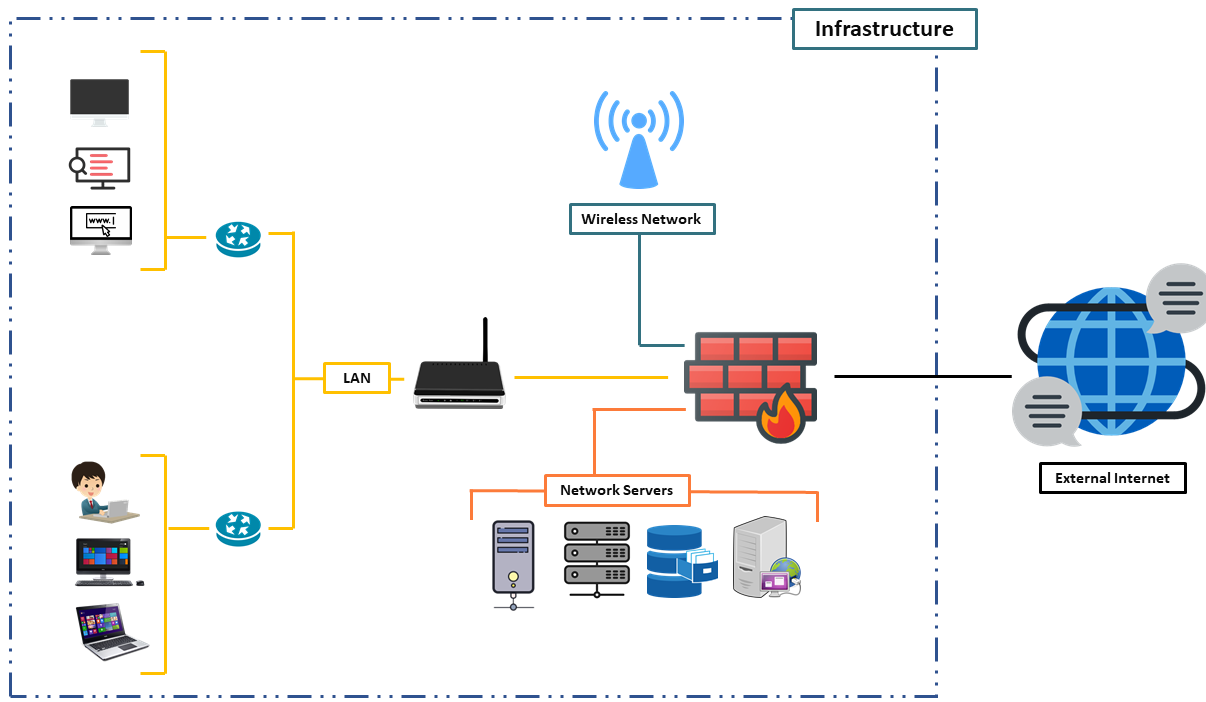
In this article, you will learn how to connect and configure a new FortiGate unit in NAT route mode to securely connect a private network to the internet.
In NAT route mode a FortiGate unit is installed as a gateway or router between two networks. In most cases it is used between private networks and the internet, this allows the Firewall to hide the IP addresses of the private network using Network Address Translation (NAT) and the various firewall Policy of FortiGate firewall as a Firewall Recipe.
As you guys have one question here why we are calling it as Recipe… answer is quite simple without using the Recipe we can’t cook a tasty food …. Wait for what… a tasty food… ? we can’t even cook the food… ? similarly without proper firewall policy (recipe), we can’t protect our network from dangerous network traffics.
Connect Network Devices
First, you need to connect a physical firewall or FortiGate into your network setup. On the place of a physical firewall, we are using a Virtual FortiGate Firewall to get hands-on.
Connect the FortiGate internet facing interface usually WAN1 to your ISP supplied equipment and connect the PC to FortiGate using an internal port usually port 1 or as per your requirement.
Power on ISP equipment, firewall and the PC and they are now in the internal network.
Configure Network Interfaces
Now you need to configure the FortiGate’s Network interfaces.
Go to network > Interfaces
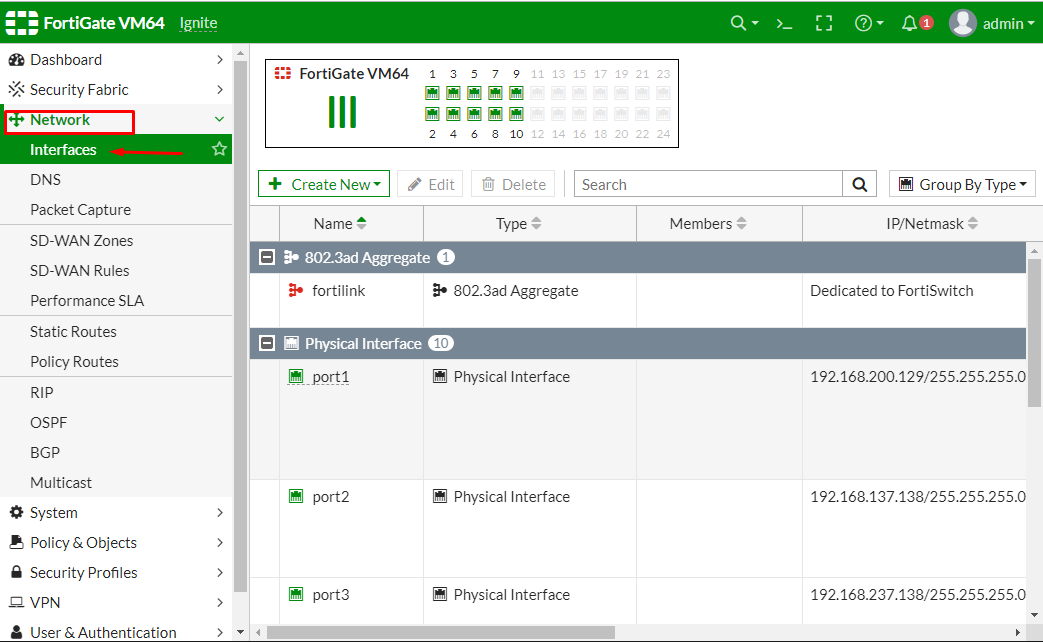
and edit the internet-facing interface set the addressing mode to manual and the IP/Netmask to the public IP address provided by your ISP. Here in my case, I’m considering port2 as an internet-facing interface. Provide Administrative access as per your requirement to the network

Then save the configuration and then similarly edit the LAN interface which may be called internal network. Set the interfaces Role to the LAN or WAN and then set the addressing mode to manual and set the IP/Netmask to the private IP address that you want to assign to the FortiGate

If you need your FortiGate to provide IP addresses to devices connected to internal network enable the DHCP server and then save the configuration as shown below.
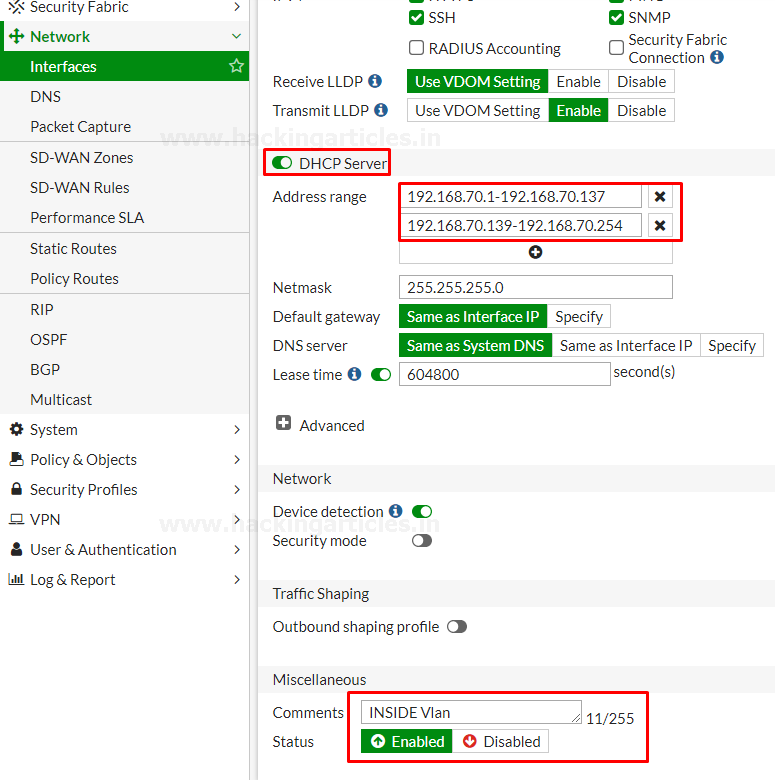
Changing the default IP of your interfaces is recommended for the security measures. But you are connected to the FortiGate through that interface the FortiGate will log you out and you must navigate to the new IP address assigned to the interface and login again.
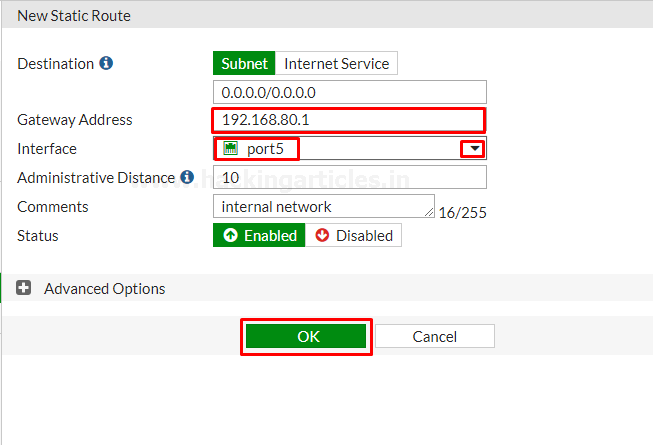
Add a Default Route
Now Go to Network > Static Routes and create a new Route to allow your FortiGate to reach the internet

Set destination to subnet and enter IP/Netmask of Eight Zeros. Set the Gateway to the Gateway IP
provided by your ISP and the interfaces to the internet-facing interface then save the Route.
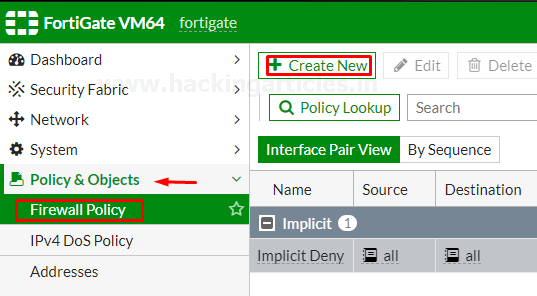
Create an IPV4 Firewall Policy
Firewall policy designed in a manner to examine Network Traffic using policy statements to block unauthorized access while permitting authorized communication.
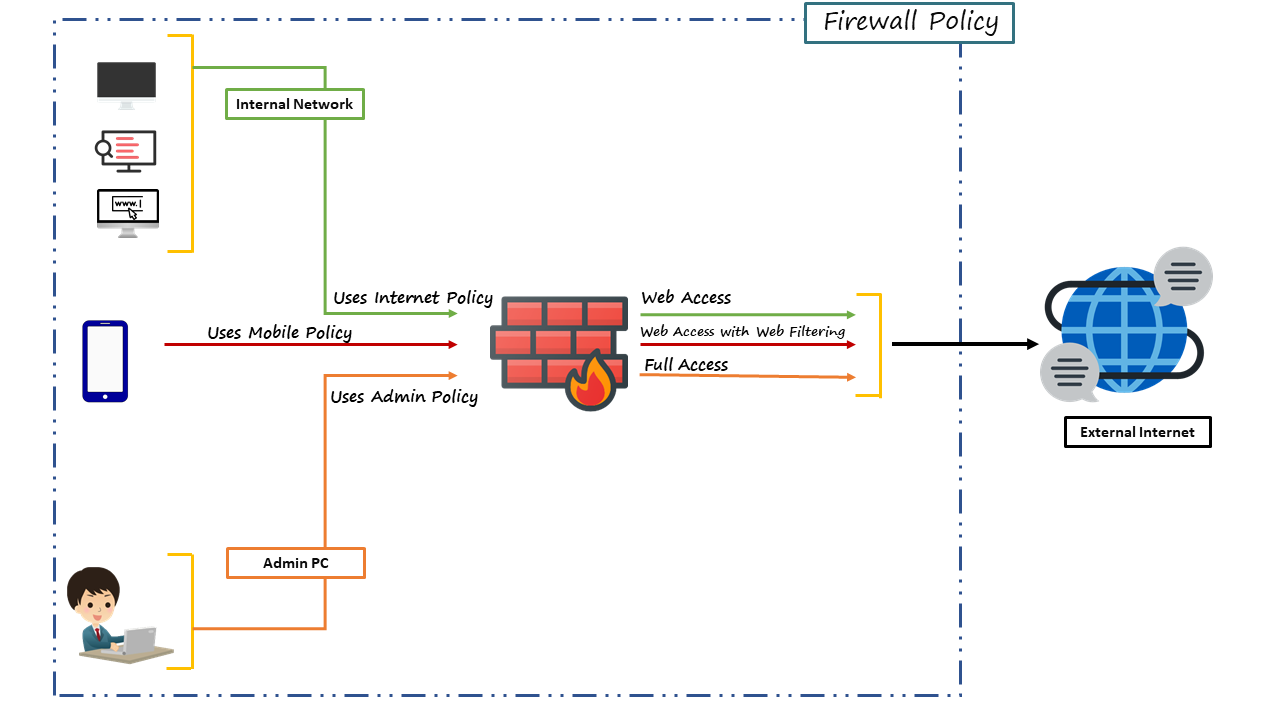
Go to Policy & Objects > Firewall Policy and create a new policy which allow internet traffic through the FortiGate.
Name the policy as “Internet-Traffic” or whatever you want. Set the incoming interface to the “Internal interface” and outgoing interface to the internet facing interface. Set the rest to allow “ALL” Traffic or you can select multiple rules by selecting the + icon and the action to “Accept” enable the “NAT” and make sure “Use Outgoing Interface Address is enabled”

Scroll down to view the logging options to Log and track internet traffic “enable Log Allowed Traffic and select All session”

After saving it you can check your saved policy is going back to a firewall policy

As you can see the policy successfully enabled.
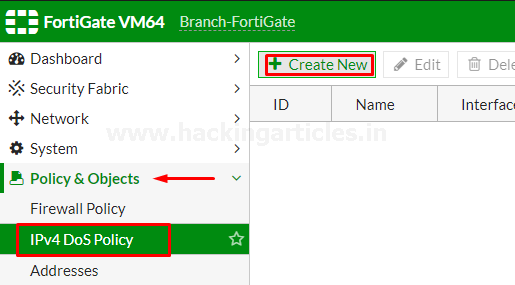
Create an IPv4 Dos Policy
Dos policy is a traffic anomaly detection feature to identify network traffic that does not fit known or common traffic patterns. Dos policies are used to apply Dos anomaly checks to network traffic based on the FortiGate interface. A common example of anomalous traffic is the Dos (Denial of Service) Attack. A denial of service occurs when an attacking system starts an abnormally large number of sessions with the target system and resultant a large number of sessions slow down or disables the target system.
To configure IPV4 policy
- Go to Policy & Objects > IPv4 Dos Policy
- To create a new policy, select the Create New icon in the top left side of the right window.
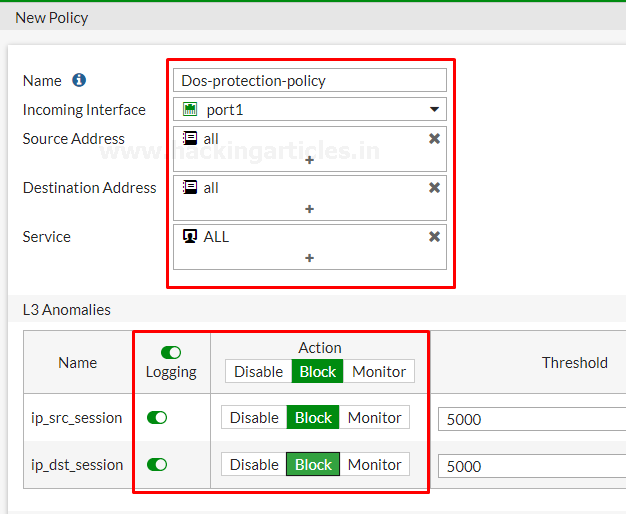
Set the incoming interface parameter by using drop-down menu to select a single interface.
Set the Source Address, Destination Address, and Service to “ALL”. Single or multiple options can be selected as per your requirement.
Set the parameters for various type of Traffic Anomalies.
The breakup of traffic anomalies table is divided into 2 parts.
- L3 Anomalies
- L4 Anomalies
Here is the list of Anomaly profile that includes:
L3 Anomalies
- Ip_src_session
- Ip_dst_session
L4 Anomalies
- tcp_syn_flood
- tcp_port_scan
- tcp_src_session
- tcp_dst_session
- udp_flood
- udp_scan
- udp_src_session
- udp_dst_session
- icmp_flood
- icmp_sweep
- icmp_src_session
- sctp_flood
- sctp_scan
- sctp_src_session
- sctp_dst_session

It all your choice whether or not to enable this policy and default is enabled. Here in our case, we have blocked some of the actions with the limited threshold values to check whether these policies working or not.
All Anomalies have the following parameters that can be set on Per Anomaly or Per Column Basis
- Status: – from this menu you can enable or disable the indicated profile.
- Logging: – Enable or Disable tracking and logging of the indicated profile being triggered.
- Action: – choices yours whether to pass or block traffic when it reaches the threshold limit.
- Threshold: – It is the number of anomalous packets detected before triggering the action.
And at last, select the ok button and save the policy.

As we can see Dos-protection-Policy is successfully deployed.
Let’s check these policies are truly protect the network from Dos attacks or not.
Hmm, exited
Let’s do it
Fire up the Attacker Machine kali Linux and run the following command
hping -c 15000 -d 120 -S -w 64 -p 80 –flood –rand-source 192.168.200.128
where 192.168.200.128 is the management IP of FortiGate
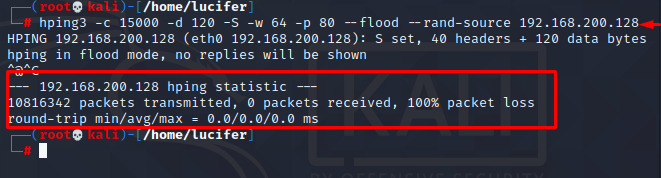
As we can see it blocks whole traffic that means it works properly.
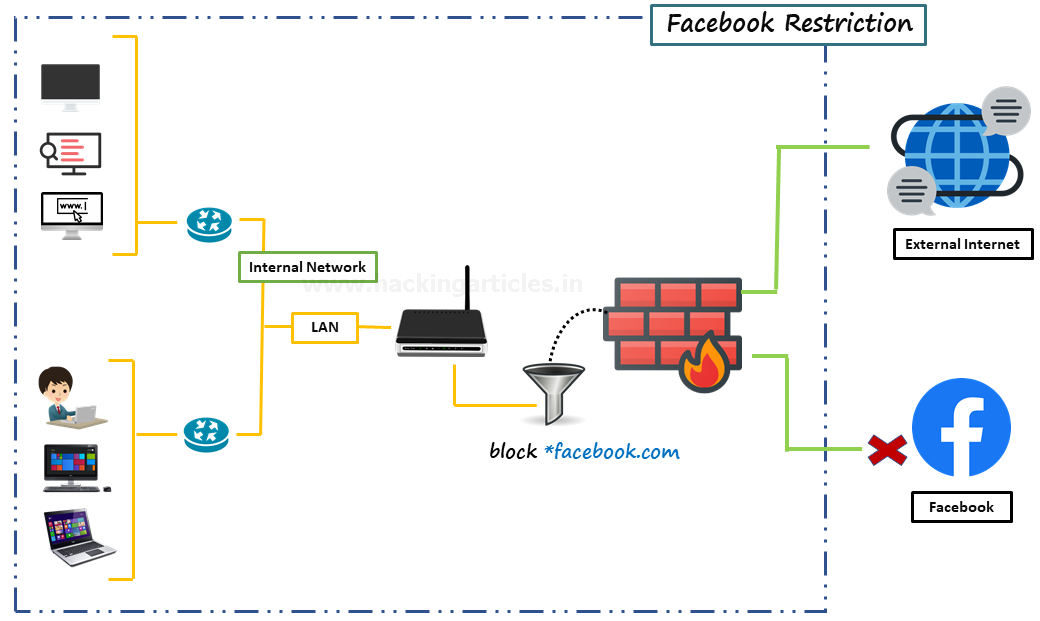
Blocking Facebook with Web filter
In this part, we are going to explain how to use a static URL filter to block access to Facebook and its subdomain in our network.
With the help of SSL inspection, you can also ensure that Facebook and its subdomains are also blocked whenever it will be accessed through HTTPS.
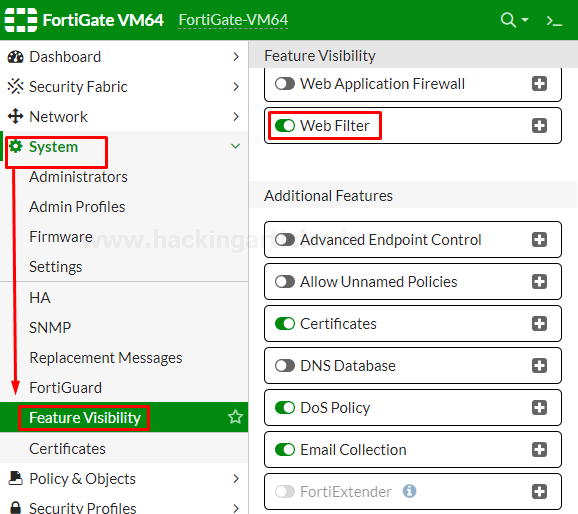
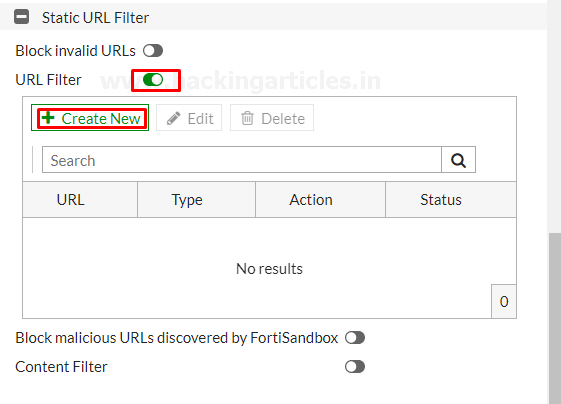
Enable web Filter
Go to system > feature Visibility and enable the Web Filter Feature
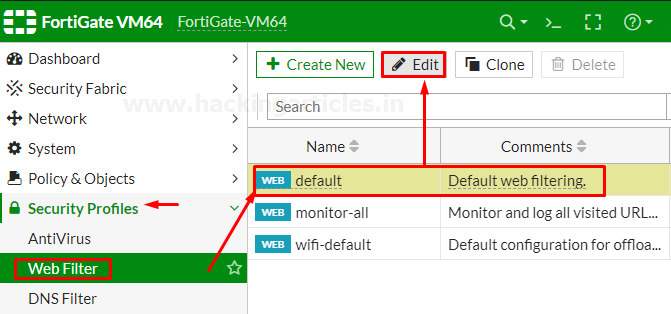
Enable Default Web Filter Profile
Go to Security profiles > Web filter and edit the default Web filter profile
Now go to Static URL filter, select the URL filter and then select “create”.
Further then Set URL to “facebook.com”, set Type to “Wildcard”, set Action to “Block” and set status to “Enable”.
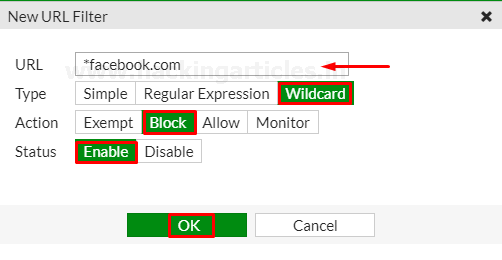
save it by selecting OK
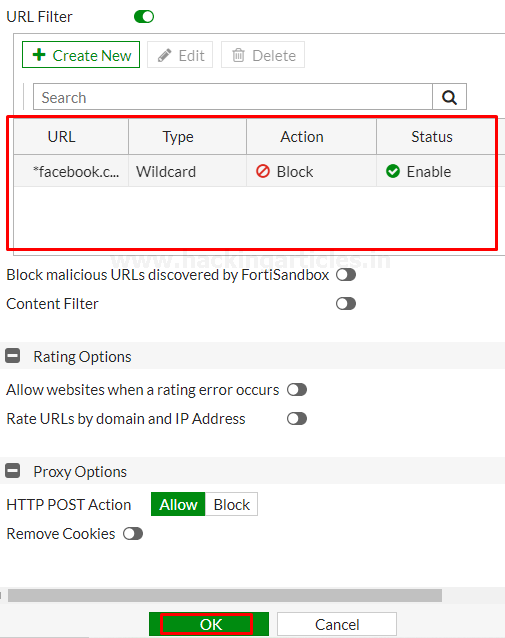
Now you have successfully enabled web filter to block Facebook.
Create Web Filter Security Policy
Go to Policy & Objects > Firewall Policy and Create a New policy.
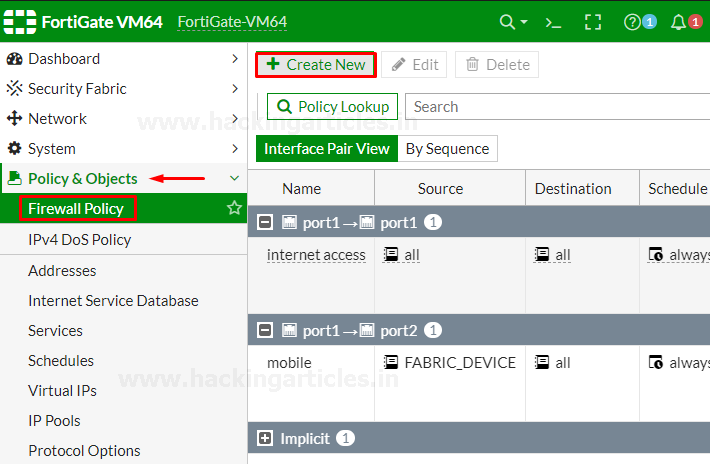
Give the name to the policy “No-Facebook-Internet-Access” to make it identifiable.
Set Incoming Interface to the internal network and set Outgoing Interface to the Internet-facing interface. Set the rest to allow “ALL” Traffic or you can select multiple rules by selecting the + icon and the action to “Accept” enable the “NAT” and make sure “Use Outgoing Interface Address is enabled”
Under Security Profiles, enable “Web Filter” and select the default web filter profile.

Now we have successfully deployed the policy that block the user to visit Facebook and its subdomains. But don’t forget one important thing this policy won’t work until it is on the top of list of deployed policies. Confirm this by viewing policies “By Sequence”.
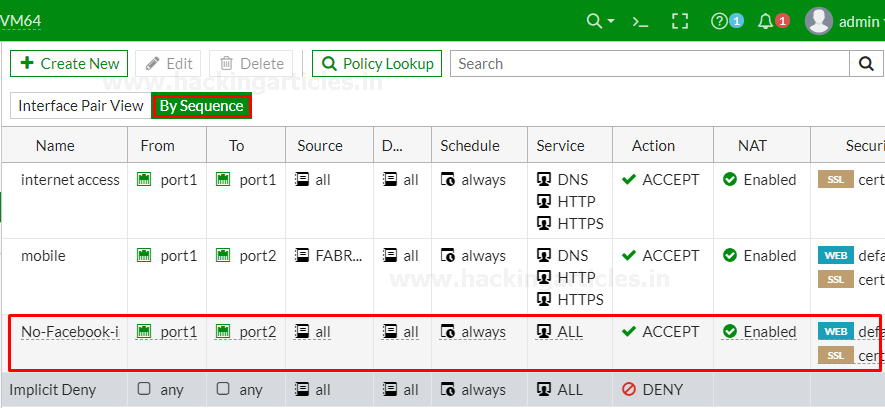
To move Policy up or down, select the policy and drag it up or down as per your requirement as shown below

Now this policy is in effect and successfully enabled.
So, in this part, we have covered some basic policies that is much needed to save you network from unauthorized traffic.
In the next part, we are going to discuss some Advance policies till then make yourself more creative in the manner to how you gonna make it more effective.
Reference: –http://docs.fortinet.com/document/fortigate/6.2.4/cookbook/856100/dashboard
Author – Vijay is a Certified Ethical Hacker, Technical writer and Penetration Tester at Hacking Articles. Technology and Gadget freak. Contact Here
Nice
Very nice