Defend against Brute Force Attack with Fail2ban
Daily we hear some news related to cybercrime just, like, some malicious users or bots have successfully defaced some publicly accessible websites or some services. As we always try to explain through our articles, how such types of activities are possible when the system is weakly configured or misconfigured. It is therefore important to build some security measures, such as IDS / IPS in the firewall, to defend your server and clients while configuring it.
In this article, we will show how you can protect your network from brute force attacks and running network services?
The answer is: Using IPS in your network.
Table of Content
- What is an IPS?
- Introduction to fail2ban
- Lab Setup Requirement
- Brute Force Attack in Absence of IPS
- Intrusion Prevention Lab Set-Up
- Configure Fail2Ban
- Protect SSH Against Brute Force Attack
- Testing Fail2ban
- How to unban IP in fail2ban for SSH
- Protect FTP against Brute Force Attack
- Testing Fail2ban for VSFTP
- Unban IP for VSFTPD
What is an IPS?
Intrusion Prevention System is short-term as IPS, it networks security measures to examine the incoming traffic to perform intrusion detection and then block the detected incidents. For example, IPS can drop malicious packets, ban the traffic coming from an offending IP address.
Introduction to fail2ban
Fail2ban scans log files (e.g. /var/log/apache/error_log) and ban IPs that show the malicious signs — too many password failures, seeking for exploits, etc. Generally, Fail2Ban is then used to update firewall rules to reject the IP addresses for a specified amount of time.
In this article, I will discuss how to prevent your running services against brute force attack using fail2ban.
Source: https://www.fail2ban.org/wiki/index.php/Main_Page
Lab Setup Requirement
Victim’s Machine: Ubuntu 14.04 (192.168.0.105)
Pentester’s Machine: Kali Linux (192.168.0.105)
Brute Force Attack in Absence of IPS
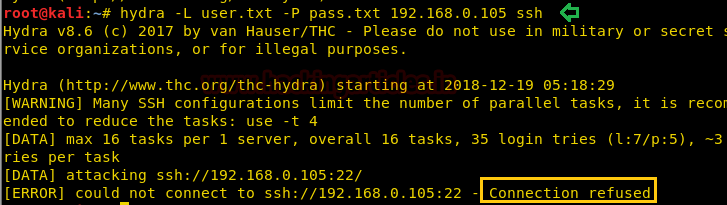
Now let’s try to launch a brute force attack when on port 22 which is open in the target’s network to make unauthorized login. With the help hydra, we will try to guess SSH login credential.
hydra -L user.txt -P pass.txt 192.168.0.105 ssh
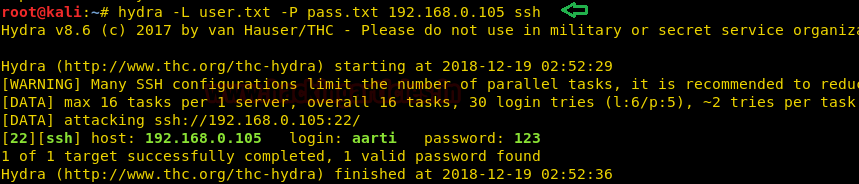
As you can observe in the above image that it has successfully found aarti:123 for ssh login. Similarly, let’s try to launch a brute force attack when on port 21 which is open in the target’s network to make unauthorized login. With the help hydra, we will try to guess FTP login credential.
hydra -L user.txt -P pass.txt 192.168.0.105 ftp
And from the given below image, you can observe, how badly these services are configured. Even the network administrator has not followed the password complexity rules as a result, it is so easy to launch a brute force against such type of network.

Intrusion Prevention Lab Set-Up
Therefore, I decided to set up the Intrusion Prevention system in this network which will monitor the incoming packets and detects the malicious activities and blocks that traffic coming from wicked IP. It is very easy to install fail2ban as Ubuntu already has a package for fail2ban in apt-repositories.
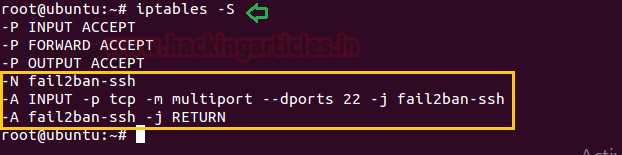
First of all, let me show you, the iptables rule list, which is empty as shown in the below image and then executes the installation command. Once it gets completed, then copy the configuration of jail.conf file inside jail.local file.
sudo iptables -S
sudo apt-get install fail2ban
NOTE: While configuring fail2ban in your local machine, you must have root access or can use a non-root user with sudo rights.

Configure Fail2Ban
The service fail2ban has its default configuration files “jail.local” in the /etc/fail2ban directory, therefore, you should not edit this file, but you can override this into jail.local file with the help of below command and then open that file for configuring it as per your requirement.
Above you have seen that we had successfully launched brute force attack on SSH and FTP, therefore I will configure fail2ban to stop brute force attack in the network.
sudo cp /etc/fail2ban/jail.conf /etc/fail2ban/jail.local
sudo gedit /etc/fail2ban/jail.local
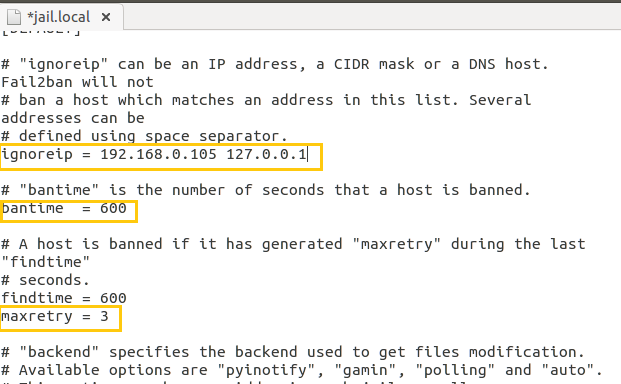
Once the file gets opened you need to focus a few things such as “ignoreip, bantime, maxretry” and then modify their value as per your requirement. Set the IPs you want fail2ban to ignore as ignoreip, set the ban time (in seconds) for a particular time period and maximum number for the user attempts.
ignoreip = 192.168.0.105 127.0.0.1
bantime = 600
maxretry = 3
Protect SSH Against Brute Force Attack
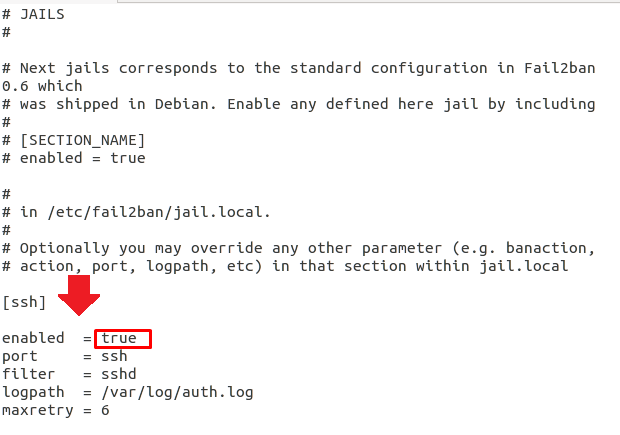
Ultimately, we come towards that portion of the configuration file which deals with specific services. These are identified by the section headers, such as [ssh].
To enable each of these sections to uncomment header [ssh] and modify the enabled value into “true” as shown in the below image, and then save the jail.local file and restart the fail2ban service:
[ssh]
enabled = true
service fail2ban restart
Testing Fail2ban for SSH
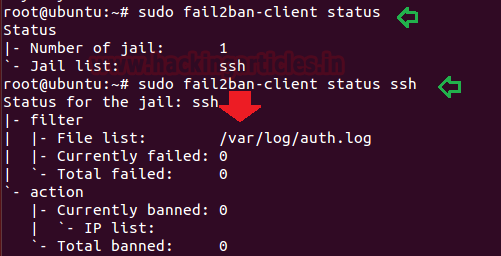
Fail2ban offers a command “fail2ban-client” that can be used to execute Fail2ban from the command line, to check that the Fail2Ban is running and the SSH jail is enabled you can follow the given syntax to confirm its status.
Syntax: fail2ban-client COMMAND
sudo fail2ban-client status
sudo fail2ban-client status ssh
As you can observe, the current filter list and action list is set as 0 or all I can say, it is empty. These values will get change if someone tries to cross the limit of maxretry.
As said above fail2ban will update iptables rules to reject the IP addresses for a specified amount of time and from the given below image you can observe, last 3 policies are automatically created by fail2ban.
Now let’s test host machine against brute force attack for ssh login once again:
hydra -L user.txt -P pass.txt 192.168.0.105 ssh
And as you can obverse, this time we got “Connection refused” error while brute forcing attack on port 22.
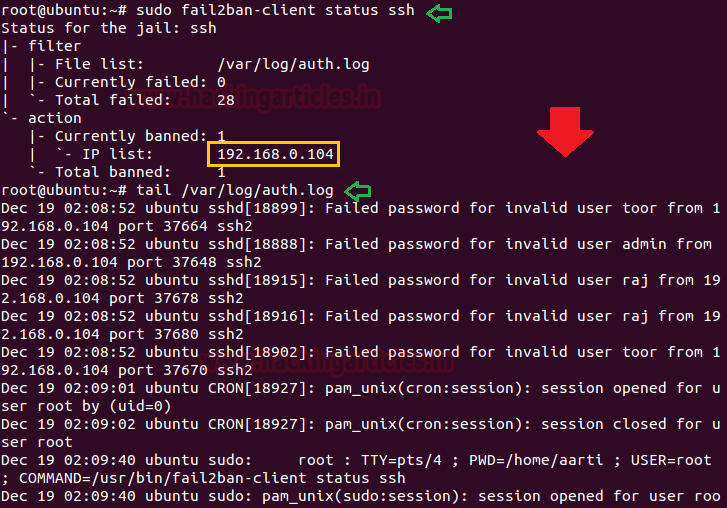
Hmm!! Not bad, let’s also check the status for ssh jail status after this attack.
sudo fail2ban-client status ssh
Now you can observe that in the given below image, it has shown 1 ban IP: 192.168.0.104 and anybody can explore log file too for more details.
tail /var/log/auth.log
How to unban IP in fail2ban for SSH
If you wish to unban the IP then again, you can go with fail2ban-client commands and do the same as done here:
fail2ban-client -i
set ssh unbanip 192.168.0.104
exit
sudo fail2ban-client status ssh
And when you will check ssh jail status one more time, this time it won’t be showing any IP in the IP list.

Protect FTP against Brute Force Attack
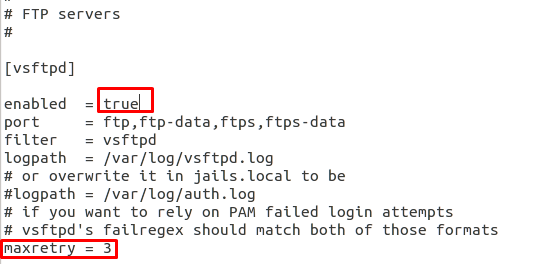
Similarly, to enable FTP sections to uncomment [vsftpd] header and change the enabled line to be “true” as shown in the below image and even you can modify maxretry or log file path as per your requirement.
[vsftpd]
enabled = true
maxretry = 3
Testing Fail2ban for VSFTPD
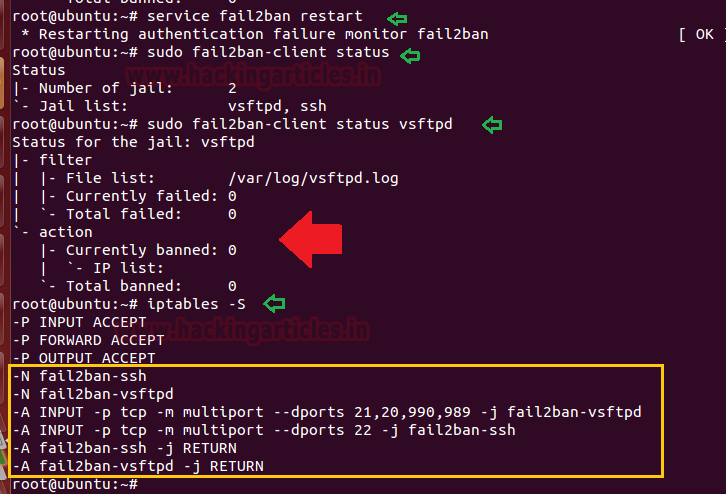
Now save jail.local file and restart the fail2ban service and then you can check fail2ban and its Jail status including iptables rules.
sudo service fail2ban restart
sudo fail2ban-client status
sudo fail2ban-client status vsftpd
iptables -S
With the help of the above command, we concluded that now there are two jails: ssh and vsftpd and also some new fail2ban policies have been created within iptables.
Now let’s test host machine against brute force attack for FTP login:
hydra -L user.txt -P pass.txt 192.168.0.105 ftp

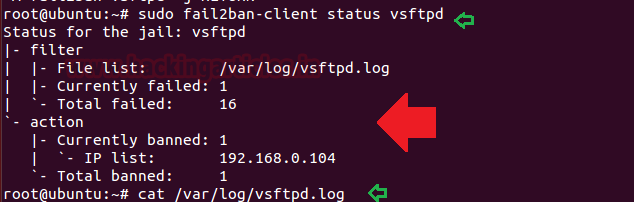
And as you can obverse, this time we got connection refused error while brute force attack and let’s check status for vsftpd jail status once again.
sudo fail2ban-client status vsftpd
Yet again you can observe that in the given below image, it has shown 1 ban IP: 192.168.0.104 and anybody can check log file too for more details.
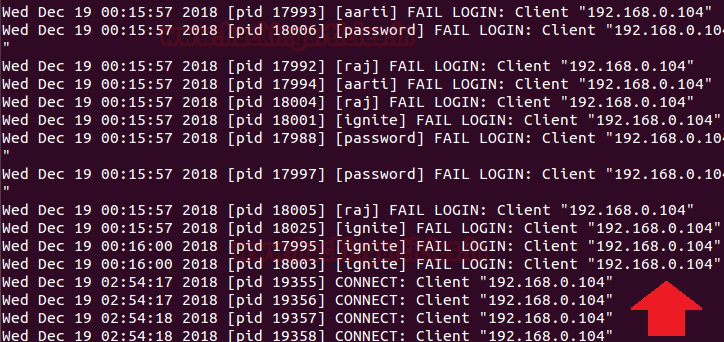
tail /var/log/vsftpd.log
And look at the vsftpd log file, contains all detailed related to login attempt.
Unban IP in fail2ban for VSFTPD
If you wish to unban or unblock the IP then again, you can go with fail2ban-client commands and do the same as done here:
sudo fail2ban-client -i
set vsftpd unbanip 192.168.0.104
exit
sudo fail2ban-client status vsftpd
And when you will check vsftpd jail status once again, this time it won’t be showing any IP in the IP list.

Hope! You people will enjoy the article and find helpful in your network penetration testing and you can do more with fail2ban for securing your network.
Author: AArti Singh is a Researcher and Technical Writer at Hacking Articles an Information Security Consultant Social Media Lover and Gadgets. Contact here
Nice article.