Comprehensive Guide on Snort (Part 1)
This article will introduce a guide to understand IDS using Snort as an example for it.
Table of Content :
- Introduction to IDS
- Categories of IDS
- Types of IDS
- Introduction to Snort
Introduction to IDS
IDS Stands for Intrusion Detection System. The techniques and methods on which an IDS is founded on are used to monitor and reveal malicious activities both on the host and network level. Once the said activities occur then an alert is issued to aware every one of the attack. It can be hardware or software or a combination of both; depends on the requirement. An IDS use both signature or anomaly based technique together or separately; again depending on requirement. Your network topology determines where to add intrusion detection systems. Whether it should be positioned at one or more places depends on if you want to track internal threat or external threat. For instance, if you want to protect yourself from external traffic then you should place an IDS at the router and if you want to protect the inner network then place the IDS on every network segment.
Categories of IDS
Signature-Based IDS
This IDS verifies signatures of data packets in the network traffic. Basically, it finds the data packets and uses their signatures to confirm whether they are a threat or not. Such signatures are commonly known for intrusion-related signatures or anomalies related to internet protocol. Intruders such as computer viruses, etc, always have a signature, therefore, it can be easily detected by software IDS. As it uses signatures to identify the threats.
Anomaly IDS
This IDS usually detects if a data packet behaves anomaly. It issues an alert if packet anomalies are present in protocol header parts. This system produces better results in some cases than signature-based IDS. Normally such IDS captures data from the network and on these packets, it then applies the rules to it in order to detect anomalies.
Types of IDS
NIDS
NIDS stand for Network Intrusion Detection System. These types of IDS will capture data packets that were received and sent in the network and tally such packets from the database of signatures. if the packet is a match then no alert will be issued otherwise it will issue an alert letting everyone know of a malicious attack. Snort is an excellent example of a NIDS.
HIDS
HIDS stands for Host Intrusion Detection System which, obviously, acts as a host. Such types of IDS monitor system and application logs to detect intruder activity. Some IDS reacts when some malicious activity takes place, others monitor all the traffics coming to the host where IDS is installed and give alerts in real time.
Introduction to snort
Snort is a Network Intrusion Detection System (NIDS). It’s quite popular and is open source software which helps in monitor network traffic in real-time, hence it can also be considered as a packet sniffer. Basically, it examines each and every data packet in depth to see if there are any malicious payloads. it can also be used for protocol analysis and content searching. It is capable of detecting various attacks like port scans, buffer overflow, etc. It’s available for all platforms i.e. Windows, Linux, etc. It doesn’t require any recompilation with the system or hardware to added to your distribution; root privileges are required though. It inspects all the network traffic against the provided set of rules and then alerts the administration about any suspicious activity. it’s divided into multiple components and all the components work together to detect an intrusion. Following are the major components of snort :
- Packet Decoder
- Pre-processors
- Detection Engine
- Logging and Alerting System
- Output Modules
Installation of Snort
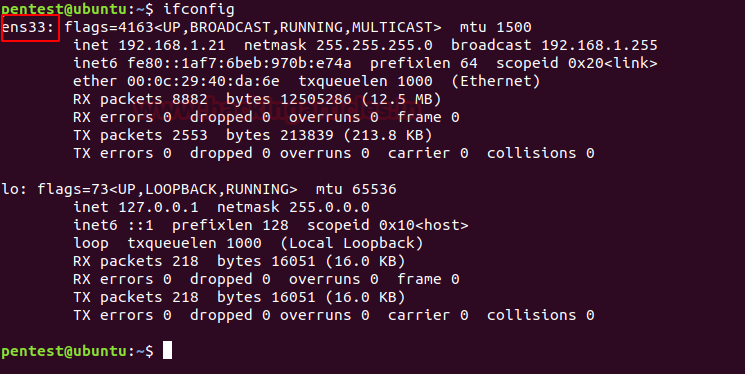
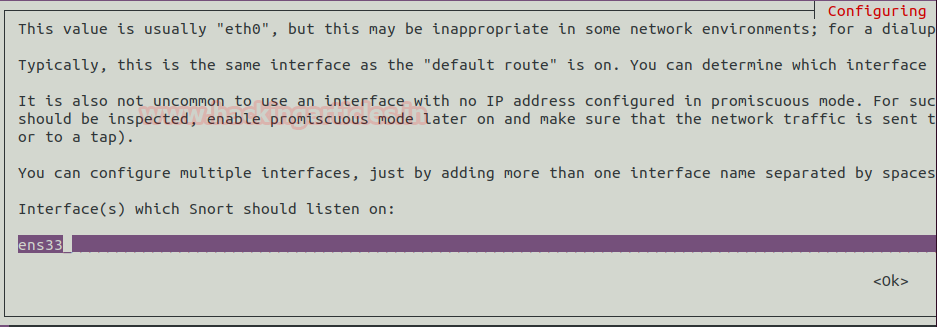
First, use the ifconfig command in your Ubuntu to check the interface. As you can see the image below the interface is ens33.
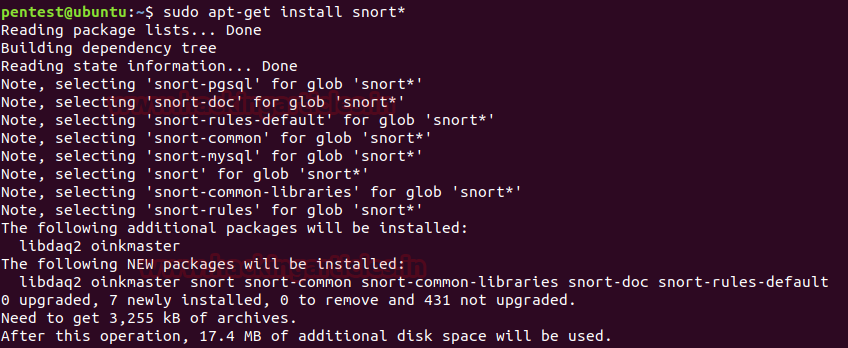
Now, let’s install snort by using the following command :
sudo apt-get install snort*
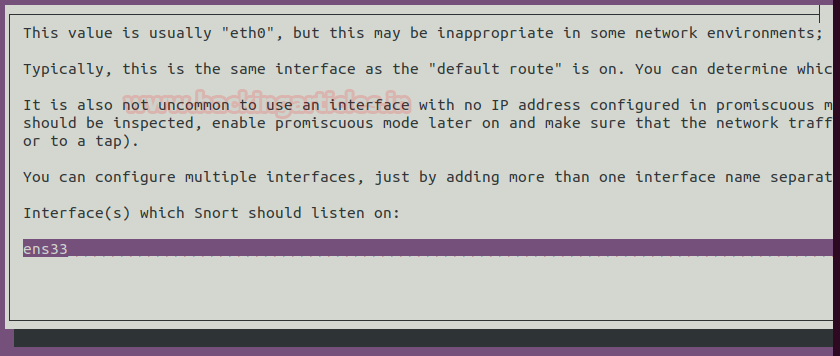
Once the installation starts, it will ask you the interface that we previously checked. Give its name here and press enter.
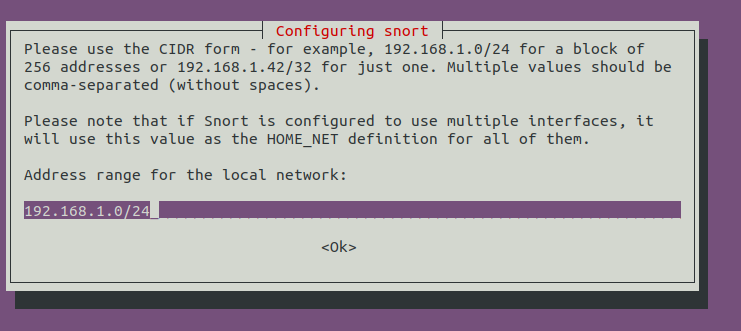
Then it will ask you about your network IP. Here, you can either provide a single IP or the range of IPs as we have given below in the image :
Then possible, it will again ask you for the name of the interface, provide it again and press enter.
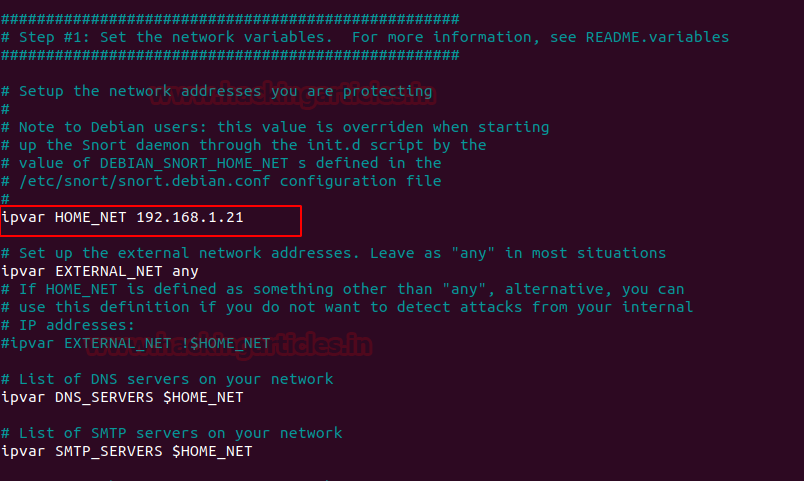
As the snort is installed, open the configuration file using nano or any text editor to make some changes inside. Use the following command to do so :
sudo nano /etc/snort/snort.conf
Scroll down the text file near line number 45 to specify your network for protection as shown in the given image.
#Setup the network addresses you are protecting
ipvar HOME_NET 192.168.1.21
Now run given below command to enable IDS mode of snort :
sudo snort -A console -i ens33 -c /etc/snort/snort.conf
The above command will compile the complete file and test the configuration setting automatically as shown in given below image:

Once the snort is installed and configured, we can start making changes to its rules as per our own requirement and desire. To the rules on which snort works use the following command :
cd /etc/snort/rules
ls -la
As shown in the image below, you can find all the documents related to rules.

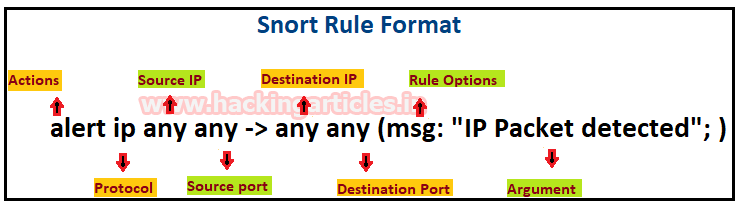
Snort Rule Format
Snort offers its user to write their own rule for generating logs of Incoming/Outgoing network packets. Only they need to follow the snort rule format where packets must meet the threshold conditions. Always bear in mind that the snort rule can be written by combining two main parts “the Header” and “the Options” segment.
The header part contains information such as the action, protocol, the source IP and port, the network packet Direction operator towards the destination IP and port, the remaining will be considered in the options part.
Syntax: Action Protocol Source IP Source port -> Destination IP Destination port (options)
Header Fields:-
Action: It informs Snort what kind of action to be performed when it discovers a packet that matches the rule description. There are five existing default job actions in Snort: alert, log, pass, activate, and dynamic are keyword use to define the action of rules. You can also go with additional options which include drop, reject, and sdrop.
Protocol: After deciding the option for action in the rule, you need to describe specific Protocol (IP, TCP, UDP, ICMP, any) on which this rule will be applicable.
Source IP: This part of header describes the sender network interface from which traffic is coming.
Source Port: This part of header describes the source Port from which traffic is coming.
Direction operator (“->”, “<>”): It denotes the direction of traffic flow between sender and receiver networks.
Destination IP: This part of header describes the destination network interface in which traffic is coming for establishing the connection.
Destination Port: This part of header describes the destination Port on which traffic is coming for establishing the connection.
Option Fields:
The body for rule option is usually written between circular brackets “()” that contains keywords with their argument and separated by semicolon “;” from another keyword.
There are four major categories of rule options.
General: These options contains metadata that offers information with reference to them.
Payload: These options all come across for data contained by the packet payload and can be interconnected.
Non-payload: These options come across for non-payload data.
Post-detection: These options are rule specific triggers that happen after a rule has fired.”
General Rule Options (Metadata)
In this article are going to explore more about general rule option for beginners so that they can easily write a basic rule in snort rule file and able to analyst packet of their network. Metadata is part of the optional rule which basically contains additional information of about snort rule that is written with the help of some keywords and with their argument details.
| Keyword | Description |
| msg | The msg keyword stands for “Message” that informs to snort that written argument should be print in logs while analyst of any packet. |
| reference | The reference keyword allows rules to a reference to information present on other systems available on the Internet such as CVE. |
| gid | The gid keyword stands for “Generator ID “which is used to identify which part of Snort create the event when a specific rule will be launched. |
| sid | The sid keyword stands for “Snort ID” is used to uniquely identify Snort rules. |
| rev | The rev keyword stands for “Revision” is used to uniquely identify revisions of Snort rules. |
| classtype | The classtype keyword is used to assigned classifications and priority numbers to the group and distinguish them a rule as detecting an attack that is part of a more general type of attack class.
Syntax: config classification: name, description, priority number. |
| priority | The priority keyword to assigns a severity rank to your rules. |
Let’s start writing snort rule:
To check whether the Snort is logging any alerts as proposed, add a detection rule alert on IP packets in the “local.rules file”
Before writing new rules let’s empty the ICMP rule file by using the following command :
echo "" > icmp.rules
cat icmp.rules
The cat command will confirm whether the file is empty. Now, let’s empty the icmp-info.rules :
echo "" > icmp-info.rules
cat icmp-info.rules

Now let’s write the rule :
alert icmp any any -> 192.168.1.21 any (msg: "ICMP Packet found"; sid:10000001; )
If you observe in the image below, we have used a one-way arrow which means that snort will alert us about incoming malicious traffic :

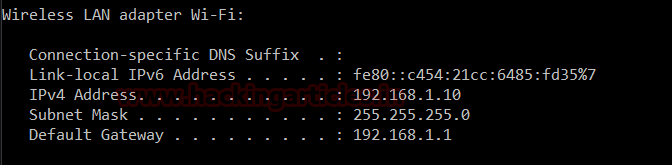
The IP (192.168.1.10) we will attack from is shown in the image shown below :
Now, we will send two packets with the following command :
ping -n 2 192.168.1.21
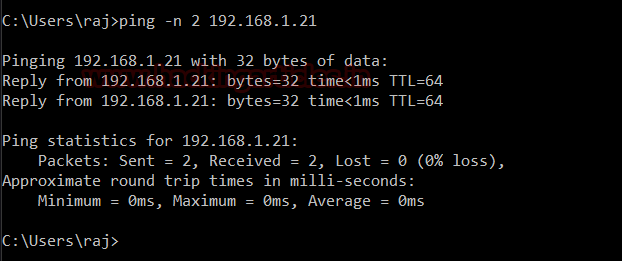
You can check the details of the packets that are being sent :
Use the following command to activate snort in order to catch the malicious packets :
sudo snort -A console -q -u snort -g snort -c /etc/snort/snort.conf -i ens33
Here,
-A Set alert mode: fast, full, console, test or none
-q stands for Quiet, Don’t show banner and status report.
–u Run snort uid as <uname> user
-g Run snort gid as <gname> group (or gid)
-c <rules> Use Rules File
-i listen on interface
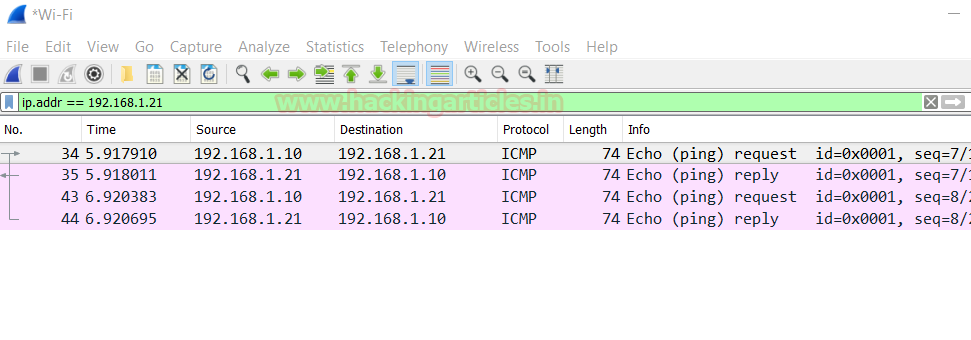
And as you can see in the image below the alerts are being issued by snort :

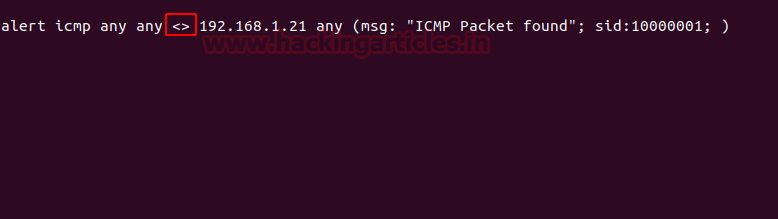
Now, add the following rule to see both incoming and outgoing traffic when an alert is issued :
alert icmp any any <> 192.168.1.21 any (msg: "ICMP Packet found"; sid:10000001; )
As the below image shows in this we have used ‘<>’, it is used in order to monitor both sent and received packets when an alert is issued.
Again we will send two packets like before using the following command :
ping -n 192.168.1.21

And therefore, as a result, you can see both packets as shown in the image below :

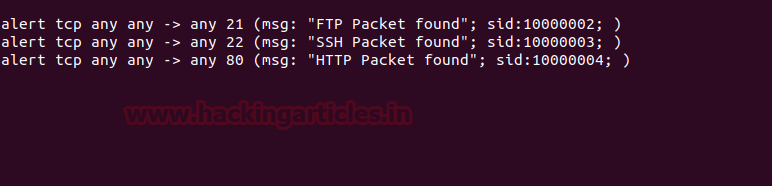
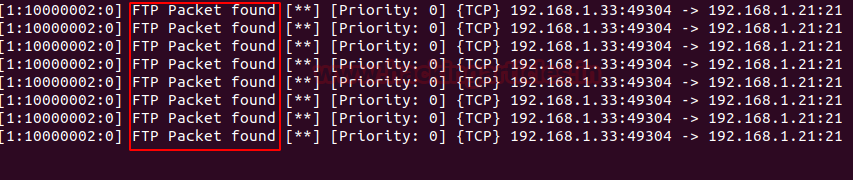
Now we will apply rules on port 21, 22 and 80. This way, whenever a suspicious packet is sent to these ports, we will be notified. Following are the rules to apply to achieve the said :
alert tcp any any -> any 21 (msg: "FTP Packet found"; sid:10000002; )
alert tcp any any -> any 22 (msg: "SSH Packet found"; sid:10000003; )
alert tcp any any -> any 80 (msg: "HTTP Packet found"; sid:10000004; )
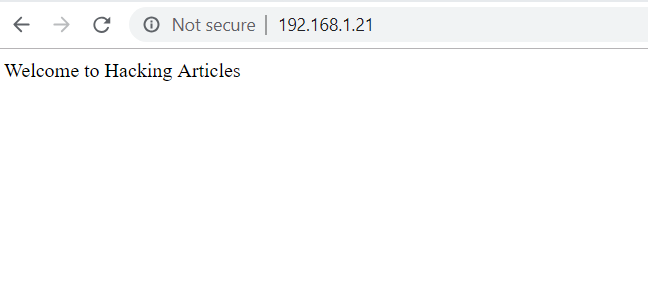
When the packet is sent to port 80 as shown in the image :
Snort will issue an alert of HTTP packet as its shown in the image below :

Similarly, when a data packet sent to ftp as given in the following image :
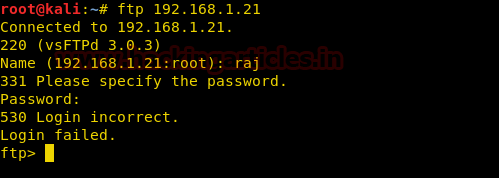
The FTP packets will be detected and one will be notified.
Again, in a similar manner, when one tries to send packets to SSH as shown in the image below :

Snort will notify the administration as shown below :

This way, using snort or any other IDS one can be protected from network attacks by being notified of them in time.
Author: Yashika Dhir is a passionate Researcher and Technical Writer at Hacking Articles. She is a hacking enthusiast. contact here
Hi. when i open to the configure snort.conf file it is empty. Why can be empty?
It should not be empty bro , you must have done something wrong. I will suggest you to try to reinstall it .
Let me know if you need any help.
Cheers!
Make sure you “sudo” before typing the rest of the command
Hi , the command ” echo “” -> ….” doent work and i cant find the command to delete the icmp rules
Hi. Make sure that you have admin privileges’ before executing this command. In other words, you need to be root. Type sudo -i or sudo -s in the terminal and enter password.
Dude, this was a fantastic guide! Thank you very much for your contribution to the community. When are the following parts coming out?
Hey, tnx for sharing!
Hi I have issue of logs and alerts not being generated I have used chef cookbook to install and configure chef can you help me with logging issue.
https://github.com/sous-chefs/snort/blob/master/templates/snort.conf.erb
Hi RAJ,
I cannot thank you enough for teaching me so much and the regular updates on security mitigations. Appreciate your work in helping others and hope you continue doing it and in good health.
I have learned so much for the short time I have been following your posts.