FTP Penetration Testing on Ubuntu (Port 21)
Security on every layer has become mandatory. Port security always make a difference by securing the network as it helps to avoid receiving or sending packets from unknown devices. Using port security, one can limit the number of MAC addresses on a given port or can specify the only IP address that can be connected. This will make all other packets are restricted. You can apply such security measures on every port. In today’s article, we will learn to apply the said security on the FTP port.
Table of Content
- Introduction to FTP
- Uses of FTP
- Working of FTP
- Penetration Testing on FTP
- Installation of FTP
- Anonymous Login
- Disable FTP_banner
- Switch Port for FTP Service
- Sniffing FTP Login credential
- Use SSL Certificate against Sniffing
- Stop FTP Brute_Force Attack with Fail2ban
- Restrict IP to Connect FTP
Introduction to FTP
FTP is a file transfer protocol, used to transfer files between a network using TCO/IP connections via Port 20/21. It is basically a client-server protocol. As it works on TCP, it requires two communication channels between client and server: a command channel and data channel. The command channel is for controlling the conversation between client and server whereas data connection is initiated by the server to transfer data.
Uses of FTP
- An FTP site is a web site where users can easily upload or download specific files.
- FTP by mail allows users without access to the Internet to access and copy files using anonymous FTP by sending an email message to ftpmail@decwrl.dec.com and putting the word help in the body of the text.
- FTP Explorer is an FTP client based on Windows 95 file manager (Windows 95 Explorer).
- An FTP server is a dedicated computer which provides FTP service. This invites hackers and necessitates security hardware or software such as utilizing usernames, passwords, and file access control.
- An FTP client is a computer application which accesses an FTP server. While doing so, users should block incoming FTP connection attempts using passive mode and should check for viruses on all downloaded files.
Working of FTP
FTP works as just like HTTP and SMB protocols. When the FTP server is configured in a network then a specific folder is defined as a shared folder in order to share files. Users can access this file server via FTP. FTP is often authenticated by sign-in protocol; however, FTP server may be configured to accept anonymous as login credentials. But now, it’s mostly FTP with SSL/TLS.
When transferring files through FTP, the user’s machine is called the local host machine and is connected to the internet. Another machine is called the remote host which has FTP running on it and is too connected to the internet. Now, in order to transfer the files, the local host machine connects to remote host’s IP. Then the user must enter the username and password. FTP always provides GUI which makes file transfer user-friendly, here, you can transfer files by drag-and-drop method. Otherwise, you can simply use FTP commands for the desired transfer.
Penetration Testing on FTP
Requirements:
- FTP server: Ubuntu
- Attacking machine: Kali
- Client machine: Windows
Installation of FTP
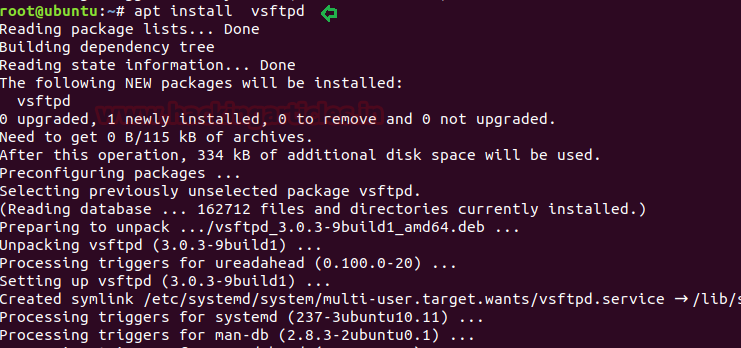
Installation FTP is quite easy. To install FTP, open the terminal in ubuntu as root user and type:
apt install vsftpd
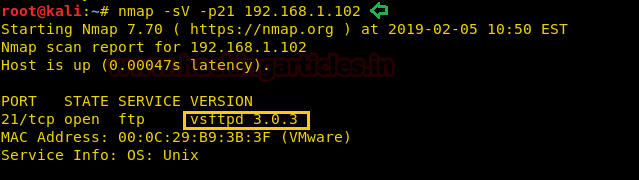
Once FTP is installed use nmap to confirm and to do so, type the following command:
nmap -p21 192.168.1.102
As you can see that FTP is working on port 21.

Anonymous Login
As I have mentioned before, that FTP credentials can be set to anonymous and this is found often on many FTP servers. FTP users may authenticate themselves with a clear-text sign-in protocol, normally in the form of a username and password, but can connect anonymously if the server is configured to allow it. So, let’s see how it will be done by first configuring it anonymous. Open vsftpd.conf using nano or any other text editor. Find “anonymous_enable=NO” statement as shown in the image below:

Change NO to YES to enable anonymous as shown here:

Now let’s check it from nmap by using the following command:
nmap -A -p21 192.168.1.102

As the result shown by nmap, you can see that port 21 is open and you some details about it to like its version. Now, let’s try and log in FTP using anonymous as our credentials. Now, let’s try and login:
ftp 192.168.1.102
Enter anonymous as username and password as shown in the image below as you will find you in the ftp server.

Disable FTP_banner
Now if you scan ftp from nmap you will its version:
nmap -sV 192.168.1.102
As this visibility of the version can leave you vulnerable to various exploits lets now learn how you will protect yourself by hiding the banner of ftp. For this, again open vsftpd.conf file using any desired text editor.

In the conf file fond the statement “ ftpd_banner=welcome to blah FTP service”. From this statement remove the # symbol as shown in the image below :

Now if you again scan from nmap if will hide the banner. Try it by using the following command:
nmap -sV -p21 192.168.1.102

Switch Port for FTP Service
Like this, you can add another security layer by changing the port of ftp. You can start the service of ftp on any port you like. Here, we have shifted the FTP port to 5000. For this, find the statement “listen_port=21” in the ftp conf file. Change the port number to 5000, or any other number as you desire, as shown in the image below:

Save the file and restart the service of ftp. Now if you scan from nmap you will find the port is now on 5000. Applying such layer of security helps to confuse attackers.

Sniffing FTP Login Credential
By default, the traffic sent to and received from ftp is not encrypted. An attacker can take help of sniffing tools to sniff the data packet traveling between server and client in a network and retrieve credential. And then use them for unauthorized access. As we have discussed above FTP users may authenticate themselves with a clear-text sign-in protocol for username and password.

Similarly, if we capture TCP packet through Wireshark for sniffing FTP credential. So, now try and log in to ftp using the following commands:
ftp 192.168.1.102 5000
Give the username and password.
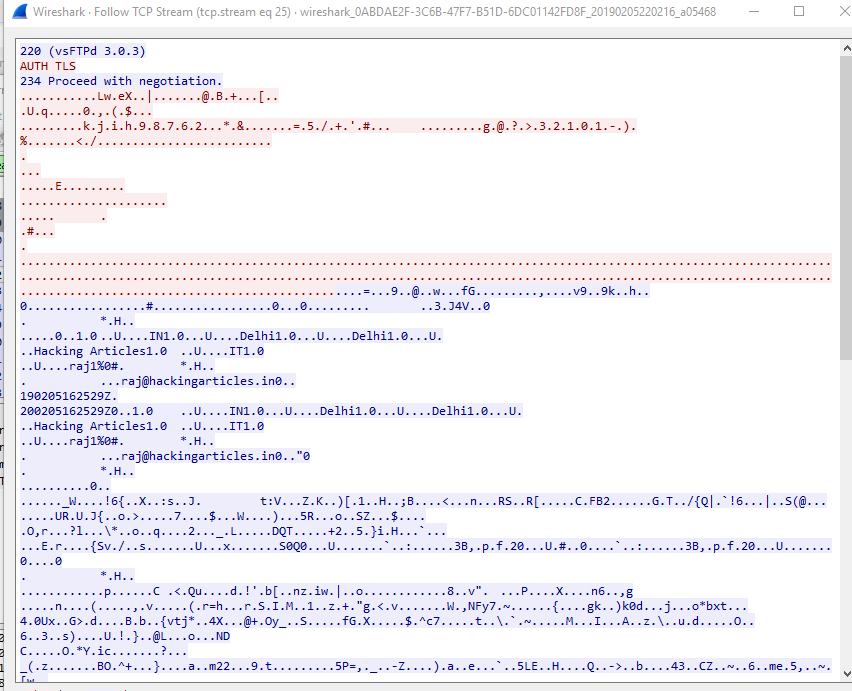
Capture the traffic using Wireshark. Now, in Wireshark, if you follow the TCP stream of the packet, you can see the login credentials in clear text as shown in the following image:

Use SSL Certificate against Sniffing
So, for this, let’s add another security layer for the problem generating above. The solution for this is creating an SSL certificate. SSL stands for Secure Sockets Layer, the protocol which provides secure, encrypted communications between server and client, this encrypted data packet traveling between server-client networks.
Although an attacker can sniff network data packet but will be not able to read fetched information because entire data will show in the form of ciphertext.
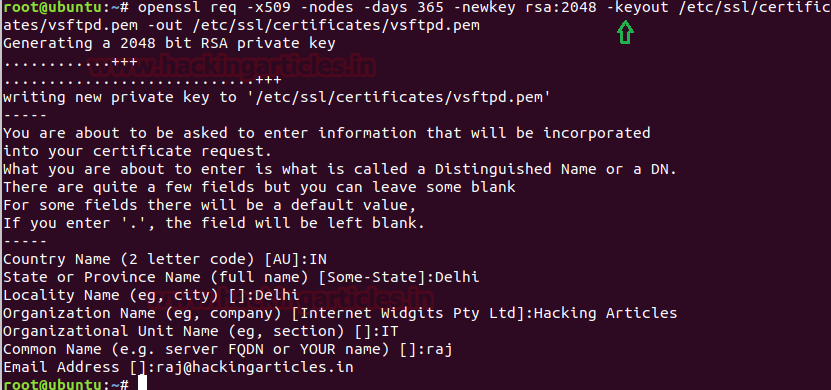
Here administrations need to generate their own SSL certificate for secure authentication. Make the directory where the SSL certificate keys will be stored.
Use the following command to create a certificate:
openssl req -x509 -nodes -days 365 -newkey rsa:2048 -keyout /etc/ssl/private/vsftpd.pem -out /etc/ssl/private/vsftpd.pem
Once the above command is executed, open vsftpd.conf file for changing default setting by adding a few lines at the end of the file. Following are the lines to be added:
rsa_cert_file=/etc/ssl/private/vsftpd.pem
rsa_private_key_file=/etc/ssl/private/vsftpd.pem
ssl_enable=YES
allow_anon_ssl=NO
force_local_data_ssl=YES
force_local_logins_ssl=YES
ssl_tlsv1=YES
ssl_sslv2=NO
ssl_sslv3=NO
require_ssl_reuse=NO
ssl_ciphers=HIGH

Now let’s ensure whether we can connect to FTP server.
Protocol to: FTP
Encryption To: TSL/SSL Explicit encryption
Hostname: IP of the FTP Server
Port: 21
Username and Password: raj: 123

Now the server will send the certificate to an authorized user click on yes to store certificate and continue the encrypted connecting.
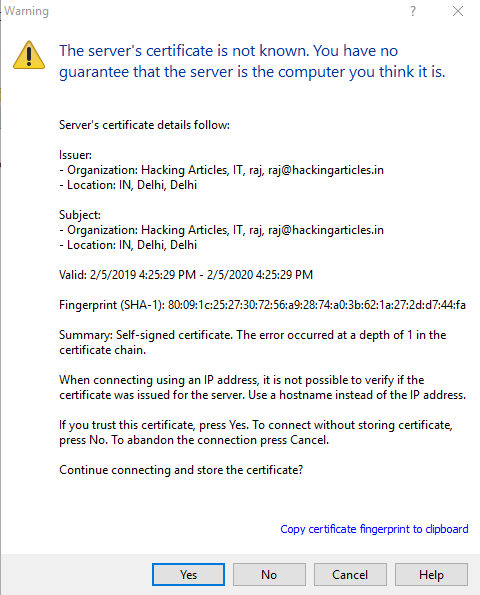
Now, when you will establish the connection of FTP as shown in the image below:

All the traffic that is sent and received is encrypted which you can check through Wireshark. It has also shown below:
Stop FTP Brute_Force Attack with Fail2ban
Hydra is often the tool of choice for bruteforce. It can perform rapid dictionary attacks against more than 50 protocols, including telnet, FTP, HTTP, HTTPS, SMB, several databases, and much more. Now, to bruteforce our ftp server we need to choose a word list. As with any dictionary attack, the wordlist is key.
Run the following command to execute bruteforce :
hydra -L user -P pass 192.168.1.102 ftp
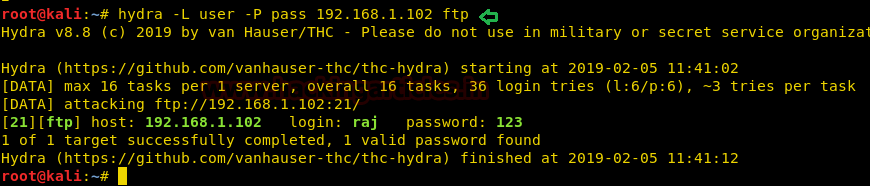
As you can see, using hydra we have logged in credentials and so are a bruteforce attack is successful. But we can protect our ftp server and important files. To be secure against bruteforce, you can use the fail2ban tool. To get a detailed guide on fail2ban tool read our other article from here.

Once you have limited the bruteforce attack through fail2ban. You can try and use hydra again, but you will get a negative result as shown in the image below:

Restrict IP to connect FTP
Another security layer that you can apply is blocking all other IPs and allowing your trusted ones. Now open hosts.allow file from inside /etc to allow the valid user to connect with server securely through specific IP. At the end of text file enter specific IP to whom you want to give permission for establishing a connection as shown in the given image.
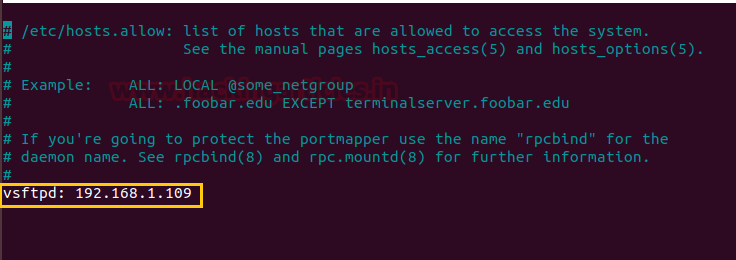
It quite important that admin should restrict all IPs other than allowed IP (192.168.0.106) to protect the network from establishing connect from unknown IP.
Open /etc/hosts.deny and specify a list of hosts whom you want don’t to allow access into the system.

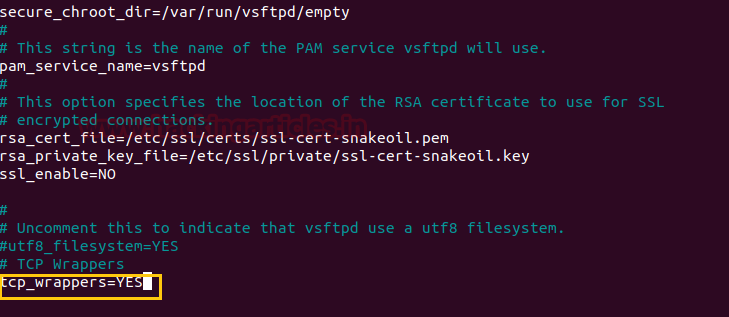
Now open configure file of vsftpd and add following lines:
# TCP Wrappers
tcp_wrappers=Yes
Now if you connect from the allowed IP to ftp then you will log in as you can see in the image below :

But it will block other IPs as shown below :

Conclusion
FTP was discovered around four decades earlier. And since then, there have been substantial changes as it has developed a lot over time. These changes have been related to encryption standards and file transfer functionality.
Author: Aarti Singh is a Researcher and Technical Writer at Hacking Articles an Information Security Consultant Social Media Lover and Gadgets. Contact here
wow! what an explanatory! just awesome . thank you so much for such a wonderful article.